# Ch 06 : Populating the database (import, lookup & synchronisation)

# Ch 06: Populating the database

## 1 Populate menu

### 1.1 Introduction

The \[Populate\] menu gets data into the database. You can create individual records via a form, upload data files such as a CSV file from a spreadsheet or an XML file from another database, synchronise with the Zotero bibliographic system, or upload and index media such as a collection of images.

[![image.png](https://docs.heuristref.net/uploads/images/gallery/2026-07/scaled-1680-/LDyimage.png)](https://docs.heuristref.net/uploads/images/gallery/2026-07/LDyimage.png)

### 1.2 Populate menu functions

Functions for adding and importing data.

- [**New record**](#New-Record) - opens a data entry form to enter data for a new record
- [**Upload Files** ](#Upload-Files)
- [**Delimited text / CSV**](#Import-Records-from-CSVTSV) - CSV upload wizard, splits complex CSVs into component record types
- [**Zotero bibliography sync.**](#Zotero-Synchronisation-) - synchronise records with one or more Zotero databases
- [**Heurist XML/JSON**](#XML-and-JSON) - import XML or JSON exported from another database, Heurist or other
- **Download template (XML)** -- get a template for formatting data for import by the above
- [**KML**](#KML-and-spatial-data) -- import spatial data, creating a new record for each spatial object
- [**Media Files**](#Media-files---images-videos-audio-and-other-files)
- [**Upload media files/images**](#Upload-Files) -- uploads individual files or directories, maintaining structure
- [**Upload media from URLs**](#42-Upload-media-from-URL) -- uploads a set of files specified by URLs
- [**Index external transfers**](#43-Index-external-files) -- scans media folders and add missed to Media Files, indexing uploaded files or external transfers
- [**Create media records**](#44-Create-media-records) -- creates, updates and reads XML manifest files in the folders ; creates Digital Media records for all files uploaded to the database
- [**IIIF Images**](#45-IIIF-Images) -- upload IIIf images or manifests
- Process IIIF manifests -- reads an uploaded IIIF JSon manifest and creates Canvas and Annotation records

## 2 Manual input

### 2.1 New record

This function creates a new empty record, ready for data entry. This is the primary means by which a database is populated manually by the users. By default and in order to speed manual data entry, the type of record created will be the same as the most recently created record. This default record type appears in italic; in this example, the default type is *Person*.

Clicking \[New\] button directly creates a record of the default type. A popup appears in which you can immediately begin entering data.

Below \[New\], hovering over \[Settings\] opens the slide tray showing the available record types in the database. To create a new record of a particular type, simply click on that record type.

<p class="callout info">Inside the record editing window, fields in bold red type are mandatory fields, which must be filled in order for the new record to be saved. There are range of options for editing both the record and also change the structure of the record (**Modify Structure** in the top left corner). It is not recommended to modify the structure of records unless you are an experienced user and have a good reason for doing so. In the bottom banner, there are several options for saving the current new record and then taking other actions:</p>

- - - duplicating the record (Dupe),
        - creating a fresh new record (New),
        - save the current record but remain editing it (Save),
        - save the current record and close it (Save + Close),
        - and close the current record without saving it (Drop Changes).

### 2.2 Permission settings

You can control and change permissions settings to all the data entry of a specific record type by clicking on \[Permission settings\] at the top of the list (right-hand panel below) which pops up on rollover of \[New\], or by clicking on \[Settings\] below \[New\] button. It offers additional controls over the new record parameters:

![](https://heurist-doc.huma-num.fr/uploads/cf19d017-fe7f-438c-945c-d56063e6c594.png)

By default, records in a new database will be visible only to logged in users. \[Settings / Permission settings\] brings up a dialogue allowing you to control the type and permission settings for future additions (cf. [chapter 2 Roles and permission](https://heurist-doc.huma-num.fr/_Dbs8brPTN-jiWtrYzEaaQ#Roles-and-Permissions)).

This can be used not only to determine the future record type and permissions which will be created when you click on \[New\], but also provides a URL which can be bookmarked or added to a web page to create new records with those specific permissions. The use of a tag or tags can be used to flag new records added, for example, by guests, that can be retrieved for editorial vetting. Other values can also be set with suitable parameters in the URL.

![](https://heurist-doc.huma-num.fr/uploads/c923712f-e782-4012-ac20-c3074f471190.png)

## 3. Upload Files

### 3.1 Delimited text / CSV

#### 3.1.1 Presentation

**Delimited text / CSV** upload is the primary means for populating your database with bulk data. This tool is used to parse delimited text, comma-separated or tab-separated variable (CSV or TSV) data, and then organise that data into structures that are compatible with Heurist. The import tool is a very powerful way to populate your database, but it can be a complex process. It is important that the data is as clean as possible, prior to import. If you are unsure about any step in the import process, please consult the Heurist Help System, watch the walkthrough video, or contact Heurist community mailing list. There are three ways to begin using the **Delimited texte/CSV** upload workflow:

- Upload new file -- an existing CSV or TSV file from your desktop
- Select previously uploaded file -- these files appear in a dropdown menu
- Paste delimited data below -- you can paste data directly from the clipboard. Please observe the conventions for representing data, including using column labels in the first line, proper line terminations, quotes, and special symbols. These are explained in the help sidebar, and also in a dedicated page in the Help System.

#### 3.1.2 What is CSV?

CSV, which stands for 'comma seperated values', is a simple text-based format for saving spreadsheets or tables. Data is stored as text. Each line in the text file represents a row of data, and commas are used to seperate each column (hence 'comma-seperated'). Consider the below example. You may have a text file called `<span class="editor-theme-code">actors.csv</span>`, which looks as follows:

```
Surname, First Name, Street, Suburb, Postcode

Chopra, Priyanka, 200 Malabar Cres, West Bandra, 400050

Weaving, Hugo, 65 George St, Sydney, 2000
```

If you opened this file in a spreasheet program such as Excel, Numbers or Sheets, it might look like this:

<table id="bkmrk-surname-first-name-s"><colgroup><col></col><col></col><col></col><col></col><col></col></colgroup><tbody><tr><th>**Surname**</th><th>**First Name**</th><th>**Street**</th><th>**Suburb**</th><th>**Postcode**</th></tr><tr><td>Chopra

</td><td>Priyanka

</td><td>200 Malabar Cres

</td><td>West Bandra

</td><td>400050

</td></tr><tr><td>Weaving

</td><td>Hugo

</td><td>65 George St

</td><td>Sydney

</td><td>2000

</td></tr></tbody></table>

Since CSV is such a simple format, it can be understood by virtually all data analysis programs from [**Excel**](https://heuristref.net/h6-alpha/viewers/smarty/showReps.php?db=Heurist_Help_System&w=a&q=t%3A52&publish=1&debug=0&template=Content.tpl&mode=html#excel-target) to SPSS. If you are planning to export your data for statistical analysis, then CSV is likely to be the ideal format.

#### 3.1.3 Describing the importing process

This import facility lets you import delimited text files:

- CSV (comma separated values) file. Stores tabular data (numbers and text) in plain text. Each row of the file become a data record, while each comma-separated entry becomes a field.
- TSV (tab separated values) file. Stores tabular data in columns and rows (as in a worksheet). Rows and columns are imported into records and fields.

The entries in the file are matched against entries in the database; unmatched rows can be added as new records.

The import process handles the following types of scenarios:

- **Pointer fields**. Splits-out data into new record types linked with a pointer field (e.g. pulls out Authors or Place Names which are repeated for many records in the input data).
- **Multi-values**. Manages multiple values in a column, multi-line text columns and handles imbalanced quotes and other typical CSV/TSV issues.
- **Misformatted data**. Detects and reports line numbers for incorrectly formatted data to assist in correction. It can handle a wide variety of separators, long multi-line text fields with &lt;CR&gt; characters within fields, single quotes within double quotes and vice versa.
- **Geographic Data**. Geographic data is accepted in WKT (Well Known Format); for example: POINT(x y). See [here](http://en.wikipedia.org/wiki/Well-known_text) for more details.
- **Repeatable Fields**. Multiple values for a repeatable field can be specified by separating the values with a | (pipe) symbol within the field. For example: 1,2,"3|4",5
- **Normalisation**. In order to normalise the data (e.g. to extract a list of persons (entities) as records and then point to these person records rather than including names repetitively in the main data records), start by importing only those fields relating to the entities to be normalised. After import, the data will be redisplayed with the ID numbers for the extracted records, which can be used as a pointer field in the subsequent import of the remaining columns of data. You needn't assign all the columns as unassigned columns will be ignored. Duplicated records will be treated as you specified.
- **Disambiguation**. When importing, Heurist tries to identify similar records which already exist in the database (a process known as disambiguation) and gives you the option of bookmarking one of these rather than making a new record.

#### 3.1.4 Before You Begin

<p class="callout info">At a minimum, you must have a suitable record type structure defined in the database (it is possible to add addiitonal fields durign the import, but you at least need th record types and their connections) and a corresponding CSV/TSV file holding the entries you wish to transform into records. </p>

<p class="callout info">Importing can be a complex business. It is important to clean up the data as much as possible in advance. The following provides some tips on how to prepare your data:</p>

- We recommend breaking very large files into manageable blocks of about two thousand lines.
- Only one record type can be imported at each step of the process.
- Have one row per entry, with each column containing a single element of data (split concatenated values into separate columns, and place notes about data items in a separate column, not appended to the data value).
- The first line MUST contain column labels. Do it for your own sanity! The first line of your data also determines the expected field count.
- Data rows must occupy a single line of data terminated with a linefeed: CRLF (Windows) or LF (Unix/Mac). Linefeeds within memo fields should be represented by CR only. Fields should be separated by tab or comma. Quotes may exist within unquoted fields, but within quoted fields they should be preceded by a backslash ( \\" ). Fields containing the field separator should be enclosed in quotes. Editors such as [Notepad++](http://notepad-plus-plus.org/%22%20%5Ct%20%22_blank) (a free, open source Windows application) show tabs, CR and LF as symbols and can do global replacements on them.
- Coded columns should use a consistent set of codes. In addition to your spreadsheet program, you may find OpenRefine a useful tool for checking and correcting coded columns, splitting fields, georeferencing, finding URL references and so on.
- We strongly suggest editing the structure of the database to add any fields and terms that you will require for the import, before attempting to load the data. If you start trying to load data without the appropriate fields in place you will find it frustrating having to exit the process repeatedly to add fields.
- If you have missing data for **Required fields**, you may find it convenient to set those fields to **Optional** before importing, then set them back to **Required**, then use **Database &gt; Structure &gt; Verify** to get a list of the records which need correcting. Alternatively, you can add some dummy value to the data, such as 'Missing', and search for this value after import.
- The import process can be repeated on the file to extract multiple entities from different columns and replace them with record IDs which can be used in a subsequent insertion or update of records.
- Please visit the page on [Importing delimited text files](http://heuristnetwork.org/importing-data/) on the Heurist network site for tips on successful import. &lt;ce renvoi ne devrait plus être nécessaire par la suite&gt;

#### 3.1.5 Delimited Text Importer Wizard

The Import Wizard takes you through a number of screens and steps to assist you in defining the import. (Read the screen instructions carefully. It might be a good idea to carry out a trial import with a small dataset to check that the result is as you expected.)

##### Set Data Source

These options are:

- **Select uploaded file**. If you are importing a file you have imported before, select it from the dropdown. To clear this list, click <span style="color: rgb(132, 63, 161);">\[Clear All files\]</span>.
- **Upload File**. If you are importing a new file, select it using the <span style="color: rgb(132, 63, 161);">\[Upload File\]</span> button.
- **Paste Data**. If you wish to use copied delimited text, paste it in the box below and click <span style="color: rgb(132, 63, 161);">\[Upload Data\]</span>.

##### Set Import Parameters

For CSV files, before carrying out the import, you can set the import parameters (these settings are saved) as follows:

- **Encoding**. Select the appropriate encoding.
- **Field Separator**. Select the appropriate field separator: Comma or Tab.
- **Fields Enclosed In**. Select the appropriate field enclosure: (', " or None).
- **Line Separator**. Leave as **Auto-Detect** or select the appropriate line separator: Windows, Unix or Mac.
- **Multi-value separator**. Select the appropriate multi-value separator: (e.g. | ; : /).
- **Date Format**. Select the appropriate date format: European (dd/mm/yyyy or US (mm/dd/yyyy). Other date formats are possible and will be handled in the following wizard dialog.)

Click <span style="color: rgb(132, 63, 161);">\[Analyse Data\]</span> again to parse the expected results. This checks that the structure of your data matches what the Import Wizard expects. The header of the upload CSV (the first line of your data determines the expected field count) is checked against your import parameters, column names are extracted and encoding verified. The Import Wizard then attempts to convert the file based on your settings and displays the result (the expected input as rows (records) and columns (fields)).

Review the result and any error messages and update the source data if required. If you don't have Heurist Record ID (H-ID) value in your file, click on <span style="color: rgb(132, 63, 161);">\[Continue\]</span>, else, specify the record that must be used to match the H-ID with already existing data.

:::info In this section you can also select any input column that contain dates (dd-mm-yyyy, mm-dd-yyyy or Iso standard) -- this allows the data to be parsed to extract consistency formatted date fields. :::

Once it's done click on <span style="color: rgb(132, 63, 161);">\[Continue\]</span>.

##### Select Primary Record Type and Dependencies

The primary record type is the one represented by each row of the input file. Additional record types may be imported from selected columns prior to import of the primary, as determined by the dependencies shown. The creation of the primary record type from rows in the input file depends on the prior identification of other entities which will be connected via pointer fields or relationships. The tree below shows the dependencies of the primary record type determined from its pointer and relationship marker fields. Where an input entity matches an existing record, its ID value will be recorded in an ID field which can be used subsequently as a pointer field value; where no existing record is matched a new record is created and the new ID recorded. Check record types to be imported. Red indicates required pointer field.

![](https://heurist-doc.huma-num.fr/uploads/27045bfd-78fc-4690-9ba2-50d566f3a242.png)

#### 3.1.6 The three importing steps

When the CSV/TSV data are loaded and that the record and connected entities are selected the import interface will take you through 3 important steps in order to correctly match and prepare your data for import:

1. **Matching** step which take care of verifying if data imported already exists inside the database and thus triggering the appropriate action (updating, deleting, etc.).
2. **Fields to import** step which define which columns of the imported CSV file will be imported into the database and in order to populate which field in the selected record type.
3. **Insert/update** step which take care of populating or updating the database given the chosen scenario.

##### Step 1. Matching

In the first step of the matching process you can choose what to match or to skip matching. Select a radio button:

- **Match on CSV Columns**. To match import rows against existing records,select at least one Matching key column (later you can select for mapping) and ensure all selected key columns are allocated to a field. You can check (and scroll through) a sample of the field data to be mapped in the Values column. A new identification field will be created.

[![image.png](https://docs.heuristref.net/uploads/images/gallery/2026-07/scaled-1680-/dmqimage.png)](https://docs.heuristref.net/uploads/images/gallery/2026-07/dmqimage.png)
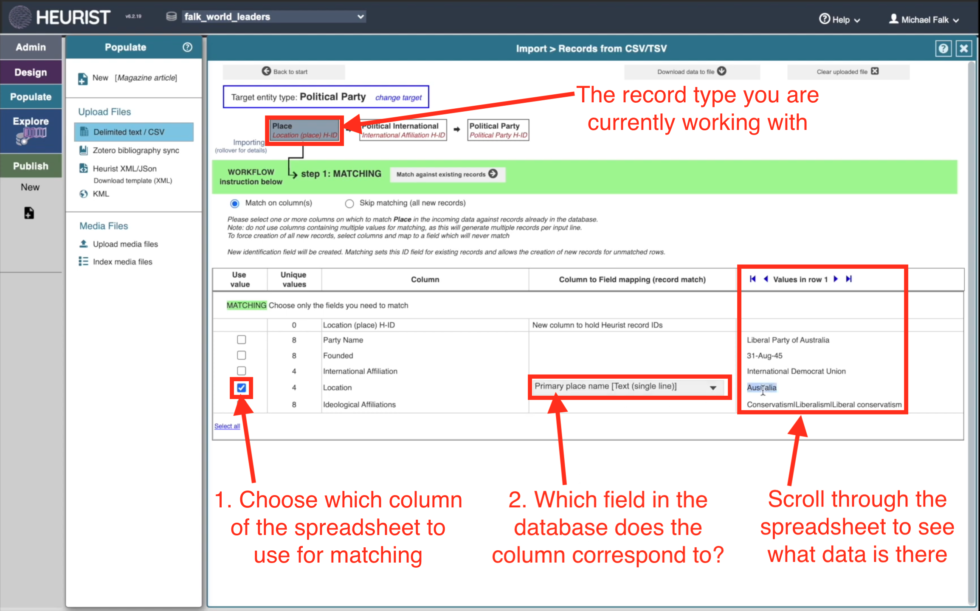
<p class="callout info">Matching sets this ID field for existing records and allows the creation of new records for unmatched rows.</p>

- **Use Heurist ID column**. (Only usable if H-ID column exists both in the CSV file and in the records to update inside heurist). In this case, the identification H-ID field (which is a field managed by the system) will be used.
- **Skip Matching** (all new records). Skips the matching step (in this case only new records are created, one per input row).

<p class="callout info">Select the <span style="color: rgb(132, 63, 161);">\[Match on Columns\]</span> / <span style="color: rgb(132, 63, 161);">Skip Matching button</span>\] (depending on the three previous cases). Matches are shown.</p>

##### Step 2. Fields to Import

<p class="callout warning">If all existing rows already match existing records (e.g. you may have already carried out the import successfully), then you can select the displayed Skip Update button to cancel the import.</p>

The **Import Summary** box shows a mapping summary:

- **Existing**. Number of matching records (that already exist based on selected matching columns). These will therefore be skipped.
- **New**. Number of input rows for which no matching record has been found. These will therefore be added.

The following options are for matched or new rows:

- **Show**. This displays the records on screen (click the Close (x) button).
- **Download**. This downloads the records to a CSV text file.

<p class="callout info">The three matching, importing and inserting steps can work as an iterative operation if the spreadsheet data you are importing is a complex one. Therefore the import workflow allows you to progressively import columns which identify subsidiary entities (other Record Types linked through Record Pointers to the main record type you want to update or need to create data into) such as Place, Organisation, Collection, Series, Person, etc. The first step is to match identifying key fields and create new records from unmatched rows. The process starts with record pointers first and once all subsidiary entities have been matched and imported, you can import the primary entity type selected in the previous import phase.</p>

- Record IDs for the imported columns are added as column 1. Copy and save these data immediately if there are additional fields to import, to allow use of the record IDs as record pointers. Warning: you will lose the record IDs as soon as you start over, so save the data below to a file first. &lt;!--TODO Vincent: je ne comprends pas bien ce que cette partie signifie --&gt;
- If the displayed results are not what you expected, then go through the steps again (go back a step or click \[Back to Start\] if you wish to start again; all of your settings will be lost) and make any adjustments (including adjustments to the CSV or TSV file and/or **Record Type**).

Complete the **Column to Field Mapping**. Since new records are to be created, make sure you select all relevant columns; all **Required fields** must be mapped to a dedicated CSV column in order to proceed further. Click \[Prepare\] when ready (importing does not happen yet).

![](https://heurist-doc.huma-num.fr/uploads/f855c85b-e26d-486d-8cec-4755062dd1e5.png)

<p class="callout info">A message will appear if you haven't selected any fields other than the ones which are used to match records, so those are the only fields which will be set, and the result may be incomplete records. Click Proceed if you wish to continue, otherwise Cancel and review your settings. </p>

##### Step 3. Insert/Update

In this step you carry out the update (this will update the database based on your settings so be sure this is what you wish to do).

Select an option on how you wish to treat data that already exists in a field:

- Retain existing values and append distinct new data as multiple field values (existing values are not duplicated)
- Add new data only if field is empty (new data ignored for non-empty fields)
- Add and replace all existing value(s) for the record with new data

If you are happy to proceed with the import, click \[Start Inset/Update\]. You will be notified of the updates:

Click <span style="color: rgb(132, 63, 161);">\[OK\]</span> and close the window to exit the Import wizard. Review the imported records.

![](https://heurist-doc.huma-num.fr/uploads/f32ecabf-3b46-44be-b5e7-114f3a05b318.png)

### 3.2 Zotero Bibliography

**Zotero Bibliography Sync** allows you to automatically synchronise a Zotero web library with the already existing bibliography structure within Heurist. It is especially powerful because it allows you to update bibliographic data from an active Zotero library, thereby saving time and effort in updating bibliography records within Heurist.

<p class="callout info">The synchronisation function looks for changes made since the last synchronisation, so it works fast even with a 20,000+ Zotero library once the initial synch has been done (which will take half an hour or so).</p>

Heurist provides the following functions and capabilities for importing bibliographic data:

- Automatic identification and disambiguation of imported bibliographic types.
- Authors stored as person records allowing rich complementary data.
- Series, Journals, Publishers stored as separate records to eliminate data redundancy.
- Pre-defined domain profiles with collections of useful references, tags and searches.

To use the **Bibliography Sync function**, you first need to define a connection to a Zotero Library in `<span class="editor-theme-code">Design/properties/Synchronisation and Indexing</span>`. If this has not yet been done, in your database, you will be prompted to edit the settings that establishing such a Zotero connection. The relevant field is Zotero web library key(s) and IDs for synchronisation.

<p class="callout warning">It should be noted that not all the zotero fields are synchronised with heurist bibliography record types. Moreover the synchronisation process will create automaticaly new records for Persons (author), organizations (Publisher), Places (publication location) and of course book references and so on. The Synchronisation is a one way process from a given Zotero collection to a Heurist database.</p>

### 3.3 Heurist XML / JSON

#### 3.3.1 Summary

**Heurist XML / JSON** allows data to be imported from an XML or JSON format that is specially tailored for compatibility with Heurist. When preparing data in this format, it is strongly recommended to first download the XML template. This is an XML document, following a Heurist-XML(HML) schema, that presents the core definitions of records that are necessary for proper functioning of your database. Following this template, you can design an XML document that can be easily read by Heurist. Once an HML or JSon-format is ready, select the file to upload from your desktop. Doing this takes you to a screen where the data is parsed and check. This screen enumerates the records to be imported and asks for final confirmation before the data is imported to create new records.

Click **\[Import Records\]** to start the import.

<p class="callout info">Contrary to the CSV/TSV import which allows a very refined way of updating or creating given field values with the use of [matching and preparing steps](#Import-Records-from-CSVTSV), the XML/JSON import is a one time operation that imports a whole set of contents in one go. If the data is correctly formatted, as when exported from one Heurist database, it is a very fast and accurate way of importing data into another Heurist database (it can even download structure to accomodate the data provided the source database is a Registered database).</p>

#### 3.3.2 Import XML/JSON

Heurist will import HML exported from another Heurist database or from an external source which have been converted to HML format.

##### For Heurist database sources

Unless the source database structure is identical with the target, it should be registered first on the heurist master server which keep an index of unique identifiers for record type and fields in order to reuse it yourself or to be shared with other heurist users. You can register your database by going to **\[Design &gt; Register\]**.

Registration thus allows the target database to contact the source Heurist database in order to import (or update) the record (entity) type and field definitions it finds in the HML file, as well as permitting the inclusion of global conceptIDs in the HML.

For HML exported from a Heurist database, **&lt;database id=??&gt;** is normally set to indicate the source database. If it is set, synchronisation of definitions will be performed before the data are imported.

##### For non-Heurist database sources

To import a file generated from another source, eg. by transformation of an RDBMS to XML:

- the XML file should conform to the template output from the target database using **\[Import &gt; Download XML template\]**;
- the target database must contain definitions for all the record (entity) types and fields encountered in the XML file (in other words, only entity type and field codes defined in the XML template should appear);
- the XML file should specify a Heurist database ID of 0 .

If a database ID is specified, synchronisation of definitions from that database will be performed before the data are imported. Since imported files will normally use a template for record types and fields exported from the target database, this is only useful for synchronising vocabularies and terms.

Record (entity) types and fields can then be specified using concept IDs (these will have a database ID of zero followed by the local ID (eg. 0-1234) for record types or fields defined locally in an unregistered target database.

Terms in the incoming data can be specified in one of the following ways which are evaluated in order:

- first it looks for a valid local term ID.
- If that is not found it tries to match it as a concept ID.
- It then looks for an alphanumeric term applicable to the current field, and finally a **standard code** applicable to the current field.
- If it gets to the end without finding a match, the value will be added to the database in the (first) vocabulary used by the field.

##### The XML Template

To create and import an XML file eg. to transfer data from another non-Heurist file or database, we strongly recommend using the XML tempalte which can be exported from Heurist using **\[Populate &gt; Download template (XML)\]**. The template file contains full instructions for setting up the file. However, it is worth explaining the handling of record pointer fields in a little more detail.

To reference an existing record in the target database, the record number must be prefixed with H-ID- otherwise Heurist interprets the number as any identifier that matches the identifier filled in &lt;id&gt; for another record in the import file, which may therefore be numeric or alpah/numeric.

This behaviour is quite intentional precisely to avoid making false connections (record IDs are database specific and cannot be known in advance unless re-exported and re imported, which is rendered unnecessary by our approach).

<p class="callout info">Note that inside the XML template, RECORD\_REFERENCE may be replaced with a numeric or alphanumeric reference to another record, indicated by the &lt;ID&gt; tag. Note that this reference will be replaced with an automatically generated numeric Heurist record ID (H-ID), which will be different from the reference supplied. The reference supplied will be recorded in a field Original ID.</p>

If you wish to specify existing Heurist records in the target database as the target (value) of a Record Pointer field, specify their Heurist record ID (H-ID) in the form H-ID-nnnn, where nnnn is the H-ID of the target record in the target database. Specifying non-existent record IDs will throw an error. The record type of target records are not checked on import; pointers to records of the\* wrong type can be found later with **\[Admin &gt; Verify integrity\]**.

Example: I put in H-ID-2456 for a record pointer value:

- if there is a record "2456", the record pointer is set to point to record "2456"
- if there is no record "2456", it is reported as an error
- if I put in any other type of value for the record pointer value eg. 2456 or wxyz or CallNo123456, it will look for a record defined in the XML with the value "2456" or "wxyz" or "CallNo123456" respectively, and set the record pointer value to the H-ID assigned to this record.

It will not try to second guess that "2456" is a valid record pointer value, because that is so database specific as to be almost certain to fail if there is no record with th especified ID, an error will be reported :::

### 3.4 KML

#### 3.4.1 Introduction

**KML** is designed specifically for the import of bulk geospatial data into Heurist. In order to use this tool, first prepare a KML document in the standard format. Note that popular mapping tools such as Google Earth and Google Maps are able to natively export geospatial data in KML format.

#### 3.4.2 Import KML

KML (Keyhole Markup Language) is a file format used to display geographic data in an Earth browser such as Google Earth, Google Maps, and Google Maps for mobile. KML uses a tag-based structure with nested elements and attributes and is based on the XML standard. All tags are case-sensitive and must be appear exactly as they are listed in the KML Reference. The Reference indicates which tags are optional. Within a given element, tags must appear in the order shown in the Reference.

Heurist will recognise the KML format and process the file, and prompt you for a record type. All records created by a single KML import will have the same record type.

1. Select **\[Choose File\]** and browse to select a KML file to import.
2. Click **\[Continue\]**. A summary of records to be imported is shown. When ready, click **\[Continue\]**. Heurist will recognise the KML format and process the file, and prompt you for a record type.
3. Select the record type and click Continue.

<p class="callout info">All records created by a single KML import have the same record type</p>

### 4 Media Files - images, videos, audio and other files

#### 4.1 Upload media files / images

**Upload media files/images** function, is designed for use by **Database Managers** only. It allows you to upload media files/images directly onto the Heurist server for use with a particular database. There are a range of allowable file formats/extension that can be uploaded in bulk in this way. As a Database Manager, you can select a media/upload folder in the relevant directory on the Heurist server. After selecting the target folder within this directory, Add Files from the desktop to upload. Once selected, click **Start uploads** to begin the process of copying these media files onto the Heurist server. Once completed, close the pane by clicking **Finished**.

#### 4.2 Upload media from URL

**Upload media from URLs** function, is designed for use by **Datab**a**se Managers** only, uploads a set of files specified by URLs, directly in the database. You can paste URLs and optional description in the area, CSV format is recommended. After pasting URLs or uploading CSV file, the URLs are checked and if the media files are supported, uploaded to the Heurist database. After uploading, assign each file to a record type and link it to the appropriate database entry by selecting file assignment.

![](https://heurist-doc.huma-num.fr/uploads/8c8126c5-6d6c-4029-969f-0bc6a8178d3e.png)

#### 4.3 Index external files

**Index external files** function, which is reserved for **advanced users** only, scans media folders and add missed to Media Files. Files have to be uploaded through Populate either using :

- Function **Upload media files/images**
- or by direct sftp access to the file\_uploads directory (or sub-directories) on the server for larger files. Make sure the format of the extensions is supported by Heurist. Then, select the folders to scan. Click on **\[Proceed\]**.

#### 4.4 Create media records

**Create media records** function, is designed for **Database Managers** only, and is reserved for **advanced users**. It creates, updates and reads XML manifest files in the folders listed in *Design &gt; Properties* and creates Digital Media records for all files uploaded to the database. Before, make sure to upload files through Populate (**Upload media files/images**). And make sure that the format of the extensions to scan is supported by Heurist. Click on "Continue" to synchronize the files.

#### 4.5 IIIF Images

IIF (International Image Interoperability Format) provides a standard for image interchange widely used by museums, art galleries and others in the GLAM sector.

To enter an IIIF image, you need a **File or Media URL** field, when editing a specific record, enter the path of either:

- a IIIF image with an url ending /info.json
- a IIIF manifest with a name like manifest.json

Heurist will recognise these specific IIIF file and display them by using the embedded IIIF [Mirador Viewer](https://projectmirador.org/).

#### 4.6 Process IIIF Manifests

**Process IIIF Manifests** function, is reserved for **advanced users.** It reads IIIF manifests and incluiding Annoftations, and creates or updates Annotation records in the Heurist database.

[![image.png](https://docs.heuristref.net/uploads/images/gallery/2026-07/scaled-1680-/Dglimage.png)](https://docs.heuristref.net/uploads/images/gallery/2026-07/Dglimage.png)
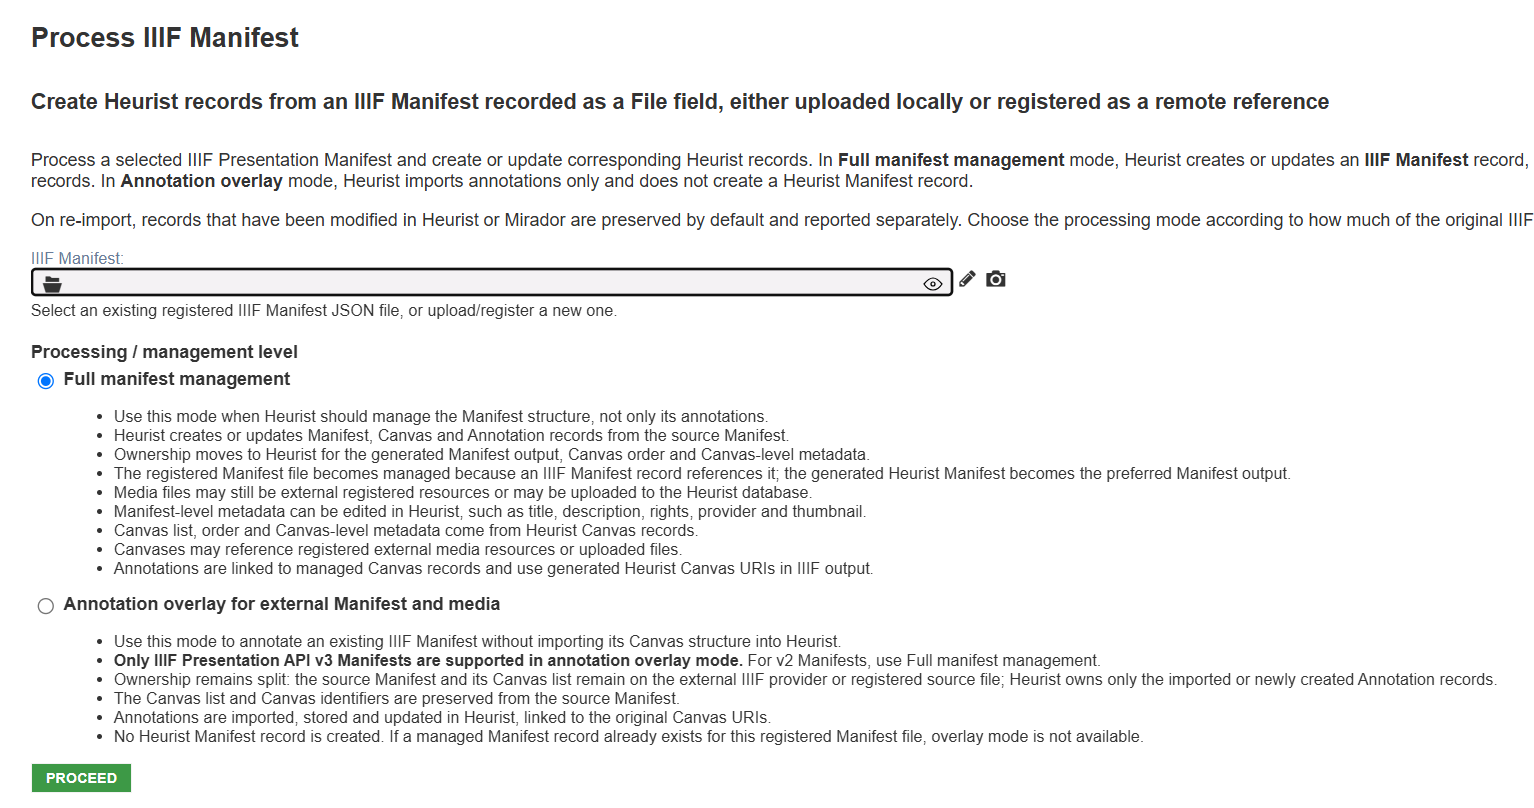
TODO: need more comprehensive documentaiton

### 5 Annexes

#### 5.1 CSV Import Tips and Notes

#### 5.1.1 Importing child records

Let's assume we have a Person **Record Type** with **Child records** linked fields such as Birth, Death, Life Event, Address association, etc. To import Address Association - which associates a Person with a Place for a particular date, date range or list of years - you must import Places to create Place **H-IDs**. But you must also import Persons to create Person **H-IDs**.

<p class="callout warning">This may be tricky because the child pointer to these records may be a required field. But it needs to be done first in order to be able to create the child records.</p>

#### 5.1.2 Beware matching a repeating value...

Beware matching on a value which repeats as it can result in a new record for every value. For example, Address Association might be derived from a file listing an address for a particular person for each of 20 years in 20 rows. So one may have 10 rows with *17, First Street* and 10 rows with *35, Second Avenue*, and each of those rows has a different value in the year column.

What you want is TWO records, each with 10 years listed in a repeating YEAR field, not 20 records each with a year value and each address repeated in ten records. You should therefore ONLY match on Address (and Person). If you match on Year you will end up with 20 records, each with one year value, rather than 2 records, each with 10 year values.

#### 5.1.3 Importing child records

**Child records** can be used to describe inherent and strongly dependent components of an entity, for example scenes in a frieze or painting, motifs in a scene, features of a building, worked edges on an artefact. They can equally be used to group rarely used attributes specific to a particular variant of an entity, for example pottery attributes for archaeological finds (where some finds are pottery, others bone, glass, stone or shell) - this is the case used here to illustrate the import of child records.

After defining all the fields for the **Child Record type**, you need a CSV file which either references the **H-ID** of the parent records, or a unique field or combination of fields in the parent records. In our case the *Finds* were imported from an **Access** database and the *Find ID* in the source database is included as *Artefact ID*. This allows it to be matched with *Finds.Artefact ID (Access DB)* in Heurist to obtain the parent **Record Pointer**.

The attributes to be imported into the child record will also be defined in the file. For categorised fields (a controlled list), we will use Heurist's Term List field type which may be represented in teh incoming data either as the labels or as the codes (foreign keys) used to reference the lookup tables in the source.

@TODO : check images on the previous paragrap in sharedocs document

 To illustrate, let's define a test field *Pottery type* field with values "One", "Two" and "Three", which have numerical code 1, 2 and 3 respectively:

Here is the very simple test file imported by way of illustration.

<p class="callout warning">Note that we use the code rather than the label (where exporting data from another software you may get either out of an SQL query depending on the way it is structured. In MSAccess, for example, some fields get joined with their lookup tables automatically and give you the label. Other softwares just give you the actual Foreign Key value in the field)</p>

```
Artefact ID, Pottery type
244415, 3
```

This file is loaded using **\[Import &gt; Delimited text (CSV/TSV)\]**.

First, we select the **Parent record type** (which is called *Finds* in this test case) as the target entity type and carry out matching using a unique field or combination (Artefact ID in this case) in order to create the Heurist IDs for the parent records (Finds), either through finding an existing record and setting its ID or creating a new one and assigning a new ID. This step can be skipped if the file contains Heurist IDs for the parent records:

![](https://heurist-doc.huma-num.fr/uploads/c9a6b5e3-94da-4206-a57f-0b2b2267fddf.png)

Once you've done that, change target to the child record type (Pottery information in this case) and match on a combination of fields which uniquely identifies each child record (these fields may include the parent record ID, that is Find H-ID in this case). Then select the field(s) you want to import (which ++must++ include the parent record ID, as this determines the parent appropriate to each child record):

![](https://heurist-doc.huma-num.fr/uploads/24bb2b15-5eb0-42ef-abc1-a60d48931b51.png)

In the data entry form for the record imported you will see the child record link (in this case we have not yet defined the full set of fields for the child record, nor the constructed title mask):

![](https://heurist-doc.huma-num.fr/uploads/d01eaf5b-08d5-4fb1-b7e6-e60ce011064f.png)

The child record identifies its parent and also shows the imported field(s). Notice that I imported "3" and it came out as the label "Three". That is NOT because Heurist connects numbers with their textual representation but because Heurist will look for the standard code if it does not find a matching label. If neither the label nor the code is recognised for one or more rows of incoming data, Heurist offers you the opportunity of adding unknown labels.

![](https://heurist-doc.huma-num.fr/uploads/a4911428-561c-45eb-a8ca-ca3a6850da40.png)

#### 5.1.4 Importing relationships / markers

People often ask "How can I import a relationship marker". The short answer is "you can't" since relationship markers are just markers (and constraints) and contain no data. The long answer is, you don't import relationship markers, you import **relationship records**.

##### Importing relationship records from a CSV file

While relationships can be imported from an XML file, the easiest way is to create a CSV file containing the relationships, and import using the CSV importer. This minimally contains something to identify the source record (eg. names or the Heurist ID) and the target record, adn the type of relationship. Dates and other attributes eg. notes or bibliographic references or degree of certainty, can also be provided.

```
Source Name, Source First name, Relation type, Target Last name, Target
First name , Start date, End date \
Dupond, Michel, is husband of, Dupont, Anne, 1512, 1531\
Dupont, Bernadette, is wife of, Dupond, Jean,,\
etc.
```

<p class="callout info">The direction in which the relationship is defined does not matter provided the right term is used. Relationship type can either be directional, as in the case of isChildOf and isParentOf, or non-directional eg. isRelatedTo</p>

Use **\[Import &gt; Delimited (CSV/TSV)\]**:

Identify the target record type as Relationship record.

<p class="callout warning">Relationship records might be marked as a hidden record type, in which case they will not show up in the options. Go to Design &gt; Record types and set them as visible.</p>

Match on the two source columns (*Source Name* and *Source First Name* in this case, or other columns that will identify the source record, for example the ID or title etc.), then a match on the two target columns. This will create appropriate Heurist ID columns (if the Heurist IDs are already in the file these can be selected).

Set the generated Heurist IDs to match the Source and Target record pointers, and the relationship type to match the relationship type field.

Finally, import the data into the **Relationship records**.

The imported relationship records will appear in any relationship markers whose constraints they fit.

Note: Relationship Markers do not contain any data. Nothing! These are markers that have two functions:

- Show **Relationship records** that match the marker (type of source, type of target, type of relationship)
- Show where you want to create relationships and constrain possible relationships (target type (s), relationship types)

If you put a **Relationship Marker** in the source type records, and another in the target type records, and if the relationships are either non-directional eg. isRelatedTo (applies in both directions) or the inverse of one-another (eg isChildOf and isParentOf), the relation will show in both records with the appropriate terms, for example:

![](https://heurist-doc.huma-num.fr/uploads/d8b6a1db-1fef-47e1-9ed5-00281e53112c.png)

### 5.2 Detailed mapping and use of KML and spatial data

#### 5.2.1 KML Field Definitions

This table shows how the data is mapped into Heurist; it lists the KML tags that Heurist recognises as record details, and the bibliographic data fields that they are imported to.

<p class="callout info">Contact the Heurist Network Association for the full list of KML Field Definitions for the XML file to determine how the data is mapped into Heurist.</p>

Heurist attempts to import each &lt;Placemark&gt; as a separate record.

<table id="bkmrk-kml-tagheurist-detai"><colgroup><col style="width: 223px;"></col><col style="width: 347px;"></col></colgroup><tbody><tr><th>KML tag

</th><th>Heurist detail field

</th></tr><tr><td>&lt;name&gt;

</td><td>Title (detail type #160)

</td></tr><tr><td>&lt;address&gt;

</td><td>Location (#181)

</td></tr><tr><td>&lt;AddressDetails&gt;

</td><td></td></tr><tr><td>&lt;phoneNumber&gt;

</td><td>Contact information (#309)

</td></tr><tr><td>&lt;TimeSpan&gt;&lt;begin&gt;

</td><td>Start Date (#177)

</td></tr><tr><td>&lt;TimeSpan&gt;&lt;end&gt;

</td><td>End Date (#178)

</td></tr><tr><td>&lt;TimeStamp&gt;&lt;when&gt;

</td><td>Date (#166)

</td></tr><tr><td>&lt;Region&gt;

</td><td>Geographic object (#230)

</td></tr><tr><td>&lt;Point&gt;

</td><td></td></tr><tr><td>&lt;LineString&gt;

</td><td></td></tr><tr><td>&lt;LinearRing&gt;

</td><td></td></tr><tr><td>&lt;Polygon&gt;

</td><td></td></tr><tr><td>&lt;MultiGeometry&gt;

</td><td></td></tr><tr><td>&lt;Snippet&gt;

</td><td> Shared scratchpad

</td></tr><tr><td>&lt;description&gt;

</td><td></td></tr><tr><td>&lt;Metadata&gt;

</td><td></td></tr></tbody></table>

It is possible to specify Heurist-formatted data in HXTBL format between KML's &lt;Metadata&gt; tags. For example:

```
...

<Placemark>

...

<Metadata>

<detail name="Name of organisation" id="160">

Archaeological Computing Laboratory

</detail>

<detail name="Organisation type" id="203">

Laboratory

</detail>

</Metadata>

...

</Placemark>

...
```

Heurist will add fields of type #160 (Title) and type #203 (Organisation Type) to the record corresponding to this &lt;Placemark&gt;.

# Ch 06a: Importing and matching references (worked example)

Ian Johnson, updated 29 May 2026

## Background

This section gives a worked example of importing two sets of references (Primary and Secondary) for inscriptions from a spreadsheet derived from Zotero data. The example comes from the IDENK project (Idenk.net) based at the EFEO, courtesy the poject director Arlo Griffiths \[REQUEST AGREEMENT, I am sure it will not be a problem\]

## Basic structure

- *Inscription* records contain two record pointer fields (*Primary references* and *Secondary references*)  
    ![](https://heurist-doc.huma-num.fr/uploads/ec988974-2ede-4a79-a58a-98a433475e9b.jpg)
- These point to *Bibliographic reference* records  
    ![](https://heurist-doc.huma-num.fr/uploads/1e939358-73d7-4c84-afae-35b25613ecc5.jpg)
- *Bibliographic reference* records contain
    - a record pointer field to a bibliographic record (Book, Chapter, Journal Article, Thesis etc.) derived from the Zotero library
    - pagination information (a text field containing page numbers, illustration or other information about sections of the document)
- *Bibliography records* are of various types (Book, Chapter, Journal Article, Thesis etc.)  
    ![](https://heurist-doc.huma-num.fr/uploads/c01a9cd9-1508-4a84-aa09-47f4660a1fce.jpg)

The bibliography records are identified by strings such as Adams1912\_01 (not shown in the view above). These are identifiers which have been filled in the Zotero Short Title field in a large Zotero library (21,000 references). These are referred to as ZSTs.

```
*One could also use the Zotero key field, which is automatically populated with an 8 alphamnumeric hash key which is statitically unique and cannot be edited - it is this key that we use to link our internal bibliographic records back to their Zotero origin records.*
```

The steps are as follows:

- The first batch were already in the Heurist database so these identifiers are exported to a spreadsheet. Later batches will be imported from a spreadsheet used to collect data 'in the field'
- If not already separate in the spreadsheet, use Libre Office *Data &gt; To columns* to split the ZST and the pagination reference (page numbers and or illustrations)
- Deduplicate the rows in the spreadsheet (Dat &gt; Duplicates) based on the ZST and pagination. Each row will then be a reference to a particular place in a particular bibliographic record.
- Import into Bibliographic reference records
- Split the original spreadsheet (before deduplication) into two CSV files, one for Primary and one for Secondary references
- Import each of these files into the Inscriptions table, the first into the primary reference field, the second into the secondary reference field.  
    *These fields are record pointer fields pointing to Bibliographic reference records, so the textual ZST + pagination value is first matched with the values in the database and this generates the ID of the Bibliographic reference records created in the previous steps, and ut us this ID which is inserted into the record pointer fields.*
- After updating the bibliographic records (Book, Chapter, Journal Artivle, |Thesis etc.) from the Zotero library (Populate &gt; *Zotero Bibliography sync* we need to relate the *Bibliographic reference records* to the bibliographic records by matching the ZST in the first with the Zotero Short Title field in the second, using *Recode &gt; Foreign Key match*.

## **From scratch**

Delete all Bibliographic references. This also deletes the pointers to them from Inscriptions.

## **Preparing the spreadsheet**

Batches 2 and 3 will already have their much more comprehensive spreadsheet, see later.

Export all the existing ZST references for Primary and Secondary refs (not Surrogates)  
to CSV using *CSV Primary Secondary refs* custom report:

![](https://docs.heuristref.net/uploads/images/gallery/2026-07/embedded-image-yg468dxx.png)

Open in Libre Office (the delimiter is tab, not $ as shown)

![](https://docs.heuristref.net/uploads/images/gallery/2026-07/embedded-image-bsr5wjno.png)

Highlight ZST column, Data &gt; Text to columns using the colon ( : ) as a delimiter:

![](https://docs.heuristref.net/uploads/images/gallery/2026-07/embedded-image-s9pis0ul.png)

You now have the original ZST+pages value and separate ZST and Pagination values in the last two columns (some have no pagination so the last column will be empty).

![](https://docs.heuristref.net/uploads/images/gallery/2026-07/embedded-image-kr2h5tdm.png)

Now deduplicate on the ZST Pages column in LibreOffice (Data &gt; Duplicates).

Rather than child records we will point multiple inscriptions to common Biblio Reference records which include a page range. Note that editing these records can corrupt other Inscription entries which point to it if the change is such as to change the reference, since the Bibliographic reference records are to a specific place in a particular bibliographic entity.

The alternative is the use of child records and significant duplication (1 in 4 approx). Using independent bibliography references is altogether simpler to deal with apart from the slight drawback above.

## **Preparing the batch X spreadsheet**

To document when I have the final spreadsheet

## **Loading the bibliographic references and linking**

Load into Heurist with Populate &gt; CSV.  
Select INScriptions for H-ID as these records relate to data in the Inscriptions

![](https://docs.heuristref.net/uploads/images/gallery/2026-07/embedded-image-yw6uuhye.png)

However, first choose Bibliographic record pointer as we want to create bibliography records and then reference them in Inscriptions.

Skip matching as we will import all the records in this first batch since there are currently no Biblio reference records and we have deduplicated.

![](https://docs.heuristref.net/uploads/images/gallery/2026-07/embedded-image-lagjqtjs.png)

For subsequent additions you will need to match with existing values

Note: after deduplication we have 1114 Biblio references, these examples were pre deduplication

![](https://docs.heuristref.net/uploads/images/gallery/2026-07/embedded-image-3uacowj7.png)

![](https://docs.heuristref.net/uploads/images/gallery/2026-07/embedded-image-1gglaz33.png)

We now have 1114 bibliographic records like this:

![](https://docs.heuristref.net/uploads/images/gallery/2026-07/embedded-image-5juh3rpb.png)

Now split the incoming original spreadsheet into Primary (n=398) and Secondary (n=1076) references based on PRI and SEC in the first column.

Save as two CSV files. Load each in turn.

![](https://docs.heuristref.net/uploads/images/gallery/2026-07/embedded-image-wh4sgvdx.png)

Select Inscription as the primary type and Primary refs or secondary refs as the dependency (these images are for the Secondary refs)

![](https://docs.heuristref.net/uploads/images/gallery/2026-07/embedded-image-wkt2xmlt.png)

It will first ask you to match the Bibliographic references in order to set the H-IDs for those references which are to be inserted into the Inscription records.

![](https://docs.heuristref.net/uploads/images/gallery/2026-07/embedded-image-pswp6wrl.png)

That sets the IDs of the Bibliographic reference records.

Now select the Inscription records which are to be updated.

![](https://docs.heuristref.net/uploads/images/gallery/2026-07/embedded-image-nivfwi5f.png)

Click on Use H-ID (this was in the original file and referenced the INScriptions)

**Existing: 191 New: 0** tells us that there are 191 Inscriptions (of the 398) which have Primary bibliographical data (for the Secondary references it's **Existing: 282 New: 0)**

We import the Primary references H-ID into the *Primary refs &gt;* record pointer field (later, the Secondary references H-ID into the Secondary refs &gt; record pointer field):

Primary references:  
![](https://docs.heuristref.net/uploads/images/gallery/2026-07/embedded-image-m6iel4jq.png)

Secondary references:  
![](https://docs.heuristref.net/uploads/images/gallery/2026-07/embedded-image-umubnqa3.png)

Prepare, then Start Update:

Primary references: Secondary references:  
![](https://docs.heuristref.net/uploads/images/gallery/2026-07/embedded-image-x2vef6yx.png)![](https://docs.heuristref.net/uploads/images/gallery/2026-07/embedded-image-uuzmokpo.png)

and all looks good:

![](https://docs.heuristref.net/uploads/images/gallery/2026-07/embedded-image-ivqd4new.png)

### **Connecting Bibliographic reference records with bibliographic entities**

Now we have to connect our Bibliographic reference records with the appropriate bibliographic records imported from Zotero. We must do this for each of the reference types used since we cannot match across multiple tables.

For books:  
![](https://docs.heuristref.net/uploads/images/gallery/2026-07/embedded-image-cejov1i5.png)

and for each of the other types:

![](https://docs.heuristref.net/uploads/images/gallery/2026-07/embedded-image-qjpxrnqq.png)

![](https://docs.heuristref.net/uploads/images/gallery/2026-07/embedded-image-8hb5r8q8.png)

![](https://docs.heuristref.net/uploads/images/gallery/2026-07/embedded-image-6e8sqte1.png)

![](https://docs.heuristref.net/uploads/images/gallery/2026-07/embedded-image-lk7x2yvc.png)

![](https://docs.heuristref.net/uploads/images/gallery/2026-07/embedded-image-cw9azro8.png)

![](https://docs.heuristref.net/uploads/images/gallery/2026-07/embedded-image-kygs8scx.png)

![](https://docs.heuristref.net/uploads/images/gallery/2026-07/embedded-image-3eehryvh.png)

These are Bibliographic reference record which do not match up with a Zotero record using the ZST, and in most (all?) cases these ZST do not exist in the database except in these records. This needs to be checked individually.

# Ch 06b: IIIF Manifests, Canvases and Annotations

This guide describes the IIIF features provided by Heurist for creating, importing, viewing, editing and exporting IIIF Manifests, Canvases and Web Annotations.

Heurist supports two main workflows:

1. **Use Heurist as an annotation layer over existing IIIF Manifests (annotation overlay mode).** The external provider keeps ownership of the source Manifest and Canvas identifiers. Heurist stores and publishes local annotations.
2. **Use Heurist to manage the Manifest (full management mode).** Heurist stores Manifest, Canvas and Annotation records and generates a IIIF Presentation API v3 Manifest from those records.

Heurist also provides a dynamic IIIF server for ordinary record sets and registered media files, and can render external IIIF files and Manifests. In this sense it can act both as a IIIF client and as a IIIF server.

---

## 1. Preparation

### 1.1 Import the required definitions

Before using the IIIF annotation and Manifest tools in an existing database, import the new definitions from the `<span class="editor-theme-code">Heurist_Core_Definitions</span>` database using **Design &gt; Browse templates**. Heurist will prompt you to do this if you attempt to process Manifests without the required definitions.

![Browse templates prompt](https://docs.heuristref.net/Pasted%20image%2020260621163412.png)

The new record types are in the **Documents** group. It is enough to select **IIIF Annotation**. The related record types **IIIF Manifest** and **IIIF Canvas** are downloaded alongside it.

![IIIF Annotation template selection](https://docs.heuristref.net/Pasted%20image%2020260621153202.png)

The important record types are:

- **IIIF Annotation** (`<span class="editor-theme-code">RT_IIIF_ANNOTATION</span>`, concept code `<span class="editor-theme-code">2-109</span>`)
- **IIIF Manifest** (`<span class="editor-theme-code">RT_IIIF_MANIFEST</span>`, concept code `<span class="editor-theme-code">2-110</span>`)
- **IIIF Canvas** (`<span class="editor-theme-code">RT_IIIF_CANVAS</span>`, concept code `<span class="editor-theme-code">2-111</span>`)

These definitions include fields for IIIF identity, original/source IIIF identity, Manifest links, Canvas links, annotation state, selector type/value, annotation JSON and related metadata.

### 1.2 Remove obsolete duplicate fields in old databases

Some older databases may contain a duplicated field named **IIIF Anotation 2** with:

- local ID: `<span class="editor-theme-code">1106</span>`
- concept code: `<span class="editor-theme-code">2-1098</span>`

This field is not used by any current IIIF record type. Remove it before using the new IIIF workflow, especially if it causes confusion in forms or import checks.

### 1.3 Recommended checks before testing

After importing definitions, check that the database contains the three IIIF record types above and that **Browse templates** no longer shows missing IIIF definitions in the Core definitions database.

For testing, start with a small Manifest first. A large external Manifest may fail for reasons unrelated to Heurist logic, such as network timeouts, remote annotation-list delays, or unavailable image services.

---

## 2. Key concepts

### 2.1 Manifest

A Manifest is the IIIF object that describes a digital object, such as a manuscript, book, image set or media collection. In Heurist, a Manifest may be:

- a registered external Manifest file or URL;
- a managed **IIIF Manifest** record;
- a dynamic Manifest generated from a record set or a single registered media file.

Managed Heurist Manifest output is generated as **IIIF Presentation API v3**. A registered IIIF Manifest file becomes managed only when an **IIIF Manifest** record references that file. If no such record exists, Heurist treats the registered Manifest file as an external/source Manifest and can use it as an annotation overlay target.

### 2.2 Canvas

A Canvas represents one viewable unit in a Manifest, for example a page, image, video or audio item. In full management mode, Heurist stores each Canvas as an **IIIF Canvas** record. Each managed Canvas normally points to a registered file or registered external media URL.

In annotation overlay mode, Canvas records are not imported or managed by Heurist. Instead, annotations remain linked to the original Canvas URI from the source Manifest.

### 2.3 Annotation

Annotations are stored as **IIIF Annotation** records. They may be created or edited in Mirador, mainly for defining the annotation area and initial text, or in the Heurist record editor for annotation attributes, which can be extended to support searching and custom reporting within Heurist.

Annotations store:

- text body / summary;
- motivation, such as commenting;
- language;
- original Canvas target URL;
- managed Canvas reference when applicable;
- selector type and selector value;
- raw IIIF/Web Annotation JSON;
- state, such as imported, Mirador-created, Heurist-created, modified, obsolete or removed.

---

## 3. Manual creation of a managed Manifest

Manual creation is used when you want Heurist to own and generate the Manifest rather than only overlay annotations on an external Manifest.

### 3.1 Create the Manifest record

Create a new **IIIF Manifest** record. Fill in Manifest-level metadata such as title, description and copyright/rights. These fields are used when Heurist generates the v3 Manifest output.

A managed Manifest can be empty. An empty managed Manifest still returns valid IIIF Presentation API v3 JSON with `<span class="editor-theme-code">items: []</span>`, so viewers should not normally show a technical error.

### 3.2 Add Canvases one by one

Create **IIIF Canvas** records and link them to the Manifest. Each Canvas may reference:

- a locally uploaded registered file;
- a registered external media URL;
- an image served by a IIIF Image API;
- other supported media such as audio or video where configured.

The order of Canvas references on the Manifest record defines the order in the generated Manifest. The order can be changed within Heurist data entry by dragging the Canvas references up and down.

### 3.3 Add or edit annotations in Mirador

Open the managed Manifest in the Mirador Viewer. Use Mirador's annotation tools to add annotations to the selected Canvas. Heurist stores the annotation as an **IIIF Annotation** record and links it back to the relevant Canvas and Manifest context.

The internal Mirador viewer uses the default annotation lookup scope `<span class="editor-theme-code">canvas</span>`, which reads annotations from `<span class="editor-theme-code">/api/{db}/annotations</span>`. A Manifest-scoped endpoint is also available as `<span class="editor-theme-code">/api/{db}/annotations/{manifestRecID}</span>` when `<span class="editor-theme-code">annotation_scope=manifest</span>` is requested.

### 3.4 Edit annotations in the Heurist record editor

Annotations can also be edited directly as Heurist records. This is useful for correcting text, language, motivation or metadata.

Be careful when editing selector information manually:

- **Selector type** and **selector value** must remain consistent.
- A rectangular fragment selector and an SVG selector are not interchangeable.
- If the selected area is edited incorrectly, Mirador may display the annotation in the wrong place or fail to display the region.

In general, use Mirador for changing the selected area and use Heurist record editing for textual and descriptive metadata.

### 3.5 Open the Manifest, Canvases and Annotations from the Record View panel

From the **IIIF Manifest** record view, open the Manifest either as raw/generated IIIF content or in the Mirador Viewer.

Related records can also provide navigation back to the Manifest context:

- **IIIF Canvas** records may include a link to open the referenced Manifest in which the Canvas is used.
- **IIIF Annotation** records may include a link to open the referenced Manifest, so the annotation can be viewed in its wider Manifest context rather than as an isolated record.
- **IIIF Canvas** records can also be opened independently, in the same way as any Heurist record with a file field. This is useful when checking a single page/image/media item before opening the full Manifest.

For internal Mirador viewing, Heurist passes `<span class="editor-theme-code">omit_annotation_pages=1</span>` to the generated Manifest URL where needed. This prevents the same database annotations from being loaded twice: once from embedded Manifest annotation-page links and once from Mirador's annotation endpoint.

### 3.6 Add Canvases in a batch — planned feature

A planned batch action will allow users to select one or several ordinary records that already have file fields and create Canvas records from those files. This is intended to make managed Manifest creation faster for large image sets.

Until this is implemented, add Canvas records manually or import/process an existing Manifest in full management mode.

---

## 4. Import or process an existing IIIF Manifest

Use **Process IIIF Manifest** to work with a registered or uploaded IIIF Presentation Manifest. A Manifest can be registered as:

- an external IIIF Presentation Manifest referenced by a File field;
- a JSON Manifest uploaded to Heurist as a File field.

![Process IIIF Manifest dialog](https://docs.heuristref.net/Pasted%20image%2020260621175823.png)

The default mode is **Full manifest management**, which creates or updates an **IIIF Manifest** record, imports **IIIF Canvas** records and imports available **IIIF Annotation** records.

**Annotation overlay** is different: it imports annotations only. It does not create an **IIIF Manifest** record. The registered Manifest file remains the source Manifest and Heurist stores local annotations against the original Canvas URIs.

### 4.1 Annotation overlay mode

Use **Annotation overlay** when the external Manifest remains the authoritative source for Canvas structure.

In this mode:

- only **IIIF Presentation API v3 Manifests** are supported;
- the source Manifest and its Canvas list remain owned by the external provider;
- Heurist does **not** create an **IIIF Manifest** record;
- Canvas identifiers are preserved from the source Manifest;
- annotations are imported into Heurist and linked to the original Canvas URIs;
- when `<span class="editor-theme-code">/api/{db}/iiif/manifest/{obfuscatedFileID}</span>` is requested, Heurist can output a v3 overlay Manifest by replacing source `<span class="editor-theme-code">Canvas.annotations</span>` with Heurist AnnotationPage links;
- local Heurist annotations are preserved on re-import/re-processing when they have been edited locally.

Do not use this mode for IIIF Presentation API v2 Manifests. For v2 source Manifests, use full management mode. If a managed **IIIF Manifest** record already references the selected registered Manifest file, annotation overlay mode is not available because the file is already under Heurist management.

### 4.2 Full manifest management mode

Use **Full manifest management** when Heurist should manage the Manifest structure.

In this mode:

- Heurist creates or updates Manifest, Canvas and Annotation records;
- the existence of the **IIIF Manifest** record is what marks the registered Manifest file as managed;
- Heurist owns the generated Manifest output, Canvas order and Canvas metadata;
- media may still be external registered resources or local uploads;
- media should be stored in Heurist where referenced resources are not held by a stable long-term repository or institutional service;
- Manifest-level metadata can be edited in Heurist;
- Canvas order comes from the Canvas references stored on the Manifest record;
- annotations are linked to managed Canvas records;
- generated IIIF output uses Heurist Canvas API URLs.

This is the preferred mode for IIIF v2 source Manifests, because the overlay workflow is v3-only.

### 4.3 Re-import / re-processing behaviour

On re-import, Heurist attempts to update imported records while preserving local work. Records that have been changed in Heurist or Mirador are preserved by default and reported separately as preserved local records.

The report includes:

- managed Manifest record ID, or `<span class="editor-theme-code">not created</span>` for annotation overlay;
- total Canvases found;
- Canvas records added, updated, unchanged or preserved;
- total annotations found;
- annotation records added, updated, unchanged or preserved;
- issues encountered during import/processing.

### 4.4 Thumbnails

The import tool can create thumbnails for annotation records. This is useful for browsing annotations in Heurist, but it is slower because it may need to access remote images or render selected regions.

---

## 5. Add annotations for an arbitrary registered file or URL

You do not need a managed Manifest before annotating media.

You can open the Mirador Viewer for any registered media file or supported registered URL. Heurist dynamically creates a single-canvas Manifest for the media and lets you add annotations. These annotations are stored in Heurist against the Canvas URL used for that file.

If you later add the same file to a managed Manifest, the annotation can be preserved because the Canvas identity is based on the registered file's obfuscated ID. This allows annotation work to start before the final Manifest structure is prepared.

Typical uses:

- annotate a single image before adding it to a larger Manifest;
- annotate a registered external IIIF image;
- test annotation behaviour on one file before importing, processing or building a large Manifest.

---

## 6. Viewing in Mirador

Heurist provides a Mirador Viewer for:

- a managed IIIF Manifest record;
- a registered external Manifest file;
- a single registered media file;
- a dynamic Manifest generated from a query or selected record set.

Registered Manifest files are opened through `<span class="editor-theme-code">/api/{db}/iiif/manifest/{obfuscatedFileID}</span>`. If an **IIIF Manifest** record references the file, the API returns the managed Manifest generated from Heurist records. Otherwise it returns the source Manifest: v2 sources are returned as-is, while v3 sources can be returned with Heurist annotation-page links overlaid.

The viewer supports two annotation lookup scopes:

- `<span class="editor-theme-code">annotation_scope=canvas</span>` — default. Shows all annotations that target the same Canvas URL.
- `<span class="editor-theme-code">annotation_scope=manifest</span>` — shows only annotations linked to the current Manifest record.

For internal Mirador viewing, Heurist avoids duplicate annotations by passing `<span class="editor-theme-code">omit_annotation_pages=1</span>` to generated Manifest URLs where needed. External IIIF consumers can receive normal `<span class="editor-theme-code">Canvas.annotations</span>` links when this parameter is not used.

---

## 7. Dynamic Manifests via Export IIIF

Heurist can generate IIIF output dynamically from ordinary record searches and file selections. This is useful when you want to view or share a record set without creating a permanent managed Manifest record.

### 7.1 Single registered media file

A single media file can be opened in Mirador or exported as a IIIF Manifest by using its registered file obfuscated ID. Heurist wraps the media in a single-canvas IIIF Presentation API v3 Manifest.

Useful for:

- quick viewing of one image, audio or video item;
- adding annotations to one registered file;
- testing IIIF output for one file.

### 7.2 One ordinary record with media files

When a record contains one or more suitable file fields, Export IIIF can generate a Manifest whose Canvases correspond to the media files linked to that record.

Useful for:

- records that represent objects with several images;
- quick Mirador viewing without creating explicit Canvas records;
- public sharing of record media as IIIF.

### 7.3 Several ordinary records with media files

When the current record set contains multiple records with suitable media, Export IIIF can generate a Manifest with one or more Canvases from those records, subject to the export limit.

Useful for:

- search results containing image records;
- temporary collections;
- comparing several media records in Mirador.

### 7.4 One registered IIIF Manifest in the record set

If a record set contains one registered IIIF Manifest and no generated media Canvases, Heurist can return that Manifest directly through the IIIF API.

Useful for:

- opening a registered external Manifest through Heurist;
- keeping a registered Manifest discoverable as a file in a record;
- testing external Manifest access.

### 7.5 Several registered IIIF Manifests in the record set

If a record set contains several registered IIIF Manifests, Heurist can generate a IIIF Collection that references those Manifests.

Useful for:

- publishing a set of related Manifests;
- opening several Manifests together in Mirador;
- grouping imported, processed or external Manifests without merging their Canvas structures.

### 7.6 Mixed record set: registered Manifests and media files

If a v3 dynamic export contains both registered Manifests and ordinary media Canvases, Heurist can generate a Collection. Registered Manifests become Manifest items in the Collection; generated media Canvases are grouped into a generated Manifest item.

Useful for mixed search results where some records already contain IIIF Manifests and others contain image/audio/video files.

### 7.7 IIIF v2 output policy

Heurist no longer generates IIIF Presentation API v2 output. Dynamic export and managed Manifest output are v3-only. Heurist can still import v2 and hybrid v2 source Manifests in **Full manifest management** mode and then publish them as generated v3 Manifests.

---

## 8. Recommended workflow examples

### 8.1 Annotate an external v3 Manifest without taking over its structure

1. Register or upload the v3 Manifest JSON.
2. Open **Process IIIF Manifest**.
3. Select **Annotation overlay**.
4. Import/process annotations.
5. Open the registered Manifest file in Mirador. The viewer uses `<span class="editor-theme-code">/api/{db}/iiif/manifest/{obfuscatedFileID}</span>` and the annotation endpoint.
6. Add or edit annotations.
7. Use the same API URL when external viewers need the v3 source Manifest with Heurist AnnotationPage links.

### 8.2 Import a v2 Manifest with many Canvases and annotations

1. Register or upload the v2 Manifest JSON.
2. Open **Process IIIF Manifest**.
3. Select **Full manifest management**.
4. Import/process Canvases and annotations.
5. Inspect the report for failed remote annotation lists or unavailable image resources.
6. Open the managed Manifest in Mirador.

If the v2 Manifest is very large, test first with a trimmed Manifest containing a few Canvases.

### 8.3 Start with one image and later build a Manifest

1. Register or upload an image.
2. Open the image in Mirador.
3. Add annotations.
4. Later create a managed Manifest and add that file as a Canvas.
5. The annotation can be preserved because it targets the file-based Canvas identity.

---

## 9. Troubleshooting

### The import widget says required definitions are missing

Import **IIIF Annotation** from `<span class="editor-theme-code">Heurist_Core_Definitions</span>`. The related Manifest and Canvas record types should be imported with it.

### The database contains an old field named “IIIF Anotation 2”

Remove the obsolete duplicate field with local ID `<span class="editor-theme-code">1106</span>` and concept code `<span class="editor-theme-code">2-1098</span>`. It is not used by the current IIIF record types.

### Overlay mode rejects a v2 Manifest

This is expected. Annotation overlay mode is v3-only because it stores annotations against original v3 Canvas URIs and can publish v3 `<span class="editor-theme-code">Canvas.annotations</span>` AnnotationPage links. Import v2 Manifests in **Full manifest management** mode.

### Overlay mode is disabled for a selected registered Manifest file

This means an **IIIF Manifest** record already references the selected registered Manifest file. That file is already managed by Heurist, so use **Full manifest management** mode.

### Mirador shows duplicate annotations

Use the internal Heurist Mirador viewer, which passes `<span class="editor-theme-code">omit_annotation_pages=1</span>` for generated Manifest URLs where required. This avoids loading the same annotations both from Manifest `<span class="editor-theme-code">Canvas.annotations</span>` and from Mirador's annotation endpoint.

### Import fails on a very large Manifest

Try a small trimmed Manifest first. Failures may be caused by remote annotation-list access, timeouts, malformed source JSON, unavailable image services, or network interruptions.

---

## 10. Summary of ownership by mode

<table id="bkmrk-feature-annotation-o"><colgroup><col></col><col></col><col></col></colgroup><tbody><tr><th>Feature

</th><th>Annotation overlay

</th><th>Full manifest management

</th></tr><tr><td>Supported source Manifest version

</td><td>v3 only

</td><td>v2 and v3

</td></tr><tr><td>Source Manifest ownership

</td><td>External provider / registered file

</td><td>Imported into Heurist management

</td></tr><tr><td>Generated Manifest output

</td><td>Source v3 Manifest with Heurist AnnotationPage links when requested through the IIIF API

</td><td>Heurist managed v3 output

</td></tr><tr><td>Canvas list ownership

</td><td>External provider

</td><td>Heurist

</td></tr><tr><td>Canvas identifiers

</td><td>Original source Canvas URIs

</td><td>Heurist Canvas API URLs

</td></tr><tr><td>Canvas records created

</td><td>No

</td><td>Yes

</td></tr><tr><td>Annotation records created

</td><td>Yes

</td><td>Yes

</td></tr><tr><td>Manifest metadata editable in Heurist

</td><td>No managed Manifest record is created

</td><td>Yes, used in generated output

</td></tr><tr><td>Best use

</td><td>Add Heurist annotations to an existing v3 Manifest without creating a Manifest record

</td><td>Build or take over a Manifest in Heurist

</td></tr></tbody></table>

# Ch 06c: Omeka-S to Heurist

Omeka S is a configurable database (there is an older version Omeka Classic). It is much more complex to set up and much more limited, although it does have some functions in the semantic web area which we don't yet address and extensive tech documentation, having been defined from scratch after a decade of Omeka Classic, and is therefore easier for programmers to extend with add-on modules. There is also an Omeka (either version) to Datacrate conversion and Heurist to Datacrate conversion developed in Python by Peter Sefton at UTS - you can find Datacrate on github - which might form the basis for an alternative pathway.

Please note that the migration from Omeka S to Heurist was developed before 2020 and may not operate 'out of the box'/

**Converting from Omeka S to Heurist**

The following table shows the correspondences between structures defined in Omeka S and structures defined in Heurist:

<table id="bkmrk-omeka-sheuristresour"><colgroup><col></col><col></col></colgroup><tbody><tr><th>**Omeka S**</th><th>**Heurist**</th></tr><tr><td>Resource\_class

</td><td>defRecTypes

</td></tr><tr><td>Resource\_template\_property

</td><td>defRecTypeStructure (order, altlabel, requirements and data\_type?)

</td></tr><tr><td>Property

</td><td>defDetailTypes

</td></tr><tr><td>Resource

</td><td>Records

</td></tr><tr><td>Value

</td><td>recDetails

</td></tr></tbody></table>

**Conversion**

1. Since data\_type is not defined in Resource\_template\_property (it was empty in def19 databases), it is necessary to detect type for every property.
    - ++Resources++: where value.value\_resource\_id IS NOT NULL
    - ++Terms++: look at tables with the same name as property and number of distinct values &lt;100
    - ++Blocktext++: where number of long values is considerable length(value.value)&gt;100
2. Get all properties in use

```
SELECT p.id,  p.local_name, count(\*) FROM value v, property p

where v.property_id=p.id group by p.id,  p.local_name order by p.id
```

3. Get properties in use by record class

```
SELECT distinct r.resource_class_id, p.id,  p.local_name FROM value v,
property p, resource r  where v.resource_id = r.id  and
v.property_id=p.id
```

4. Order by r.resource\_class\_id, p.id
5. As a result, you need to create following CSV tables.

***For terms***

- Property id: list of enum properties uses the same vocabulary
- Table name: takes terms from this table, don't worry if value is missed in this table it will be added to target vocabulary
- Vocab name: name of vocabulary to be added to heurist
- Resource class ID: check properties for these class only. (in OMEKA some fields are inconsistent for its types for different classes)<table><colgroup><col></col><col></col><col></col><col></col></colgroup><tbody><tr><th>**Property ID**</th><th>**Table Name**</th><th>**Vocab Name**</th><th>**Resource Class ID**</th></tr><tr><td>202
    
    </td><td>fonctions
    
    </td><td>fonctions
    
    </td><td>155
    
    </td></tr><tr><td>"223,245,325"
    
    </td><td> pays
    
    </td><td>pays
    
    </td><td></td></tr><tr><td>283
    
    </td><td>causes-fin-brevets
    
    </td><td>brevet cause fin
    
    </td><td></td></tr><tr><td>291
    
    </td><td>genres
    
    </td><td>genres
    
    </td><td></td></tr><tr><td>329
    
    </td><td>types-adresses
    
    </td><td>types de adresses
    
    </td><td></td></tr><tr><td>346
    
    </td><td>typesdeproces
    
    </td><td>types de proces
    
    </td><td></td></tr><tr><td>"290,383"
    
    </td><td>roles
    
    </td><td>roles
    
    </td><td></td></tr></tbody></table>

For all fields:

`<span class="editor-theme-code">$config = <<<'EOD'</span>`

<table id="bkmrk-rty-id-local_name-dt"><colgroup><col></col><col></col><col></col><col></col><col></col><col></col></colgroup><tbody><tr><th>**rty**</th><th>**id**</th><th>**local\_name**</th><th>**dty\_Type**</th><th>**dty\_ID**</th><th>**ptr/vocab Explanation**</th></tr><tr><td></td><td></td><td>7

</td><td>date

</td><td>date

</td><td>9

</td></tr><tr><td></td><td></td><td>252

</td><td>birthdate

</td><td>date

</td><td></td></tr><tr><td></td><td></td><td>35

</td><td>isReferencedBy

</td><td>blocktext

</td><td></td></tr><tr><td></td><td></td><td>131

</td><td>nick

</td><td>freetext

</td><td></td></tr><tr><td>95,110,111

</td><td>143

</td><td>surname

</td><td>freetext

</td><td>1

</td><td> map property 143 to heurist 1 for classes 95..

</td></tr><tr><td>150

</td><td>143

</td><td>surname

</td><td>resource

</td><td>16

</td><td> map property 143 to heurist 16 for class 150

</td></tr><tr><td></td><td></td><td>230

</td><td>parrain

</td><td>resource

</td><td> 95

</td></tr><tr><td></td><td></td><td>125

</td><td>gender

</td><td>enum

</td><td>20

</td></tr><tr><td></td><td></td><td>202

</td><td>agent

</td><td>enum

</td><td>6255

</td></tr></tbody></table>

Classes by records

```
SELECT resource.resource_class_id, rc.local_name,count(\*) FROM
resource, resource_class rc 

where  resource_class_id=rc.id group by
resource.resource_class_id,rc.local_name
```

***Conversion notes (for developers)***

I will do mapping their ResourceClass/Property to Heurist Rectypes/Fields   
Enumeration types are vague in their system. If some of properties have table of the same name (for example property genre has table genres this property considered enumerated)

Import Resource/Values to Records/recDetails

DEFINITIONS: Map existing Heurist record types/fields to Omeka resource classes/properties.Omeka database does not keep any information about its database definitions just two tables that refers to resource/properties of RDF models (url of xml that describes these models are in Vocabulary table).  
Example:  
Resource class Agent (id 95, vocab\_id=4) refers to Agent in [http://xmlns.com/foaf/0.1/](http://xmlns.com/foaf/0.1/)

Property Genre (vocab #6) refers to [http://dbpedia.org/ontology/genre](http://dbpedia.org/ontology/genre)

Manual matching Omeka-&gt;Heurist: Resource class-&gt;Rectypes Property-&gt;Field type

Store RDF name (like foaf:Person OR dbo:Genre) in some field of defRectype, defDetailTypes tables OR keep matching in external file Omeka ID-&gt;Heurist ID, or RDF name-&gt;Heurist concept code I believe it is much cleaner to store such data in the database, this then allows us to use it directly in a future RDF export. Every time we use files we end up with problems eg. of synchronisation, referential integrity etc.

DATA: Import Omeka resource/value tables into Heurist Records/recDetails