# 09a: Publishing websites and database archiving

### <span style="color: rgb(15, 71, 97);">The Publish menu</span>

<span style="color: rgb(0, 0, 0);">The Publish menu delivers easily edited CMS websites embedded directly within the database, as well as individual web pages which can be embedded in other sites. It also provides an archiving function which enables the download of a complete, documented copy of the data in the database in open format. </span>

![](https://docs.heuristref.net/uploads/images/gallery/2026-07/embedded-image-fud0m8yr.png)

- **Safeguard file - download**<span style="color: rgb(0, 0, 0);"> - a fully internally documented archive package of all the data in the database</span>
- **Safeguard file - to repository**<span style="color: rgb(0, 0, 0);"> - as above, but uploads the file to a chosen repository (2026 - only Nakala)</span>
- **Website &gt; Create**<span style="color: rgb(0, 0, 0);"> - sets up a new CMS website. A database can have multiple websites for different audiences </span>
- **Website &gt; Edit**<span style="color: rgb(0, 0, 0);"> - edit an existing CMS website stored in the database </span>
- **Website &gt;View** <span style="color: rgb(0, 0, 0);">- view an existing CMS website in a separate window - use to check results and to obtain the URL </span>  
      
    <span style="color: rgb(0, 0, 0);">Note : You can also access the website record in the Explore Menu, just like any other record. To find the website record, type 'website' in the searchbox, or filter by Entities in the Explore Tray, and choose 'CMS\_Home' as the Record Type. Any websites you have created will appear as records in the Results Pane.</span>
- **Standalone web page**<span style="color: rgb(0, 0, 0);"> - create or edit a CMS-generated web page for embedding in a third-party website </span>
- **Statistics**<span style="color: rgb(0, 0, 0);"> - displays access statistics usign the eidely used Matomo Open Source web tracklign system</span>

### <span style="color: rgb(0, 0, 0);">The CMS : creating a website</span>

#### **Why use the Heurist CMS?**

<span style="color: rgb(0, 0, 0);">Heurist provides a powerful CMS capability tightly integrated with the database. There are several advantages to this approach:</span>

- **Functionality:**<span style="color: rgb(0, 0, 0);"> Database search and visualisation widgets can be embedded directly in web pages and have full access to the content of the database, including saved searches;</span>
- **Sustainability:**<span style="color: rgb(0, 0, 0);"> The CMS pages are stored as standard record types in the database. That means that there is no need to have a separate server and cross-server integration (high sustainability risks); as long as the database is accessible through Heurist, the CMS will remain operational, potentially long after the completion of the project which built it, and at practically no cost.</span>  
      
    
    - - <span style="color: rgb(0, 0, 0);">Stability</span>
        - <span style="color: rgb(0, 0, 0);">Flexibility</span>
        - <span style="color: rgb(0, 0, 0);">Multiple websites from one database</span>
        - <span style="color: rgb(0, 0, 0);">Embedded in the database and thus saved as an integral part of the database</span>
        - <span style="color: rgb(0, 0, 0);">No dependency on connections between servers, avoids multiple points of failure</span>
        - <span style="color: rgb(0, 0, 0);">Backed up in archive track package and in normal backups</span>
        - <span style="color: rgb(0, 0, 0);">Has access to the most functions directly available as widgets ( reuses the widgets of the main interface)</span>
        - <span style="color: rgb(0, 0, 0);">Has direct access to data in the database and respects permissions and visibility down to the individual value level</span>
        - <span style="color: rgb(0, 0, 0);">Flexible configuration of widgets using parameters which can be set via forms in the interface</span>
        - <span style="color: rgb(0, 0, 0);">Widgets provide powerful functions without any programming - mapping, facet searches etc</span>
        - <span style="color: rgb(0, 0, 0);">All images or files in the database are accessible for embedding without creating special web image directories (eg. WordPress) and are resampled automatically for web resolution allowing high resolution images to be stored in the database without bogging down the website &lt;check this has been enabled&gt;</span>
        - <span style="color: rgb(0, 0, 0);">Allows embedding of remote images and streaming EG or videos and sound audio</span>
        - <span style="color: rgb(0, 0, 0);">Instant editing of text elements in the website and change of parameters including styling of widgets and other components</span>
        - <span style="color: rgb(0, 0, 0);">Creates embeddable pages independent of the Heurist menu structure as well as complete websites with a couple of clicks</span>
        - <span style="color: rgb(0, 0, 0);">Easy linking of pages and records within text, generation of bread crumbs and page headings</span>
        - <span style="color: rgb(0, 0, 0);">Hierarchical menus and the possibility of multiple menus</span>

#### <span style="color: rgb(0, 0, 0);">Configuring website layout </span>

<span style="color: rgb(0, 0, 0);">The initial web page may look somewhat different depending on what template has been set as the default. </span>  
<span style="color: rgb(0, 0, 0);">The default website is created with a set of commonly used menu entries and web pages with dummy content.</span>

Note: If you are not logged in you will first need to login with the <u>login</u> link at top right of the screen, or in the backend interface.

[![image.png](https://docs.heuristref.net/uploads/images/gallery/2026-07/scaled-1680-/GiTimage.png)](https://docs.heuristref.net/uploads/images/gallery/2026-07/GiTimage.png)

<span style="color: rgb(0, 0, 0);">The website editor can be displayed by clicking on the </span><u><span style="color: rgb(0, 0, 0);">website editor </span></u><span style="color: rgb(0, 0, 0);">link on the top left of the screen</span>

[![image.png](https://docs.heuristref.net/uploads/images/gallery/2026-07/scaled-1680-/12timage.png)](https://docs.heuristref.net/uploads/images/gallery/2026-07/12timage.png)

<span style="color: rgb(0, 0, 0);">At the top of the screen you have some general controls:</span>

[![image.png](https://docs.heuristref.net/uploads/images/gallery/2026-07/scaled-1680-/AY6image.png)](https://docs.heuristref.net/uploads/images/gallery/2026-07/AY6image.png)

<span style="color: rgb(0, 0, 0);">The </span>**&lt;&lt; chevrons**<span style="color: rgb(0, 0, 0);"> can be used to temporarily close up the website editor panel, without exiting the website editor. This may be useful to have extra screen space when editing text blocks on the page (which open in a WYSIWYG editor when yu click on them).</span>

[![image.png](https://docs.heuristref.net/uploads/images/gallery/2026-07/scaled-1680-/uqsimage.png)](https://docs.heuristref.net/uploads/images/gallery/2026-07/uqsimage.png)

<span style="color: rgb(0, 0, 0);">The website URL is the recommended compact URL for the website. Click on it to copy it to your clipboard.</span>

##### <span style="color: rgb(0, 0, 0);">The </span>**Website Layout / Properties button**<span style="color: rgb(0, 0, 0);"> </span>

<span style="color: rgb(0, 0, 0);">Changes the title, logo, background, languages and other settings of the website as a whole</span>

[![image.png](https://docs.heuristref.net/uploads/images/gallery/2026-07/scaled-1680-/QTpimage.png)](https://docs.heuristref.net/uploads/images/gallery/2026-07/QTpimage.png)

Opens a standard record edit form for the CMS\_Home record which defines the website:

[![image.png](https://docs.heuristref.net/uploads/images/gallery/2026-07/scaled-1680-/lCOimage.png)](https://docs.heuristref.net/uploads/images/gallery/2026-07/lCOimage.png)

<span style="color: rgb(0, 0, 0);">The “Advanced” tab allows you to provide some custom CSS and/or Javascript : see below.</span>  
<span style="color: rgb(0, 0, 0);">DT\_THUMBNAIL (base field 2-39) is used as favicon for the website.</span>

##### <span style="color: rgb(0, 0, 0);">The </span>**Site tab**<span style="color: rgb(0, 0, 0);"> (menu management)</span>

<span style="color: rgb(0, 0, 0);">Allows you to add, reorder, rename and delete menu entries</span>

[![image.png](https://docs.heuristref.net/uploads/images/gallery/2026-07/scaled-1680-/fBwimage.png)](https://docs.heuristref.net/uploads/images/gallery/2026-07/fBwimage.png)

##### <span style="color: rgb(0, 0, 0);">The </span>**Page tab**<span style="color: rgb(0, 0, 0);"> (widgets)</span>

<span style="color: rgb(0, 0, 0);">Edits the currently selected page structure and modify the component styles and widget properties.</span>  
<span style="color: rgb(0, 0, 0);">The widgets making up the page are shown on the left.</span>

[![image.png](https://docs.heuristref.net/uploads/images/gallery/2026-07/scaled-1680-/4jiimage.png)](https://docs.heuristref.net/uploads/images/gallery/2026-07/4jiimage.png)

#### <span style="color: rgb(0, 0, 0);">Creating and editing components in a page</span>

<span style="color: rgb(0, 0, 0);">The element you are currently working on is highlighted by an animated blue border. If you change the element in any way, the changes are immediately visible in the preview. You can therefore use Heurist’s web editor to experiment and learn by doing. </span>

<span style="color: rgb(0, 0, 0);">You don’t need to know very much in advance about what these different settings do — just change them, and see the effect. You can actually learn a lot about web development just by playing with Heurist’s website builder. Anything you learn about your Heurist site will apply to most website development.</span>

<span style="color: rgb(0, 0, 0);">Advanced users can apply custom CSS classes to the element, or write inline CSS as they desire (see below).</span>

<span style="color: rgb(0, 0, 0);">After inserting the component, you can edit its content in the usual way. You can also add further elements to change the component. </span>

#### <span style="color: rgb(0, 0, 0);">Using widgets</span>

<span style="color: rgb(0, 0, 0);">If you insert a widget you will first see a list of possible widgets.</span>

![embedded-image-oiibs4ht.png](https://docs.heuristref.net/uploads/images/gallery/2026-07/scaled-1680-/NV0embedded-image-oiibs4ht.png)

#### **What is a widget?**

<span style="color: rgb(0, 0, 0);">To add interactive content to your Heurist site, you need to use Heurist </span>**widgets**<span style="color: rgb(0, 0, 0);">. A widget is an interactive component which either retrieves or displays information about records in your database. The Map and Timeline widget, for example, plots records on a map and displays them in chronological order on a timeline below. The Saved Filters widget allows you to embed filters that you have defined in the Explore menu on a webpage, enabling visitors to your site to search the database.</span>

<span style="color: rgb(0, 0, 0);">Many of the widgets replicate tools that you are already familiar with from the Explore Menu (you are in fact using the same widgets that we use to build the backend interface). However, when you embed a widget on a Heurist site, you will have more ability to customise its look and behaviour, so you can control the user's experience.</span>

<span style="color: rgb(0, 0, 0);">The available widgets are:</span>

- **Filter:** <span style="color: rgb(0, 0, 0);">This widget gives visitors access to the standard Heurist search bar, such as you see at the top of the </span>[<span style="color: rgb(0, 0, 255);">Filtered Results Pane</span>](https://heuristref.net/h6-alpha/viewers/smarty/727)<span style="color: rgb(0, 0, 0);"> of the </span>[<span style="color: rgb(0, 0, 255);">Explore Menu</span>](https://heuristref.net/h6-alpha/viewers/smarty/672)<span style="color: rgb(0, 0, 0);">.</span>
- **Saved Filters:**<span style="color: rgb(0, 0, 0);"> This widget allows you to embed Saved Filters on a Heurist webpage. In most cases, we recommend that you use </span>[<span style="color: rgb(0, 0, 255);">Faceted Searches</span>](https://heuristref.net/h6-alpha/viewers/smarty/546)<span style="color: rgb(0, 0, 0);"> with this widget, as they provide the best user experience.</span>
- **Standard Filter Result:**<span style="color: rgb(0, 0, 0);"> This widget displays records in a similar manner to the </span>[<span style="color: rgb(0, 0, 255);">Filtered Results Pane</span>](https://heuristref.net/h6-alpha/viewers/smarty/727)<span style="color: rgb(0, 0, 0);"> of the </span>[<span style="color: rgb(0, 0, 255);">Explore Menu</span>](https://heuristref.net/h6-alpha/viewers/smarty/672)<span style="color: rgb(0, 0, 0);">.</span>
- **Custom Report:**<span style="color: rgb(0, 0, 0);"> This widget displays information using a Custom Report that you have built in the Explore Menu. Custom Reports can also be embedded within other widgets, for instance to configure the popups on the Map and Timeline, or to provide a different view of records in the Standard Filter Result.</span>
- **Table Format:** <span style="color: rgb(0, 0, 0);">This widget displays records in a tabular format, the same as the List View in the Explore Menu</span>
- **Map and Timeline:**<span style="color: rgb(0, 0, 0);"> This widget plots records on a map with embedded timeline, just like the Map View in the Explore Menu. You can utilise Map Documents defined in your Heurist database to provide additional advanced functionality.</span>
- **Story Map:** <span style="color: rgb(0, 0, 0);">This widget plots a set of records on the map as a connected series, with an accompanying 'slideshow' of information about each record. This is ideal for 10-20 records.</span>
- **Network Graph:**<span style="color: rgb(0, 0, 0);"> This widget displays records as nodes in a network, much like the Network View in the Explore Menu.</span>
- **Menu:** <span style="color: rgb(0, 0, 0);">This widget allows you to add a navigation menu to your site, like the one that is automatically generated in your website header.</span>
- **Add Record:**<span style="color: rgb(0, 0, 0);"> This widget allows you to add an 'Add Record' button to your page. Visitors can click the button to open the standard data entry form for a given record type.</span>
- **Email Us Form:**<span style="color: rgb(0, 0, 0);"> This widget allows you to add a contact form to your page, so that visitors can email you without you revealing your email address publicly on the internet.</span>

#### **How do I configure a widget?**

<span style="color: rgb(0, 0, 0);">Once you have inserted a widget into a page, it will appear in the treeview to the left. If you click on it, this will open all the settings for the widget, where you can alter its functionality. Note that there are several tabs with different fucntions - nasic setup, onscreen controls, image handling, messages (when data is missing etc.) and Connect (which sets connections between </span>

[![image.png](https://docs.heuristref.net/uploads/images/gallery/2026-07/scaled-1680-/sUnimage.png)](https://docs.heuristref.net/uploads/images/gallery/2026-07/sUnimage.png)

<span style="color: rgb(0, 0, 0);">See the specific page for each widget for information on the specific settings.</span>

#### **How do I format a widget?**

<span style="color: rgb(0, 0, 0);">Most widgets will expand to fill up whatever space you provide them on your webpage. If you need to adjust the positioning or external appearance of a widget (e.g. by adding margins around it or a border), then you can do this using the Style tool, as you would for a static component such as some text or a heading.</span>

#### **How do widgets talk to each other?**

<span style="color: rgb(0, 0, 0);">You are very likely to add more that one widget to a webpage. When you do, you will probably want them to interact. For example, you might use the Saved Filters Widget to allow visitors to search the database, the Standard Filter Result to list the results of a search, and the Network Graph to display the results visually. When widgets are inserted into a page Heurist links the widgets together so that they interact correctly. You do not need to configure anything for this to happen—it is automatic.</span>

<span style="color: rgb(0, 0, 0);">More advanced users might wish to know how this works. Behind the scenes, Heurist divides the page into one or more </span>**search realms**<span style="color: rgb(0, 0, 0);">. All the widgets in a given search realm share data with one another. By default, the entire page is a single search realm, so that all widgets on the page will search, filter or display the same set of records at any given time. But it is also possible to divide a page into multiple search realms if required. It is even possible to have search realms which run across pages.</span>

<span style="color: rgb(0, 0, 0);">When you configure a widget, you have the option to specify which search realm it belongs to. You simply tell Heurist what search realms you would like to exist, and it will take care of creating and utilising them. If your 'Saved Filters' and 'Network Graph' are both in a search realm called 'Bob', then they will be linked. If you instead write 'Jane' in the search realm box for both widgets, then they will be linked together in a search realm called 'Jane'.</span>

### <span style="color: rgb(0, 0, 0);">Types of widgets</span>

#### <span style="color: rgb(0, 0, 0);">Simple text box</span>  


[![image.png](https://docs.heuristref.net/uploads/images/gallery/2026-08/scaled-1680-/dekimage.png)](https://docs.heuristref.net/uploads/images/gallery/2026-08/dekimage.png)

<span style="color: rgb(0, 0, 0);">The simplest of all components, the simple text box contains static WYSIYYG text (</span>*Simple text boxes can also be loaded in two and three column modes as a shortcut to individual positioning or flexboxes).*

<span style="color: rgb(0, 0, 0);">Simple text can be edited in WYSIWYG mode simply by clicking on the text in website edit mode:</span>

[![image.png](https://docs.heuristref.net/uploads/images/gallery/2026-08/scaled-1680-/UBsimage.png)](https://docs.heuristref.net/uploads/images/gallery/2026-08/UBsimage.png)

Apart from the usual formatting options, one can create a link which inserts a new record in the database (**Add Rec)**, one can insert images and other files from those previously uploaded or by uploading from your local drive or providing a remote URL (**Add Media** - see data entry of file fields for detailex explanation), or standard web hyperlinks (**URL).**

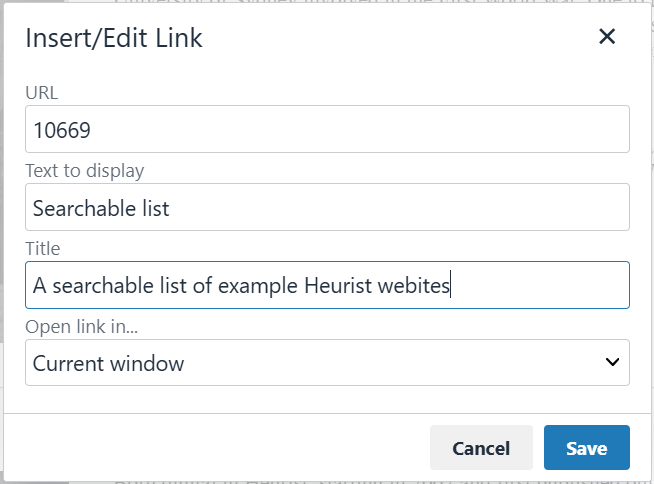
<p class="callout info">To insert a link which skips to an another page in the website, use the URL button and simply enter the ID of the web page you wish to load.  
*(find the ID either by a search for CMS Web Pages - open another browser tab to carry out the search - or by editing the site structure - button at top left in website edit more - and looking at hte menu pages which are connected to the CMS Home page)*  
  
 [![image.png](https://docs.heuristref.net/uploads/images/gallery/2026-08/scaled-1680-/Euiimage.png)](https://docs.heuristref.net/uploads/images/gallery/2026-08/Euiimage.png)</p>
#### <span style="color: rgb(0, 0, 0);">Filter</span>

<span style="color: rgb(0, 0, 0);">The </span>*Filter* <span style="color: rgb(0, 0, 0);">widget create a search box (as in the Explore menu) which can be used :</span>

- <span style="color: rgb(0, 0, 0);">To perform a simple search in the database (for example from a keyword)</span>
- <span style="color: rgb(0, 0, 0);">To write a query using the Heurist JSON Query Langage (see documentation chapter 7)</span>
- <span style="color: rgb(0, 0, 0);">To display a Filter builder button to allow your visitors to build their own queries.</span>

<span style="color: rgb(0, 0, 0);">This widget has to be completed with the</span> *Standard filter results*<span style="color: rgb(0, 0, 0);"> widget.</span>

##### <span style="color: rgb(0, 0, 0);">Filters Tab</span>

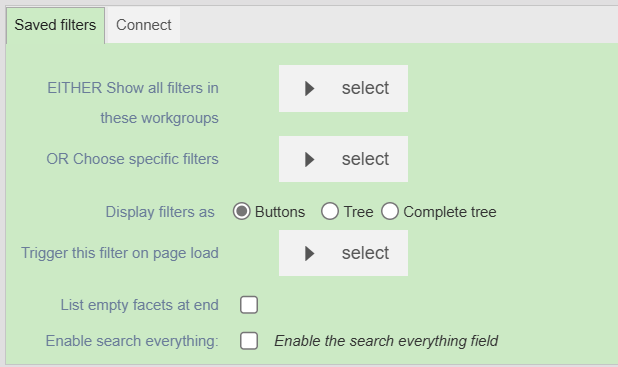
<span style="color: rgb(0, 0, 0);">The </span>*Saved filters*<span style="color: rgb(0, 0, 0);"> allows you to display a selection of filters previously created and saved using the </span>*Facets Builder*<span style="color: rgb(0, 0, 0);"> function described in chapter 7 (</span>*Explore* <span style="color: rgb(0, 0, 0);">menu), to enable your visitors to search your database by facet. This widget has to be completed with the</span> *Standard filter results*<span style="color: rgb(0, 0, 0);"> widget.</span>

##### ![](https://docs.heuristref.net/uploads/images/gallery/2026-07/embedded-image-qh4yaug0.png)

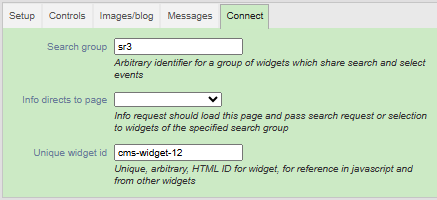
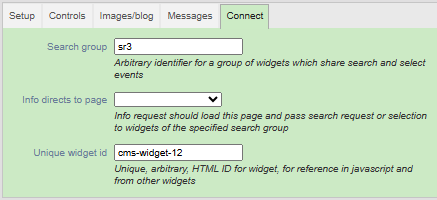
##### <span style="color: rgb(0, 0, 0);">Connect Tab</span>

![](https://docs.heuristref.net/uploads/images/gallery/2026-07/embedded-image-chgshzrc.png)

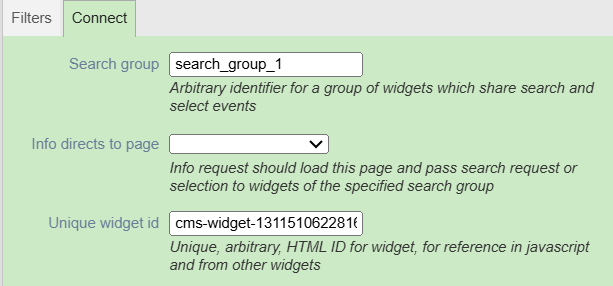
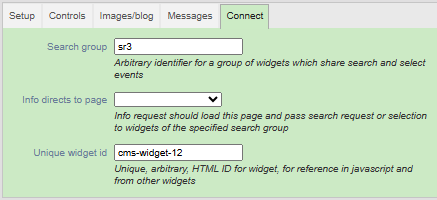
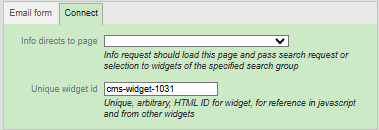
**Search group:**<span style="color: rgb(0, 0, 0);"> Name the search realm that the widget belongs to. </span>*By default, all widgets belong to 'search\_group\_1*<span style="color: rgb(0, 0, 0);">'. </span>*If you choose to use this feature, do ensure that you type the names of each different search realm **exactly**. Any typo will prevent the feature from working.*

**Info directs to**<span style="color: rgb(0, 0, 0);"> </span>**page**<span style="color: rgb(0, 0, 0);">: Use this feature if you wish to direct visitors to a different page on the site when they select a record on the map.</span>

**Unique widget id:**<span style="color: rgb(0, 0, 0);"> A name for the map widget on this page. This feature is only useful if you are using custom Javascript or CSS in your website.</span>

<span style="color: rgb(0, 0, 0);">-------------------------------------------------------------------------------------------------------------------------</span>

### <span style="color: rgb(0, 0, 0);">Standard filter results</span>

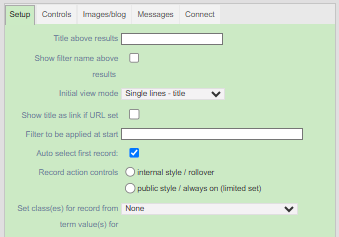
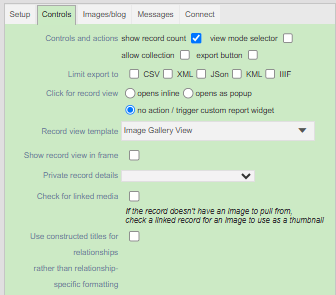
<span style="color: rgb(0, 0, 0);">This widget allows you to display </span><span style="color: rgb(51, 51, 51);">a </span><span style="color: rgb(51, 51, 51); background-color: rgb(255, 255, 255);">Filtered Results</span> <span style="color: rgb(51, 51, 51); background-color: rgb(255, 255, 255);">pane, displaying the records in your current 'result set'. </span>  
<span style="color: rgb(51, 51, 51); background-color: rgb(255, 255, 255);">The current 'result set' is the set of records retrieved by the filter you have most recently applied.</span><span style="color: rgb(51, 51, 51);"> (see chapter 7).</span>

##### <span style="color: rgb(51, 51, 51);">Setup Tab </span><span style="color: rgb(51, 51, 51); background-color: rgb(255, 255, 0);">\[to be described\]</span>

[![image.png](https://docs.heuristref.net/uploads/images/gallery/2026-07/scaled-1680-/BHrimage.png)](https://docs.heuristref.net/uploads/images/gallery/2026-07/BHrimage.png)

##### <span style="color: rgb(51, 51, 51);">Controls tab </span><span style="color: rgb(51, 51, 51); background-color: rgb(255, 255, 0);">\[to be described\]</span>

[![image.png](https://docs.heuristref.net/uploads/images/gallery/2026-07/scaled-1680-/UXWimage.png)](https://docs.heuristref.net/uploads/images/gallery/2026-07/UXWimage.png)

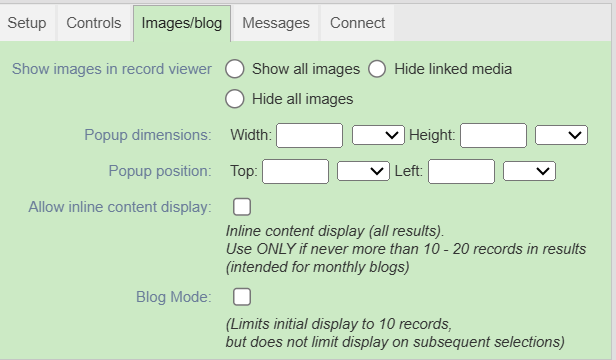
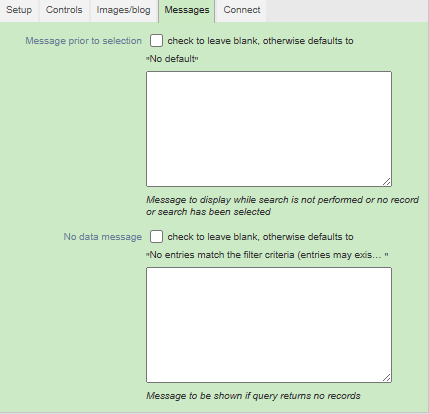
##### <span style="color: rgb(0, 0, 0);">Images/blog tab </span><span style="color: rgb(51, 51, 51); background-color: rgb(255, 255, 0);">\[to be described\]</span>

![](https://docs.heuristref.net/uploads/images/gallery/2026-07/embedded-image-aat8yhom.png)

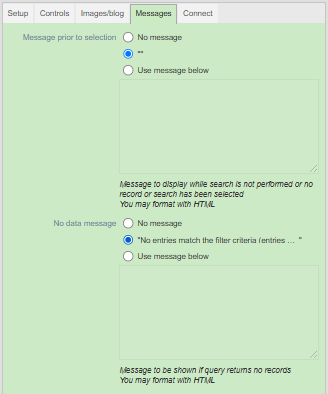
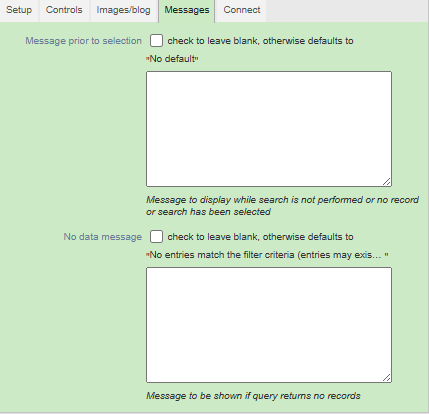
##### <span style="color: rgb(0, 0, 0);">Messages Tab </span><span style="color: rgb(51, 51, 51); background-color: rgb(255, 255, 0);">\[to be described\]</span>

##### [![image.png](https://docs.heuristref.net/uploads/images/gallery/2026-07/scaled-1680-/YRSimage.png)](https://docs.heuristref.net/uploads/images/gallery/2026-07/YRSimage.png)

<span style="color: rgb(0, 0, 0);">The messages accept fairly basic html such as &lt;b&gt; &lt;i&gt; &lt;u&gt; &amp;nbsp;</span>  
<span style="color: rgb(0, 0, 0);">They can also use simple styles such as:</span>

<span style="color: rgb(0, 0, 0);">&lt;p style="text-align:center;width:98%;border:2px solid green"&gt;</span>  
<span style="color: rgb(0, 0, 0);">Please make a selection on the left&lt;/p&gt;</span>

<p class="callout info">We recommend spacing the messages down from the top and in from the left using simple inline CSS for a more attractive appearance. They should only be left in teh default position when space is at a premium.</p>

##### <span style="color: rgb(0, 0, 0);">Connect Tab </span><span style="color: rgb(51, 51, 51); background-color: rgb(255, 255, 0);">\[to be described\]</span>

![](https://docs.heuristref.net/uploads/images/gallery/2026-07/embedded-image-3uvvp1ma.png)

#### <span style="color: rgb(0, 0, 0);">Custom report</span>

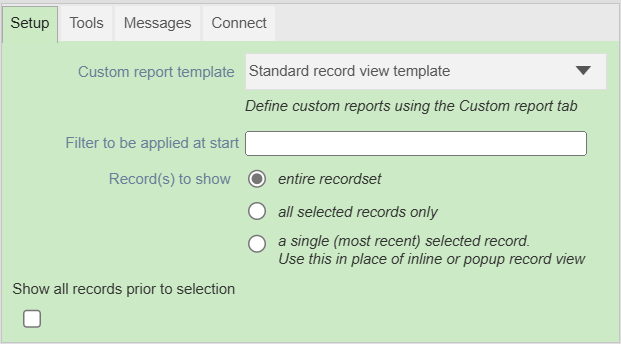
<span style="color: rgb(0, 0, 0);">The </span>*Custom Report*<span style="color: rgb(0, 0, 0);"> widget lets you display the record selected in the results list in the form of a a custom template that allows you to display the results of a search in the desired format (see chapter 8a : the custom report template must first be built using the editor available in the Record view pane, via the “Report” tab.)</span>

##### <span style="color: rgb(51, 51, 51);">Setup Tab </span><span style="color: rgb(51, 51, 51); background-color: rgb(255, 255, 0);">\[to be described\]</span>

![](https://docs.heuristref.net/uploads/images/gallery/2026-07/embedded-image-jy6lpvbd.png)

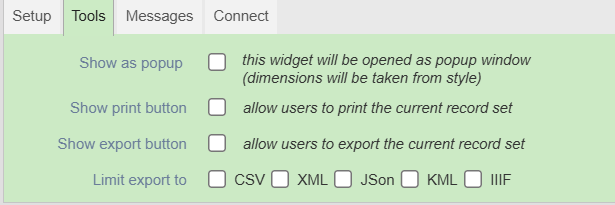
##### <span style="color: rgb(0, 0, 0);">Tools Tab </span><span style="color: rgb(51, 51, 51); background-color: rgb(255, 255, 0);">\[to be described\]</span>

![](https://docs.heuristref.net/uploads/images/gallery/2026-07/embedded-image-rwjpby66.png)

##### <span style="color: rgb(0, 0, 0);">Messages Tab </span><span style="color: rgb(51, 51, 51); background-color: rgb(255, 255, 0);">\[to be described\]</span>

![](https://docs.heuristref.net/uploads/images/gallery/2026-07/embedded-image-pyrkiesd.png)

##### <span style="color: rgb(0, 0, 0);">Connect Tab </span><span style="color: rgb(51, 51, 51); background-color: rgb(255, 255, 0);">\[to be described\]</span>

![](https://docs.heuristref.net/uploads/images/gallery/2026-07/embedded-image-xabexfya.png)

#### <span style="color: rgb(0, 0, 0);">Table format</span>

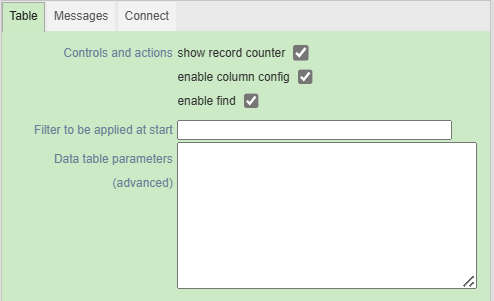
<span style="color: rgb(0, 0, 0);">The </span>*Table format* <span style="color: rgb(0, 0, 0);">widget lets you display the results of a query in a table format.</span>

##### <span style="color: rgb(0, 0, 0);">The Table Tab </span><span style="color: rgb(51, 51, 51); background-color: rgb(255, 255, 0);">\[to be described\]</span>

![](https://docs.heuristref.net/uploads/images/gallery/2026-07/embedded-image-fhblavzk.png)

##### <span style="color: rgb(0, 0, 0);">Messages Tab </span><span style="color: rgb(51, 51, 51); background-color: rgb(255, 255, 0);">\[to be described\]</span>

![](https://docs.heuristref.net/uploads/images/gallery/2026-07/embedded-image-e4fbxiia.png)

##### <span style="color: rgb(0, 0, 0);">Connect Tab </span><span style="color: rgb(51, 51, 51); background-color: rgb(255, 255, 0);">\[to be described\]</span>

![](https://docs.heuristref.net/uploads/images/gallery/2026-07/embedded-image-lb7gkrwl.png)

\----------------------------------------------------------------------------------------------------

### <span style="color: rgb(0, 0, 0);">Map and Timeline</span>

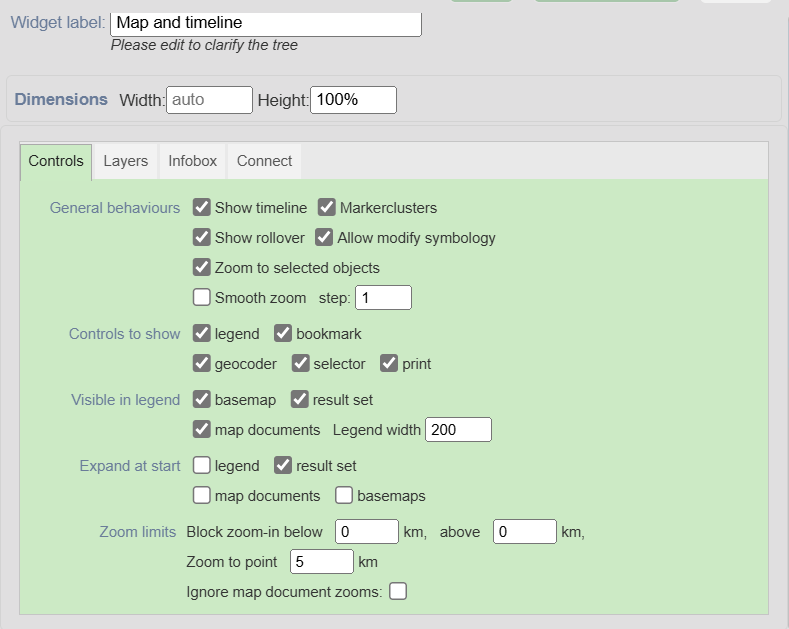
There are many options for controlling the appearance and functionality of the map widget.
<span style="color: rgb(0, 0, 0);"> </span>![](https://docs.heuristref.net/uploads/images/gallery/2026-07/embedded-image-rz6ed98v.png)

##### <span style="color: rgb(0, 0, 0);">Controls Tab</span>

*General behaviours:*

- - <u><span style="color: rgb(0, 0, 0);">Show timeline</span></u><span style="color: rgb(0, 0, 0);">: Choose whether to include the timeline at the bottom of the map</span>
    - <u><span style="color: rgb(0, 0, 0);">Markerclusters:</span></u><span style="color: rgb(0, 0, 0);"> Choose whether records clump together when the map is zoomed out (recommended)</span>
    - <u><span style="color: rgb(0, 0, 0);">Show rollover:</span></u><span style="color: rgb(0, 0, 0);"> Should tooltips appear when users hover over buttons on the map?</span>
    - <u><span style="color: rgb(0, 0, 0);">Allow modify symbology:</span></u><span style="color: rgb(0, 0, 0);"> Enable custom symbology (only relevant if using a Map Document)</span>
    - *Controls to*<span style="color: rgb(0, 0, 0);"> </span>*show*<span style="color: rgb(0, 0, 0);">:</span>
    - <u><span style="color: rgb(0, 0, 0);">Legend</span></u><span style="color: rgb(0, 0, 0);">: Allow visitors to change the base map, and turn on or off any result sets or map documents currently affecting the map. The legend appears in the top right corner of the map. Other controls appear down the left hand side.</span>
    - <u><span style="color: rgb(0, 0, 0);">Bookmark:</span></u><span style="color: rgb(0, 0, 0);"> Allow visitors to drop pins on the map</span>
    - <u><span style="color: rgb(0, 0, 0);">Geocoder:</span></u><span style="color: rgb(0, 0, 0);"> Allow visitors to search for places on the map</span>
    - <u><span style="color: rgb(0, 0, 0);">Print</span></u><span style="color: rgb(0, 0, 0);">: Allow visitors to print an image of the map</span>
    - *Visible in Legend:* <span style="color: rgb(0, 0, 0);">If you have enabled the legend under </span>*Controls to Show*<span style="color: rgb(0, 0, 0);">, then you can choose which controls are available in the legend here.</span>
    - *Expand at start*
    - *Zoom limits:*<span style="color: rgb(0, 0, 0);"> Prevent users from zooming too far in or out on the map.</span>

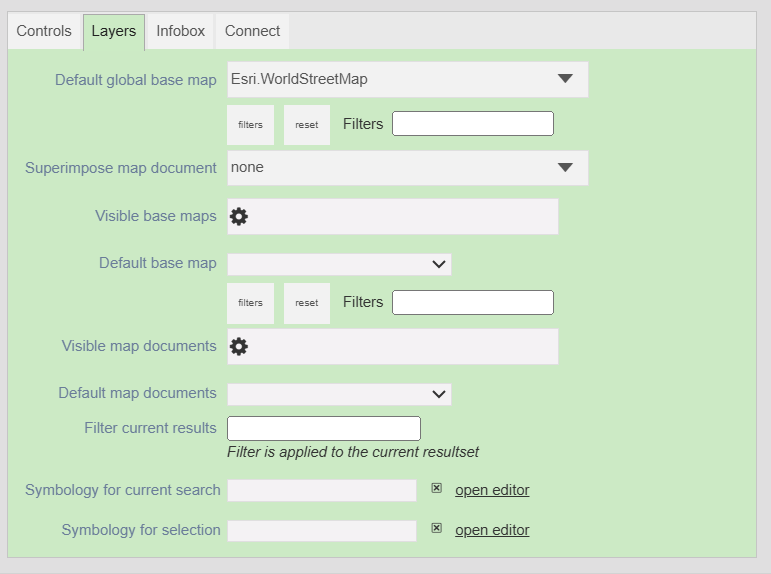
##### <span style="color: rgb(0, 0, 0);">Layers Tab</span>

![](https://docs.heuristref.net/uploads/images/gallery/2026-07/embedded-image-sum9yy8t.png)

**Default global base map:**<span style="color: rgb(0, 0, 0);"> Choose the 'basemap' that is used to create the image of the earth's surface. Heurist comes with many base maps. Advanced users can apply 'filters' to the base map to e.g. invert the colours or make the map sepia.</span>

**Superimpose map document:**<span style="color: rgb(0, 0, 0);"> Select a Map Document from the database to govern the appearance of the map.</span>

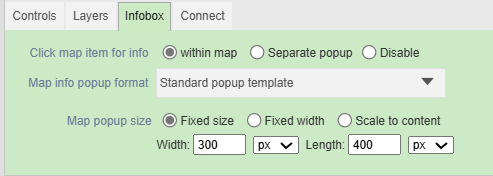
##### <span style="color: rgb(0, 0, 0);">Infobox Tab</span>

![](https://docs.heuristref.net/uploads/images/gallery/2026-07/embedded-image-idpamr04.png)

**Click map item for info:**<span style="color: rgb(0, 0, 0);"> You have three options for how record data will be displayed when a record is clicked on the map.</span>

**Map info popup format:**<span style="color: rgb(0, 0, 0);"> If you don't wish to use the default format, you can define an alternative format using Heurist's </span>[<span style="color: rgb(0, 0, 255);">Custom Report builder</span>](https://heuristref.net/h6-alpha/Heurist_Help_System/view/588)<span style="color: rgb(0, 0, 0);">. If you do this, you will probably wish to change the </span>**Map popup size**<span style="color: rgb(0, 0, 0);"> using.</span>

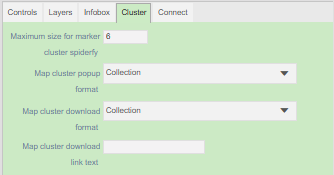
##### <span style="color: rgb(0, 0, 0);">Cluster tab</span>

[![image.png](https://docs.heuristref.net/uploads/images/gallery/2026-07/scaled-1680-/JfTimage.png)](https://docs.heuristref.net/uploads/images/gallery/2026-07/JfTimage.png)

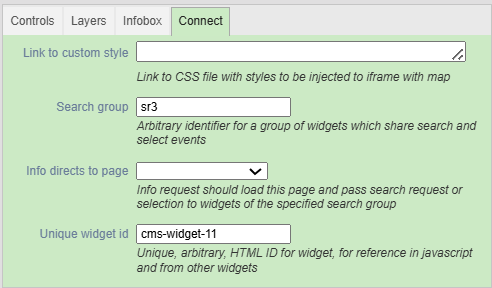
##### <span style="color: rgb(0, 0, 0);">Connect Tab</span>

![](https://docs.heuristref.net/uploads/images/gallery/2026-07/embedded-image-e88xrome.png)

**Link to custom style:**<span style="color: rgb(0, 0, 0);"> If you wish to inject custom CSS into the map, provide the &lt;link&gt; element here.</span>

**Search group:**<span style="color: rgb(0, 0, 0);"> Name the search realm that the widget belongs to. </span>*By default, all widgets belong to 'search\_group\_1*<span style="color: rgb(0, 0, 0);">'. </span>*If you choose to use this feature, do ensure that you type the names of each different search realm **exactly**. Any typo will prevent the feature from working.*

**Info directs to**<span style="color: rgb(0, 0, 0);"> </span>**page**<span style="color: rgb(0, 0, 0);">: Use this feature if you wish to direct visitors to a different page on the site when they select a record on the map.</span>

**Unique widget id:**<span style="color: rgb(0, 0, 0);"> A name for the map widget on this page. This feature is only useful if you are using custom Javascript or CSS in your website.</span>

\-----------------------------------------------------------------------------------------------------------------------------

#### <span style="color: rgb(0, 0, 0);">Story Map \[TO DO\]</span>

\-----------------------------------------------------------------------------------------------------------------------------

#### <span style="color: rgb(0, 0, 0);">Network Graph \[TO DO\]</span>

\-----------------------------------------------------------------------------------------------------------------------------

#### <span style="color: rgb(0, 0, 0);">Menu \[TO DO\]</span>

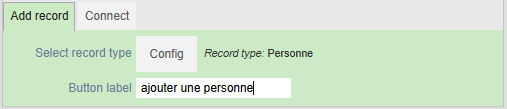
#### <span style="color: rgb(0, 0, 0);">Add record</span>

<span style="color: rgb(0, 0, 0);">This widget display a button to add contributions to the database : it open a form to fill in, in the same way as in the populate menu.</span>

<span style="color: rgb(0, 0, 0);">The administrator has to define the Record Type in which the data will be created :</span>

![](https://docs.heuristref.net/uploads/images/gallery/2026-07/embedded-image-kthfsdwn.png)

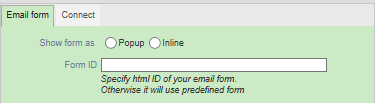
#### <span style="color: rgb(0, 0, 0);">Email Us Form</span>

<span style="color: rgb(0, 0, 0);">The "email us form" widget allows you to add a contact form to your page, so that visitors can email you without you revealing your email address publicly on the internet. The form will send emails to the owner of the database.</span>

[![image.png](https://docs.heuristref.net/uploads/images/gallery/2026-07/scaled-1680-/uwIimage.png)](https://docs.heuristref.net/uploads/images/gallery/2026-07/uwIimage.png)

[![image.png](https://docs.heuristref.net/uploads/images/gallery/2026-07/scaled-1680-/m4Dimage.png)](https://docs.heuristref.net/uploads/images/gallery/2026-07/m4Dimage.png)
#### <span style="color: rgb(255, 0, 0); background-color: rgb(182, 215, 168);">====13/05/2025 - reprendre ici=====</span>

### **2.2.4. Using CSS (=== Styling**<span style="color: rgb(0, 0, 0);">)</span>

#### **Adding CSS to your Heurist website**

[<span style="color: rgb(0, 0, 255);">Publish</span>](https://heuristref.net/h6-alpha/?db=Heurist_Help_System&website&id=39&pageid=673)<span style="color: rgb(0, 0, 0);"> &gt; </span>[<span style="color: rgb(0, 0, 255);">Website</span>](https://heuristref.net/h6-alpha/?db=Heurist_Help_System&website&id=39&pageid=667)

<span style="color: rgb(0, 0, 0);">Cascading Style Sheets (CSS) is a programming language used to format webpages on the internet. </span>**If you arrange the appropriate authorisation with your server administrator**<span style="color: rgb(0, 0, 0);">, then you will be able to write CSS code to adjust the appearance of your website. If you are willing learn some basic CSS, then you will be able to powerfully customise your Heurist site, changing its appearance significantly. If you choose to go further with CSS, you can even introduce animations and mobile-friendly layouts to your site.</span>

<span style="color: rgb(0, 0, 0);">It can be daunting when you get started with CSS, but the best approach is trial-and-error. Edit the CSS, see how the website looks, then keep tinkering until you get the appearance you want. You can use the developer tools in </span>[<span style="color: rgb(0, 0, 255);">Chrome</span>](https://developer.chrome.com/docs/devtools/)<span style="color: rgb(0, 0, 0);"> or </span>[<span style="color: rgb(0, 0, 255);">Firefox</span>](https://firefox-dev.tools/)<span style="color: rgb(0, 0, 0);"> to explore the structure of your website, and to see exactly how the CSS is applying to it.</span>

<span style="color: rgb(0, 0, 0);">For a brief introduction to the fundamental concepts of CSS, and links to some useful resources, see our </span>[<span style="color: rgb(0, 0, 255);">Publish Menu Tutorial</span>](https://heuristnetwork.org/tutorial-7-publish-menu/#tutorial-walkthrough%7C1)<span style="color: rgb(0, 0, 0);">.</span>

<span style="color: rgb(0, 0, 0);">There are five main ways you can incorporate custom CSS into your website. You can:</span>

- <span style="color: rgb(0, 0, 0);">Add a global stylesheet to the website</span>
- <span style="color: rgb(0, 0, 0);">Add individual stylesheets to particular webpages</span>
- <span style="color: rgb(0, 0, 0);">Add custom CSS into a Custom Report (see the Custom Reports </span>[<span style="color: rgb(0, 0, 255);">Advanced Usage</span>](https://heuristref.net/h6-alpha/?db=Heurist_Help_System&website&id=39&pageid=737)<span style="color: rgb(0, 0, 0);"> page).</span>
- <span style="color: rgb(0, 0, 0);">Add CSS to individual page elements (not recommended)</span>
- <span style="color: rgb(0, 0, 0);">Import CSS from elsewhere</span>

<span style="color: rgb(0, 0, 0);">Before we cover these topics, however, you need to know how the custom CSS you write will link up with your website.</span>

#### **Controlling how CSS affects your website**

<span style="color: rgb(0, 0, 0);">A CSS file is made up of a series of </span>**selectors** <span style="color: rgb(0, 0, 0);">and </span>**declaration blocks** <span style="color: rgb(0, 0, 0);">. The </span>**selector**  <span style="color: rgb(0, 0, 0);">says which elements of a page you would like to format, and the </span>**declaration block** <span style="color: rgb(0, 0, 0);">says what formatting you would like to apply to the selected element. For example, let's say you wanted all paragraphs on your website to have blue text and two lines of space above and below them. You could write the following code:</span>

<span style="color: rgb(0, 0, 0);">p {</span>  
<span style="color: rgb(0, 0, 0);"> color: blue;</span>  
<span style="color: rgb(0, 0, 0);"> margin-block-start: 2em;</span>  
<span style="color: rgb(0, 0, 0);"> margin-block-end: 2em;</span>  
<span style="color: rgb(0, 0, 0);"> }</span>

<span style="color: rgb(0, 0, 0);">In this example, the selector is p . It will apply to all p tags – i.e. it will apply to all paragraphs.</span>

<span style="color: rgb(0, 0, 0);">But what if you only want to apply your formatting to some elements? For example, perhaps you are writing an internet novel with two narrators. You want all the paragraphs spoken by Narrator One to be in blue, and all paragraphs spoken by Narrator Two to be in red. To achieve this, you can use CSS classes . Take a look at the code below:</span>

<span style="color: rgb(0, 0, 0);">p.narrator-one {</span>  
<span style="color: rgb(0, 0, 0);"> color: blue;</span>  
<span style="color: rgb(0, 0, 0);"> }</span>

<span style="color: rgb(0, 0, 0);">p.narrator-two {</span>  
<span style="color: rgb(0, 0, 0);"> color: red;</span>  
<span style="color: rgb(0, 0, 0);"> }</span>

<span style="color: rgb(0, 0, 0);">In this example, we use a period "." to select only paragraphs that have a certain class. "p.narrator-one" selects all paragraphs with the class "narrator-one", and "p.narrator-two" selects all paragraphs with the class "narrator-two". You can actually use a class selector on its own. In this case, it will have a slightly different meaning:</span>

<span style="color: rgb(0, 0, 0);">.narrator-one {</span>  
<span style="color: rgb(0, 0, 0);"> color: blue;</span>  
<span style="color: rgb(0, 0, 0);"> }</span>

<span style="color: rgb(0, 0, 0);">This example will select all elements with the class .narrator-two, whether they are paragraphs or divisions or headings or any other element. Though this particular example will only have an effect if the element contains some text, since the 'color' declaration only affect the colour of text. There are different CSS declaration for the colour of the element's border or background.</span>

<span style="color: rgb(0, 0, 0);">If you just want to style one particular element on a page, you can select it by id using the hash "#" symbol. For example: </span>

<span style="color: rgb(0, 0, 0);">\#my-special-element {</span>  
<span style="color: rgb(0, 0, 0);"> border: solid green 5px;</span>  
<span style="color: rgb(0, 0, 0);"> }</span>

<span style="color: rgb(0, 0, 0);">This will select the element on the page with the id 'my-special-element', and give it a green border 5 pixels thick. If you want to be more specific, you could also write something like h1#my-special-element, which would select just the heading level 1 that has the id 'my-special-element.'</span>

<span style="color: rgb(0, 0, 0);">We could go into much more depth about CSS selectors and declaration blocks, but if you really want to learn all the details, then you should do one of the many excellent </span>[<span style="color: rgb(0, 0, 0);">CSS Tutorials </span>](https://www.w3schools.com/css/default.asp)<span style="color: rgb(0, 0, 0);">available on the internet. The key question here is:</span>

#### **How do I assign a class or id to an element on my Heurist website?**

**Assign classes**

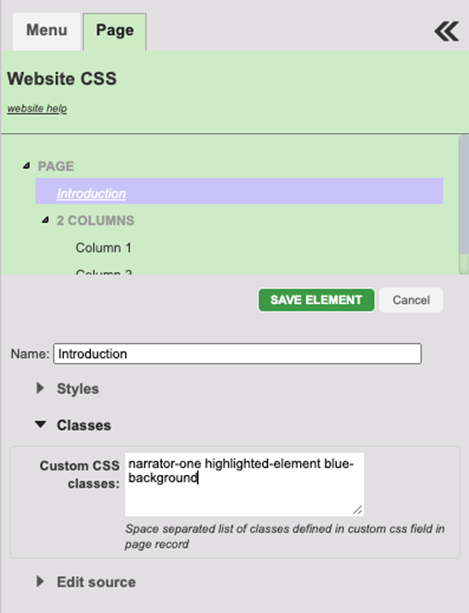
<span style="color: rgb(0, 0, 0);">To assign one or more classes to an element on a Heurist page, click on the element in the treeview and open the 'Classes' section. You can add as many classes as you like, seperated by spaces.</span>

<span style="color: rgb(0, 0, 0);">NB: Obviously this means that class names cannot have spaces in them. The convention in CSS is to replace spaces with hyphens. Hence in the example image, the classes are narrator-one, highlighted-element and blue-background.</span>

![](https://docs.heuristref.net/uploads/images/gallery/2026-07/embedded-image-ddwkj0ng.png)

**Assign an id or add element CSS (right image)**

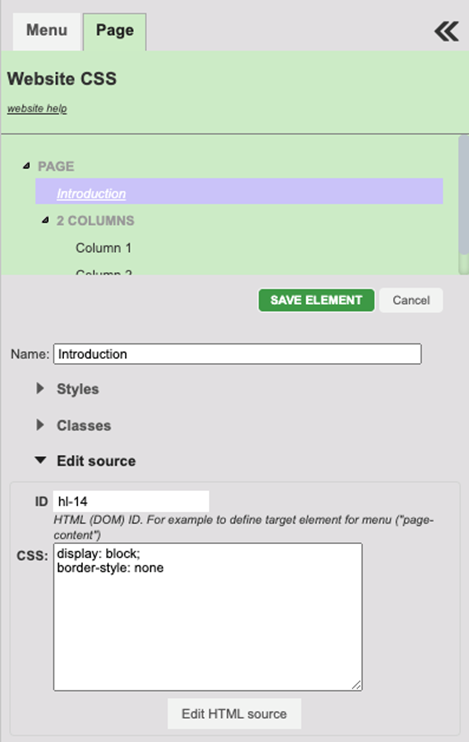
<span style="color: rgb(0, 0, 0);">Every element you insert in the Heurist treeview is given an ID automatically. If you click 'Edit source', you will see the automatically assigned id in the ID field. You can change this as you wish. You will also see a box for applying CSS directly to this particular element. This box is only for special cases – as much as possible, you should use stylesheets that apply to entire pages or entire websites, as described below.</span>

**Editing the source (advanced; right image)**

<span style="color: rgb(0, 0, 0);">If you wish to apply CSS to particular elements </span>*inside*<span style="color: rgb(0, 0, 0);"> one of the element in the treeview, then you will need to click 'Edit HTML source' under the 'Edit source' heading, and assign classes or an id to the relevant elements directly. There are good explanations about how to </span>[<span style="color: rgb(0, 0, 255);">assign a class</span>](https://www.w3schools.com/html/html_classes.asp)<span style="color: rgb(0, 0, 0);"> or </span>[<span style="color: rgb(0, 0, 255);">give an id</span>](https://www.w3schools.com/html/html_id.asp)<span style="color: rgb(0, 0, 0);"> to an HTML element on W3Schools.</span>

![](https://docs.heuristref.net/uploads/images/gallery/2026-07/embedded-image-psyqaq1l.png)

### **Some useful selectors (advanced)**

<span style="color: rgb(0, 0, 0);">If you are ambitious, and wish to develop a CSS template that thoroughly formats your whole website, it can be useful to know some of Heurist's key selectors. Click below to expand the list.</span>

<span style="color: rgb(0, 0, 0);"> Useful selectors for Heurist websites</span>

**\#main-content:**<span style="color: rgb(0, 0, 0);"> All Heurist sites by default are packaged into three main div elements. The #main-content element occupies most of the screen, and is where the content of the webpage is loaded. To apply formatting to elements inside #main-content, you can use a </span>[<span style="color: rgb(0, 0, 255);">child or sibling selector </span>](https://css-tricks.com/child-and-sibling-selectors/)<span style="color: rgb(0, 0, 0);">. For example, the selector #main-content p {/\* some formatting \*/} will apply formatting to all paragraphs </span>*inside* <span style="color: rgb(0, 0, 0);">the #main-content division.</span>

**\#main-header:**<span style="color: rgb(0, 0, 0);"> The #main-header element appears at the top of the screen. </span>**NB:** <span style="color: rgb(0, 0, 0);">If you wish to change the appearance of the #main-header using CSS, then you are strongly advised to define your own custom header in the 'custom header' field of the website record. Make sure to include all the named elements below (#main-title etc.), if you want Heurist to automatically generate the website's title, menu and so on.</span>

**\#main-footer:**<span style="color: rgb(0, 0, 0);">The #main-footer element appears at the bottom of the screen.</span>

**\#main-logo:**<span style="color: rgb(0, 0, 0);"> The #main-logo is a div element in the left of the #main-header, which contains the site logo.</span>

**\#alt-logo:**<span style="color: rgb(0, 0, 0);"> The #alt-logo is a div to the right of the #main-header, which contains the site's second logo, if there is one.</span>

**\#main-title:**<span style="color: rgb(0, 0, 0);"> The #main-title div contains an &lt;h1&gt; element with the main title of the site</span>

**\#main-menu:**<span style="color: rgb(0, 0, 0);"> The #main-menu is a div in the #main-header containing an unordered list (a &lt;ul&gt; with &lt;li&gt; tags for each menu item).</span>

**.smarty-report:**<span style="color: rgb(0, 0, 0);"> This class is assigned to the main-content of any custom reports embedded in your site. Any styles that you apply to your website will automatically be applied to custom reports as well. If you would like to define special styles that only apply to items inside a custom report, then you can use the </span>**.smarty-report** <span style="color: rgb(0, 0, 0);">selector. E.g. </span>**.smarty-report p {** ***some styles*** **}** <span style="color: rgb(0, 0, 0);">would apply to any paragraphs </span>*inside*<span style="color: rgb(0, 0, 0);"> a custom report, but would not affect paragraphs in the rest of your site.</span>

**heurist-searchFaceted-header**<span style="color: rgb(0, 0, 0);">. define it in custom css. This is the header which appears above the facet searches</span>

#### <span style="color: rgb(0, 0, 0);">Where do I put my CSS?</span>

<span style="color: rgb(0, 0, 0);">As mentioned above, there are five main ways you can incorporate CSS into your website.</span>

##### <span style="color: rgb(0, 0, 0);">As a global stylesheet in the website record</span>

<span style="color: rgb(0, 0, 0);">The best place to put your CSS is in the database record for your website. Any CSS that you place here will be loaded when visitors first visit your site, and will be applied to every page of your website. This allows you to create a consistent look and feel for the entire website, with a coherent colour scheme, fonts, and layout.</span>

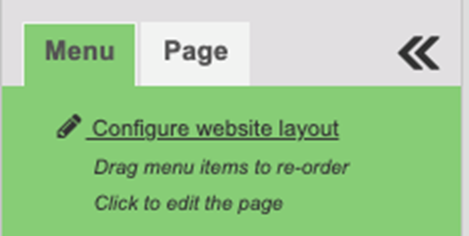
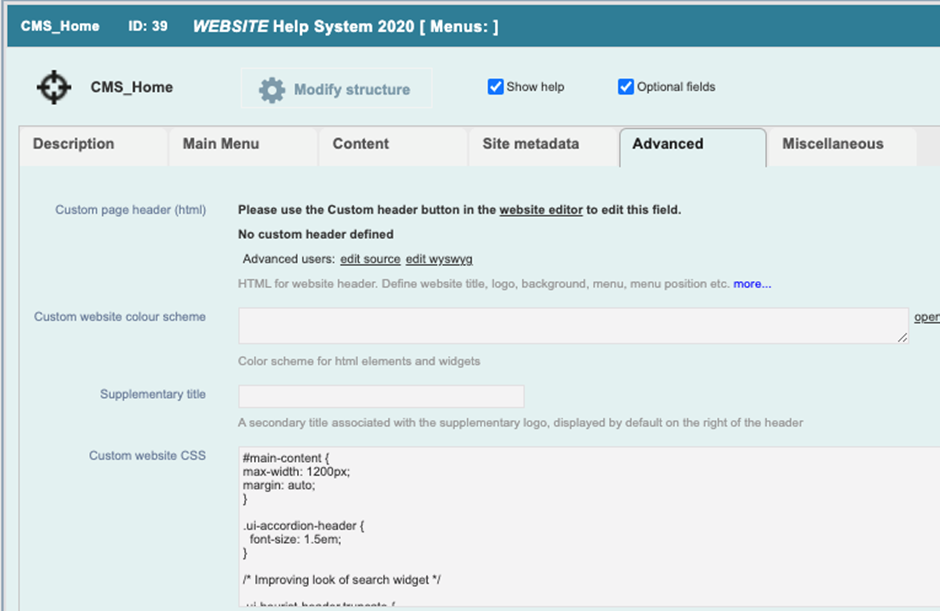
<span style="color: rgb(0, 0, 0);">To add CSS to your entire website, click 'Menu' in the top left of the treeview in the web editor, and then click 'configure website layout'. Go to the 'Advanced' tab, and you will see the textbox where you can type in your custom CSS.</span>

![](https://docs.heuristref.net/uploads/images/gallery/2026-07/embedded-image-59hpulf0.png)

<span style="color: rgb(0, 0, 0);">You can also access the website record in the Explore Menu, just like any other record. To find the website record, type 'website' in the searchbox, or filter by Entities in the Explore Tray, and choose 'CMS\_Home' as the Record Type. Any websites you have created will appear as records in the Results Pane.</span>

<span style="color: rgb(0, 0, 0);"> </span>![](https://docs.heuristref.net/uploads/images/gallery/2026-07/embedded-image-uuvz6nni.png)

##### <span style="color: rgb(0, 0, 0);"> </span>**As a page stylesheet in a webpage record**

<span style="color: rgb(0, 0, 0);">You can also create page-specific CSS. This is a good idea when one particular page of your site has a special layout or functionality. That particular page may need a special set of CSS classes, and may have many special elements with particular ids.</span>

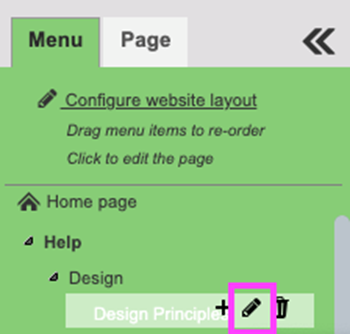
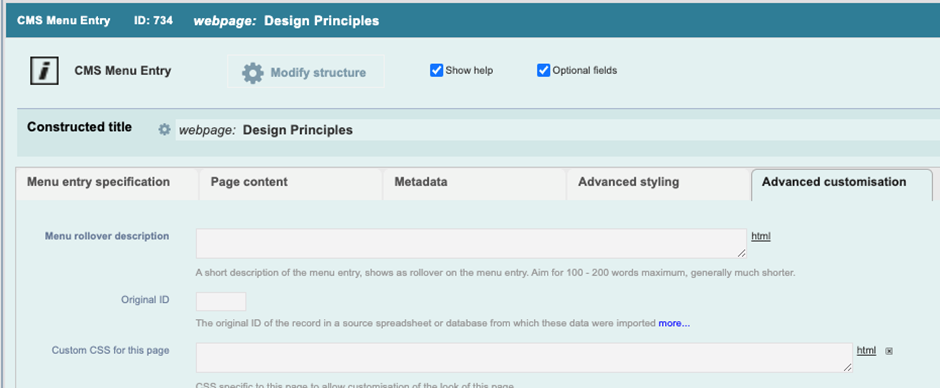
<span style="color: rgb(0, 0, 0);">To add CSS to a particular webpage, click 'Menu' in the treeview of the web editor, and find the relevant page in the treeview. Click the pencil icon to open the database record for that webpage. Under the 'Advanced Customisation' tab, you will find the text field for 'Page CSS'.</span>

![](https://docs.heuristref.net/uploads/images/gallery/2026-07/embedded-image-gni7up85.png)

<span style="color: rgb(0, 0, 0);">As with the website record, you can also locate page records through the Explore Menu. Simply look for the 'CMS Menu Entry' record type, or search for the name of the page you wish to add CSS to.</span>

<span style="color: rgb(0, 0, 0);"> </span>![](https://docs.heuristref.net/uploads/images/gallery/2026-07/embedded-image-ujzvupas.png)

##### <span style="color: rgb(0, 0, 0);"> Add CSS to a Custom Report</span>

<span style="color: rgb(0, 0, 0);">If you wish to style a Custom Report, then you can add CSS at the top of the report, as described in the Custom Report </span>[<span style="color: rgb(0, 0, 255);">Advanced Usage</span>](https://heuristref.net/h6-alpha/?db=Heurist_Help_System&website&id=39&pageid=737)<span style="color: rgb(0, 0, 0);"> page.</span>

##### <span style="color: rgb(0, 0, 0);">Add CSS to a particular element</span>

<span style="color: rgb(0, 0, 0);">Your final option for writing your own CSS is to use '</span>[<span style="color: rgb(0, 0, 255);">inline styles</span>](https://www.w3schools.com/CSS/css_howto.asp)<span style="color: rgb(0, 0, 0);">'. There are two ways to do this. As depicted above, when you edit an element of a webpage in the Treeview, you can find a box for 'CSS' in the 'Edit Source' section. Any CSS you insert here will be applied to that element of the page. If you wish to provide inline CSS for elements within the page element (e.g. paragraphs in a textbox), then you can click 'Edit HTML Source', and type the inline styles into the screen.</span>

<span style="color: rgb(0, 0, 0);">Generally we do not advise this use of CSS. It should only be used when you encounter problems with </span>[<span style="color: rgb(0, 0, 255);">specificity</span>](https://developer.mozilla.org/en-US/docs/Web/CSS/Specificity)<span style="color: rgb(0, 0, 0);">, and cannot override a global style any other way.</span>

##### <span style="color: rgb(0, 0, 0);"> External CSS/JS</span>

<span style="color: rgb(0, 0, 0);">You can also import CSS from an external source, using the 'External Scripts and Styles' field in either the Website record or the record for a particular Webpage. The most likely use case is if you wish to use </span>[<span style="color: rgb(0, 0, 255);">Bootstrap </span>](https://getbootstrap.com/)<span style="color: rgb(0, 0, 0);">in your website. If you wish to use this feature, you should certainly get in touch with the Heurist team for more detailed advice.</span>

<span style="color: rgb(0, 0, 0);">To link to an external CSS or JS to your site, you need to write the relevant html tag in the 'External Scripts and Styles' field. For a CSS file you need to use a link tag. For JS, you need to use a script tag. So, for example, if you wish to use the Bootstrap on your site, you would need to insert something like the following into the 'External Scripts and Styles' field:</span>

<span style="color: rgb(0, 0, 0);">&lt;link href="https://cdn.jsdelivr.net/npm/bootstrap@5.1.3/dist/css/bootstrap.min.css" rel="stylesheet" integrity="sha384-1BmE4kWBq78iYhFldvKuhfTAU6auU8tT94WrHftjDbrCEXSU1oBoqyl2QvZ6jIW3" crossorigin="anonymous"&gt;</span>

<span style="color: rgb(0, 0, 0);">&lt;script src="https://cdn.jsdelivr.net/npm/bootstrap@5.1.3/dist/js/bootstrap.bundle.min.js" integrity="sha384-ka7Sk0Gln4gmtz2MlQnikT1wXgYsOg+OMhuP+IlRH9sENBO0LRn5q+8nbTov4+1p" crossorigin="anonymous"&gt;&lt;/script&gt;</span>

<span style="color: rgb(0, 0, 0);">If you have written CSS on your own machine, and wish to upload the stylesheet, then you can choose to do this as an 'External Stylesheet' using Heurist's 'Manage Files' tool. You may find this more convenient than copying-and-pasting the CSS into the 'Custom CSS' field, particularly if you have mulitple websites using the same CSS in your database.</span>

<span style="color: rgb(0, 0, 0);">If you wish to take this option, upload the CSS file using 'Manage Files', and then copy-and-paste the URL for the file using the built-in URL-copying tool. Then paste the URL using the below template into 'External Scripts and Styles':</span>

<span style="color: rgb(0, 0, 0);">&lt;link href=&lt;copied url&gt; rel="stylesheet"&gt;</span>

<span style="color: rgb(0, 0, 0);"> === A REPRENDRE A PARTIR D’ICI !===</span>

##### <span style="color: rgb(0, 0, 0);">Changing header styles</span>

<span style="color: rgb(0, 0, 0); background-color: rgb(255, 255, 0);">&lt;to be written, please contact Heurist team for instructions / assistance</span><span style="color: rgb(0, 0, 0);">&gt;</span>

##### <span style="color: rgb(0, 0, 0);">Loading record view or custom format in a panel</span>

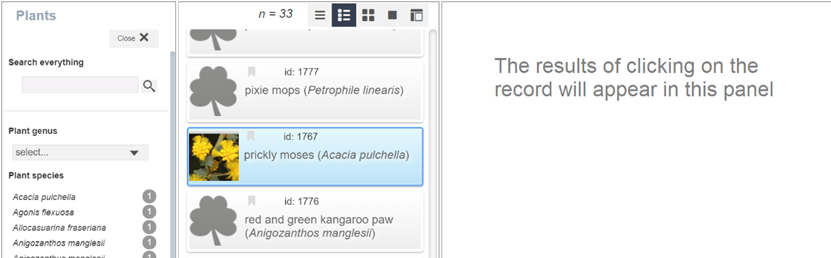
<span style="color: rgb(0, 0, 0);">The aim is to carry out a search, click on a record in the results panel, and display the data for the selected record in a separate panel. This is achieved in two steps:</span>

- <span style="color: rgb(0, 0, 0);">Add the panel in which you want to display the record view as a </span>*custom report*<span style="color: rgb(0, 0, 0);"> widget. This is automatically tied (by default) to the search results on the same page;</span>
- <span style="color: rgb(0, 0, 0);">Set the results panel widget parameters to </span>*Click to view record = disable*<span style="color: rgb(0, 0, 0);"> and choosing an appropriate record view template in the </span>*Record view template* <span style="color: rgb(0, 0, 0);">dropdown (record view format can be either the default format used in the standard interface or any of the custom report formats defined in the Custim format tab of the Explore pages).</span>

![](https://docs.heuristref.net/uploads/images/gallery/2026-07/embedded-image-i46stvtz.png)<span style="color: rgb(0, 0, 0);"> </span>

![](https://docs.heuristref.net/uploads/images/gallery/2026-07/embedded-image-v38bvcf3.png)

**Link/button to pop up edit form**

<span style="color: rgb(0, 0, 0);">To popup a new record form in a large window rather than a new tab (note that this also makes the record owned by the current user)</span>

<span style="color: rgb(0, 0, 0);"> &lt;a href="#" onclick="{window.hWin.HEURIST4.ui.openRecordEdit(-1, null, {new\_record\_params:{rt:54,ro:'current\_user',rv:'public'}}); return false;}" </span>

**Running Javascript**

<span style="color: rgb(0, 0, 0);">To avoid the risks of out-of-control websites, this requires authorisation by the system adminstrator. Contact the system adminstrator / Heurist team to have your website added.</span>

**Editing pages in standard edit form**

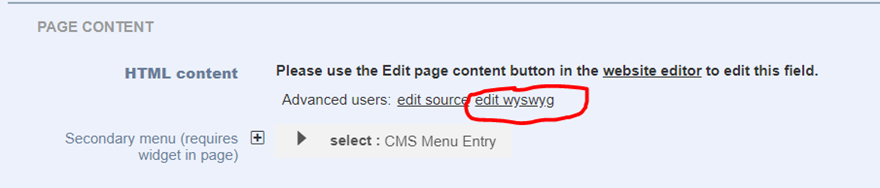
<span style="color: rgb(0, 0, 0);">Although it is possible to edit the content of a web page directly in the standard Heurist record edit form, we recommend editing it within the CMS editor, as this provides additional capabilites including the insertion of images and database widgets (filters, visualisations and layouts). </span>
<span style="color: rgb(0, 0, 0);"> </span>![](https://docs.heuristref.net/uploads/images/gallery/2026-07/embedded-image-0dykzve3.png)

<span style="color: rgb(0, 0, 0);">However direct editing in the standard data entry form can be useful if you are only dealing with entering text or fixing up text in existing records. </span>

# <span style="color: rgb(0, 0, 0);">FAQ</span>

## <span style="color: rgb(34, 34, 34);"> </span><span style="color: rgb(34, 34, 34); background-color: rgb(255, 255, 0);">\[Custom style for Standard Record view ?\]</span>

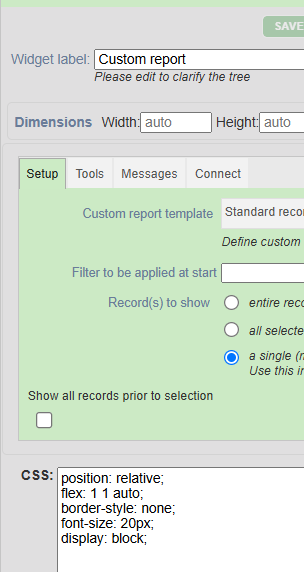
<span style="color: rgb(34, 34, 34);">This issue can be resolved by setting custom styles for desired elements. I've added the following styles for your page:</span>

<span style="color: rgb(34, 34, 34); background-color: rgb(255, 255, 255);">.heurist-widget{</span>  
<span style="color: rgb(34, 34, 34); background-color: rgb(255, 255, 255);"> font-size:18px !important;</span>  
<span style="color: rgb(34, 34, 34); background-color: rgb(255, 255, 255);"> }</span>  
<span style="color: rgb(34, 34, 34); background-color: rgb(255, 255, 255);">.recordTitle{</span>  
<span style="color: rgb(34, 34, 34); background-color: rgb(255, 255, 255);"> font-size:20px !important;</span>  
<span style="color: rgb(34, 34, 34); background-color: rgb(255, 255, 255);"> }</span>

All font-size are relative to body font size

Font-size is being taken from CSS for custom report widget
![](https://docs.heuristref.net/uploads/images/gallery/2026-07/embedded-image-0bevsylb.png)<span style="color: rgb(0, 0, 255); background-color: rgb(255, 255, 255);"> </span>

![](https://docs.heuristref.net/uploads/images/gallery/2026-07/embedded-image-4naydyxr.png)<span style="color: rgb(0, 0, 255); background-color: rgb(255, 255, 255);">20px </span>![](https://docs.heuristref.net/uploads/images/gallery/2026-07/embedded-image-rplovyvp.png)<span style="color: rgb(0, 0, 255); background-color: rgb(255, 255, 255);">10px</span>

If it is not defined it takes font-size from user preferences

If both values above not defined it takes body.popup.font-size from h4styles.css 11px

##### <span style="color: rgb(0, 0, 0);">Examples of how to lay out a web page using DIVs</span>

##### <span style="color: rgb(0, 0, 0);">Heurist blog page (with widgets removed)</span>

<span style="color: rgb(0, 0, 0);">Defines lefthand panel for saved filters or search widget and rfull height righthand panel for blog entries (a resutkls list in full content mode)</span>

<span style="color: rgb(0, 0, 0);">&lt;div style="</span>**position:absolute;left:5px;width:315px;height:100%**<span style="color: rgb(0, 0, 0);">"&gt;</span>  
<span style="color: rgb(0, 0, 0);">&lt;p style="padding:0 5px;"&gt;&lt;/p&gt;</span>  
<span style="color: rgb(0, 0, 0);">&lt;div … style="</span>**position: absolute;top:70px; bottom:5px; width: 315px;**<span style="color: rgb(0, 0, 0);">"… &gt; &lt;/div&gt;</span>  
<span style="color: rgb(0, 0, 0);">&lt;/div&gt;</span>  
<span style="color: rgb(0, 0, 0);">&lt;div … style="</span>**position: absolute; border: none; left:322; right:0;top:0;bottom:5px**<span style="color: rgb(0, 0, 0);">"… &gt;</span>  
<span style="color: rgb(0, 0, 0);">&lt;/div&gt;</span>

#### <span style="color: rgb(0, 0, 0);">Cardinal view layout</span>

<span style="color: rgb(0, 0, 0);">&lt;div id="cardinal1" style="background: white; position: relative; border: 1px solid gray; height: 100%; width: 100%;"&gt;</span>  
<span style="color: rgb(0, 0, 0);"> &lt;div id="westpane"&gt;WEST&lt;/div&gt;</span>  
<span style="color: rgb(0, 0, 0);"> &lt;div id="centerpane"&gt;CENTER&lt;/div&gt;</span>  
<span style="color: rgb(0, 0, 0);"> &lt;div id="eastpane"&gt;EAST&lt;/div&gt;</span>  
<span style="color: rgb(0, 0, 0);">&lt;/div&gt;</span>

<span style="color: rgb(0, 0, 0);">&lt;div id="mywidget\_2203" class="mceNonEditable" data-heurist-app-id="heurist\_Cardinals"&gt;</span>  
<span style="color: rgb(0, 0, 0);"> {"container":"cardinal1", "tabs": {"west":{"id":"westpane","size":"300","minSize":"150"},"center":{"id":"centerpane"},"east": </span>  
<span style="color: rgb(0, 0, 0);"> {"id":"eastpane","initClosed":true}}}</span>  
<span style="color: rgb(0, 0, 0);">&lt;/div&gt;</span>

#### **Strategy**

1. <span style="color: rgb(0, 0, 0);">Create the widgets you need without worrying too much where they are located</span>
2. <span style="color: rgb(0, 0, 0);">Open the page in source edit and copy the source to a text editor such as notepad</span>
3. <span style="color: rgb(0, 0, 0);">Return to WYSIWYG and add Cardinal layout widget</span>
4. <span style="color: rgb(0, 0, 0);">Open source editor again and add the widgets within the cardinal layout divs, for example:</span>

<span style="color: rgb(0, 0, 0);">&lt;div id="mywidget\_6801" class="mceNonEditable" style="width:100;heigth:100;border: 1px solid gray;" data-heurist-app-id="heurist\_Cardinals"&gt;{"container":"cont","tabs":{"west":{"id":"west","initClosed":true},"center":{"id":"center"},"east":{"id":"east","size":300,"minSize":200}}}&lt;/div&gt;</span>

Parameters for each panel can be found here https://plugins.jquery.com/layout/

<span style="color: rgb(0, 0, 0);">Most important are: size, minSize, maxSize, resizable, closable, initClosed</span>

- <span style="color: rgb(0, 0, 0);">Any link on the page with parameters "id" (for the website) and "pageid "(for a menu-page) will navigate to the desired page without reloading.</span>

<span style="color: rgb(0, 0, 0);">&lt;a href="?db=abc&amp;website&amp;id=123&amp;pageid=456"&gt;Open page 456 of website 123&lt;/a&gt;</span>

- <span style="color: rgb(0, 0, 0);">Website URL with &amp;pageid=xx will init this page on load</span>
- <span style="color: rgb(0, 0, 0);">Loaded page reflects in URL</span>

#### <span style="color: rgb(0, 0, 0);">Table View widget</span>

- <span style="color: rgb(0, 0, 0);">There is global variable datatable\_custom\_render</span>
- <span style="color: rgb(0, 0, 0);">In custom js filed assign render function to this variable</span>

<span style="color: rgb(0, 0, 0);">datatable\_custom\_render = function(data, type) </span>  
<span style="color: rgb(0, 0, 0);"> { if (type === 'display') </span>  
<span style="color: rgb(0, 0, 0);"> { return '&lt;span style="color: red; font-style: italic;"&gt;'+ data + '&lt;/span&gt;'; } </span>  
<span style="color: rgb(0, 0, 0);"> return data; </span>  
<span style="color: rgb(0, 0, 0);"> };</span>

- <span style="color: rgb(0, 0, 0);">In widget properties assign this variable for desired column</span>

<span style="color: rgb(0, 0, 0);">{"columns": \[{ "data":"rec\_ID","title":"ID"},{"data":"1","title":"Title","render":datatable\_custom\_render}\]}</span>

<span style="color: rgb(0, 0, 0);">It is possible to define a particular function for every column. In this case define this variable as array of function datatable\_custom\_render=\[foo1{}, foo2{}, foo3{}\] and refer them on “column” by index: "render":datatable\_custom\_render\[2\]</span>

<span style="color: rgb(0, 0, 0);">Load arbitrary style files</span>

<span style="color: rgb(0, 0, 0);">To enable bootstrap styles</span>

- <span style="color: rgb(0, 0, 0);">Define 3 external files to be added to page (in field 2-939)</span>

<span style="color: rgb(51, 51, 51);">&lt;link rel="stylesheet" type="text/css" href="</span>[<span style="color: rgb(17, 85, 204);">https://cdnjs.cloudflare.com/ajax/libs/twitter-bootstrap/4.1.3/css/bootstrap.css"/</span>](https://cdnjs.cloudflare.com/ajax/libs/twitter-bootstrap/4.1.3/css/bootstrap.css%22/)<span style="color: rgb(51, 51, 51);">&gt;</span>

<span style="color: rgb(51, 51, 51);">&lt;link rel="stylesheet" type="text/css" href="</span>[<span style="color: rgb(17, 85, 204);">https://cdn.datatables.net/1.10.21/css/dataTables.bootstrap4.min.css"/</span>](https://cdn.datatables.net/1.10.21/css/dataTables.bootstrap4.min.css%22/)<span style="color: rgb(51, 51, 51);">&gt;</span>

- <span style="color: rgb(0, 0, 0);">Define “classes” parameter for widget options</span>

<span style="color: rgb(0, 0, 0);">{"classes":"table table-striped table-bordered","columns": \[{ …...</span>

#### <span style="color: rgb(0, 0, 0);">==== à relire ====</span>

##### <span style="color: rgb(0, 0, 0);"> Treeview Navigation widget</span>

<span style="color: rgb(0, 0, 0);">This is an extension of the Navigation widget. Now it has 3 modes: horizontal, vertical and treeview. It loads a page depending on “target” field</span>

1. <span style="color: rgb(0, 0, 0);">“Inline” with usage of target field from menu/page record. By default this is #main-content - page will be overloaded</span>
2. <span style="color: rgb(0, 0, 0);">“Inline into #page-content div” (target field from menu/page record will be ignored). You have to add &lt;div id=”page-content”&gt;&lt;/div&gt; next to widget div. In order they will be next to each other either use table or</span>
3. <span style="color: rgb(0, 0, 0);">Float:left for menu widget and display:inline-block for page-content. Or display:inline-block for both</span>

<span style="color: rgb(0, 0, 0);">&lt;div id="mywidget\_879" class="mceNonEditable" style="background: none; position: relative; border: 1px solid green; height: 500px; width: 200px; float: left;" data-heurist-app-id="heurist\_Navigation"&gt;{"menu\_recIDs":"1092,1091,1090","use\_next\_level":false,"orientation":"treeview","target":"inline\_page\_content","init\_at\_once":true,"search\_realm":"sr1"}&lt;/div&gt;</span>

<span style="color: rgb(0, 0, 0);">&lt;div id="page-content" style="display: inline-block; width: 400px; height: 500px; border: 1px solid red;"&gt;&amp;nbsp;&lt;/div&gt;</span>

- <span style="color: rgb(0, 0, 0);">“Popup” (target field from menu/page record will be ignored). </span>
- <span style="color: rgb(0, 0, 0);">Heurist sanitises content to remove javascript which users migth have inserted in html, for security reasons. You can disable this by listing the name of the database in ..../HEURIST/js\_in\_database\_authorised.txt</span>  
    <span style="color: rgb(0, 0, 0);">Example:</span>

<span style="color: rgb(0, 0, 0);">// Sep 2019: This file lists databases on this server which may include JS code in the CMS Home Page or CMS Menu records</span>  
<span style="color: rgb(0, 0, 0);">// All other databases are excluded from executing such code. Order is unimportant.</span>  
<span style="color: rgb(0, 0, 0);">balipaintings</span>  
<span style="color: rgb(0, 0, 0);">ExpertNation</span>  
<span style="color: rgb(0, 0, 0);">etc.</span>

- <span style="color: rgb(0, 0, 0);">The register dataset link on the Discover page is still doing nothing (Chrome, logged in)</span>  
    <span style="color: rgb(0, 0, 0);">TinyMCE erases all javascript from elements. So the only opportunity to assign event listeners is in custom js field. The same issue for Login on mapspaces.</span>  
    <span style="color: rgb(0, 0, 0);">We need to document the way to do this based on the JS in TLCMap\_Clearinghosue website</span>
- <span style="color: rgb(0, 0, 0);">Make a link (or button) popup a new record form in a large window rather than a new tab. Note that this also makes the record owned by the current user.</span>

<span style="color: rgb(0, 0, 0);">&lt;a href="#" onclick="{window.hWin.HEURIST4.ui.openRecordEdit(-1, null,</span>  
<span style="color: rgb(0, 0, 0);">{new\_record\_params:{rt:54,ro:'current\_user',rv:'public'}}); return false;}"</span>  
<span style="color: rgb(0, 0, 0);">rel="noopener"&gt;</span>

- <span style="color: rgb(0, 0, 0);">Besides storing page content in database fields, we have an opportunity to load content for site and pages either from uploaded html files or as smarty output. </span>

<span style="color: rgb(0, 0, 0);">CSS is responsible for colors and positions only. All other properties are set via widget options, although we define some color/appearance styles per every widget (border, background). I believe it would be better to apply our color scheme dialog for CMS website. I’ve added DT\_SYMBOLOGY field to CMS\_HOME in Heurist\_Core\_Definitions - need to synchronise CMS\_HOME structure for existing databases (prior to ~21 Nov) using Structure &gt; Browse templates. So user can set these colors via color scheme dialog.</span>

<span style="color: rgb(0, 0, 0);">In summary, the style of the website is defined through:</span>

1. <span style="color: rgb(0, 0, 0);">Color scheme per CMS website - defined in color scheme dialog;</span>
2. <span style="color: rgb(0, 0, 0);">Widget options - defined in widget properties dialog;</span>
3. <span style="color: rgb(0, 0, 0);">Widget css - position styles (and optionally special color scheme) - defined in widget properties dialog;</span>
4. <span style="color: rgb(0, 0, 0);">Header elements (#main-xxxx) position/visibility and optional colors - defined in “website css” field in “CMS home record”. Use “heurist-header” class for CMS header. </span>

<span style="color: rgb(0, 0, 0);">Parameter “style” for map widget layout\_param. For example: "style":{"color":"#00ff00","fillOpacity":0}. It takes precedence over style defined in 1) top most mapspace 2) user preferences</span>

<span style="color: rgb(0, 0, 0);">Further documentation is in the header of websiteRecord.php</span>

<span style="color: rgb(0, 0, 0);">\#main\_header.ent\_header is hardcoded in websiteRecord.php. It has the following elements</span>  
<span style="color: rgb(0, 0, 0);">\#main-logo - content defined via field "Site logo" (99-51.2-38). On click it reloads main page</span>  
<span style="color: rgb(0, 0, 0);">\#main-logo-alt - content defined via field "Supplementary logo image" (99-51.2-926)</span>  
<span style="color: rgb(0, 0, 0);">\#main-title&gt;h2 - field "Website title" (99-51.2-1)</span>  
<span style="color: rgb(0, 0, 0);">\#main-host - information about host and heurist. Content defined in Heurist settings</span>  
<span style="color: rgb(0, 0, 0);">\#main-menu - generated based on linked Menu/Page records (99-52)</span>  
<span style="color: rgb(0, 0, 0);">\#main-pagetitle&gt;.webpageheading - loaded Page title "Menu label" (99-52.2-1)</span>

- <span style="color: rgb(0, 0, 0);">Header and menu colour colour. Top level menu takes color from #main-header</span>

<span style="color: rgb(0, 0, 0);">\#main-header{</span>  
<span style="color: rgb(0, 0, 0);"> background:rgb(112,146,190);</span>  
<span style="color: rgb(0, 0, 0);">}</span>

- <span style="color: rgb(0, 0, 0);">Getting a logo on the top right of a generated web page using CSS:</span>

<span style="color: rgb(0, 0, 0);">\#main-logo-alt {float:right; display:block !important; min-height: 73px; min-width: 130px;</span>  
<span style="color: rgb(0, 0, 0);"> background:url('./?db=johns\_hamburg&amp;file=0b7475713789fb09e30334c7ae8e094b32e6bd71');</span>  
<span style="color: rgb(0, 0, 0);"> margin: 7px 4px 0 0; background-size: contain; }</span>

- <span style="color: rgb(0, 0, 0);"> Default layout for Heurist CMS web site consists of 3 divs with absolute positions</span>

<span style="color: rgb(0, 0, 0);">main\_header.ent\_wrapper</span>  
<span style="color: rgb(0, 0, 0);">main\_header.ent\_header #main\_header</span>  
<span style="color: rgb(0, 0, 0);">main\_header.ent\_content\_full #main-content-container</span>

<span style="color: rgb(0, 0, 0);">Main setting for these elements is height of header. To change it set:</span>

<span style="color: rgb(0, 0, 0);">main\_header.ent\_header{height:180px} .ent\_content\_full{top:190px}</span>

<span style="color: rgb(0, 0, 0);">HEADER:</span>

<span style="color: rgb(0, 0, 0);">\#main\_header.ent\_header is hardcoded in websiteRecord.php. It has the following elements</span>

<span style="color: rgb(0, 0, 0);"> #main-logo - content defined via field "Site logo" (99-51.2-38). On click it reloads main page</span>

<span style="color: rgb(0, 0, 0);"> #main-logo-alt - content defined via field "Supplementary logo image" (99-51.2-926)</span>

<span style="color: rgb(0, 0, 0);"> #main-title&gt;h2 - field "Website title" (99-51.2-1)</span>

<span style="color: rgb(0, 0, 0);"> #main-host - information about host and heurist. Content defined in Heurist settings</span>

<span style="color: rgb(0, 0, 0);"> #main-menu - generated based on linked Menu/Page records (99-52)</span>

<span style="color: rgb(0, 0, 0);"> #main-pagetitle&gt;.webpageheading - loaded page title "Menu label" (99-52.2-1) </span>

<span style="color: rgb(0, 0, 0);">You may overwrite default styles for these elements in field "Website CSS" (99-51.99-46).</span>

<span style="color: rgb(0, 0, 0);">Background image for #main\_header is defined in field "Banner image" (99-51.99-951).</span>

<span style="color: rgb(0, 0, 0);"> CONTENT:</span>

<span style="color: rgb(0, 0, 0);">\#main-content-container.ent\_content\_full cosist of one element #main-content</span>

<span style="color: rgb(0, 0, 0);">This element is emptied and reloaded for every page of website. Its content is arbitrary and defined via CMS editor or direcееly via record editor in field</span>

<span style="color: rgb(0, 0, 0);"> "Website home page content"/"HTML content". (2-4)</span>

<span style="color: rgb(0, 0, 0);"> After load, Heurist invokes</span>

<span style="color: rgb(0, 0, 0);"> window.hWin.HAPI4.LayoutMgr.appInitFromContainer( document, "#main-content" )</span>

<span style="color: rgb(0, 0, 0);"> This method replaces all div elements with attribute data-heurist-app-id to appropriate Heurist widgets (search, map, result list etc)</span>

<span style="color: rgb(0, 0, 0);">There are 2 fields per menu/page record "target css" and "target element". They are reserved for future use. At the moment page content is always loaded into #main-content and applied general Heurist color scheme unless the style is overdefined for particular widget.</span>

<span style="color: rgb(0, 0, 0);">Content of website can be defined as custom smarty template in field 99-51.2-922.</span>  
<span style="color: rgb(0, 0, 0);">In this case designer has to define at least one element with id #main-content.</span>  
<span style="color: rgb(0, 0, 0);">Element with this name will be used as layout container for widget initialization.</span>  
<span style="color: rgb(0, 0, 0);">All other elements (#main-xxx) are optional. </span>

##### INITIALIZATION workflow:

<span style="color: rgb(0, 0, 0);">On server side:</span>

1. <span style="color: rgb(0, 0, 0);">It loads Home page record </span>
2. <span style="color: rgb(0, 0, 0);">If there is DT\_POPUP\_TEMPLATE field, it executes smarty template, otherwise page html structure and cotent of #main-header is generated in websiteRecord.php</span>

<span style="color: rgb(0, 0, 0);">On client side</span>

1. <span style="color: rgb(0, 0, 0);">HAPI initialization, DB defintions load -&gt; onHapiInit -&gt; onPageInit</span>
2. <span style="color: rgb(0, 0, 0);">onPageInit: init LayoutMgr, init main menu in #main-menu element</span>
3. <span style="color: rgb(0, 0, 0);">loadHomePageContent(pageid): Loads content of page into #main-content and calls widget initialization width LayoutMgr.appInitFromContainer</span>
4. <span style="color: rgb(0, 0, 0);">If database configuration permits only:</span>  
      
    <span style="color: rgb(0, 0, 0);">After widgets initialization it loads javascript (field 2-927) and incapsulate this code into afterPageLoad function. The purpose of this script is additional configuration of widgets on page (that can not be set via cms editor) - mainly addition of event listeners.</span>

<span style="color: rgb(0, 0, 0);">ToDo: This will need an explanation of how to set styles of target element - please could you give me a couple of examples here that I can expand upon:</span>

<span style="color: rgb(0, 0, 0);">For popup use can specify jquery dialog options: </span>

<span style="color: rgb(51, 51, 51);">width:400px;height:200px;title:"Kuku";resizable:true;position:{ "my": "left top", "at": "left+100 top+200"},</span>[<span style="color: rgb(17, 85, 204);">modal</span>](https://api.jqueryui.com/dialog/#option-modal)<span style="color: rgb(51, 51, 51);"> </span>[<span style="color: rgb(17, 85, 204);">draggable</span>](https://api.jqueryui.com/dialog/#option-draggable)

<span style="color: rgb(0, 0, 0);">Position is relative to window. User can define “of” param { "my": "left top", "at": "left+100 top+200", of:”#id-of-element”}</span>

<span style="color: rgb(0, 0, 0);">css for content: background:red;font-size:4em and others</span>

<span style="color: rgb(0, 0, 0);">For non-pop this is usual css. After loading the different content to the same container, the original style will be restored.</span>

<span style="color: rgb(0, 0, 0);">Target style and popup option are applied on publishing only. In CMS editor it is difficult to cope with popups.</span>

<span style="color: rgb(0, 0, 0);">-----------</span>

<span style="color: rgb(0, 0, 0);">Open websiteRecord.php. If main page is not generated via smarty template the structure of page is defined in this php script:</span>

<span style="color: rgb(0, 0, 0);">main-header with elements: main-logo, main-title, main-host, main-menu, main-pagetitle</span>

<span style="color: rgb(0, 0, 0);">And container for current page main-content.</span>

<span style="color: rgb(0, 0, 0);">All other style selectors (such as .hie-result-list) are defined in tinymce editor and can vary from page to page.</span>

<span style="color: rgb(0, 0, 0);">If using a custom report (Smarty report), none of these selectors is applicable since user can define their own custom website with arbitrary html elements.</span>

# <span style="color: rgb(0, 0, 0);">=== à relire (fin)===</span>

  
<span style="color: rgb(0, 0, 0);">For detailed instructions and tips on configuring a website, please refer to the top level </span>**CMS websites**<span style="color: rgb(0, 0, 0);"> menu entry.</span>

<span style="color: rgb(0, 0, 0);">Heurist is tailored to publish data in the form of a website, using its core functions to present and organise data for the public.</span>

<span style="color: rgb(0, 0, 0);">The website editor screen consists of a </span>**Website editor** <span style="color: rgb(0, 0, 0);">panel on the left, and the current page being edited (</span>**"This page"**<span style="color: rgb(0, 0, 0);">) on the right.</span>

##### **Editing this page**

##### <span style="color: rgb(0, 0, 0);">Applying CSS</span>

<span style="color: rgb(0, 0, 0);">The website can be styled through CSS files which may be stored in Heurist uploaded files, accessed through records containing uploaded files &lt;check&gt;, placed within custom reports or entered in the custom CSS fields of the website definition record (CMS\_Home)</span>

<table id="bkmrk-page-itemcss-selecto" style="border-width: medium; border-style: none; border-color: currentcolor; border-image: initial; border-collapse: collapse;"><colgroup><col style="width: 206px;"></col><col style="width: 683px;"></col></colgroup><tbody><tr style="height: 0pt;"><td style="border-width: 1pt; border-style: solid; border-color: rgb(0, 0, 0); vertical-align: top; padding: 5pt; overflow: hidden; overflow-wrap: break-word;"><span style="color: rgb(0, 0, 0);">Page Item</span>

</td><td style="border-width: 1pt; border-style: solid; border-color: rgb(0, 0, 0); vertical-align: top; padding: 5pt; overflow: hidden; overflow-wrap: break-word;"><span style="color: rgb(0, 0, 0);">CSS Selector</span>

</td></tr><tr style="height: 0pt;"><td style="border-width: 1pt; border-style: solid; border-color: rgb(0, 0, 0); vertical-align: top; padding: 5pt; overflow: hidden; overflow-wrap: break-word;"><span style="color: rgb(0, 0, 0);">Website Header</span>

</td><td style="border-width: 1pt; border-style: solid; border-color: rgb(0, 0, 0); vertical-align: top; padding: 5pt; overflow: hidden; overflow-wrap: break-word;"><span style="color: rgb(0, 0, 0);">\#main-header</span>

</td></tr><tr style="height: 0pt;"><td style="border-width: 1pt; border-style: solid; border-color: rgb(0, 0, 0); vertical-align: top; padding: 5pt; overflow: hidden; overflow-wrap: break-word;"><span style="color: rgb(0, 0, 0);">Website title</span>

</td><td style="border-width: 1pt; border-style: solid; border-color: rgb(0, 0, 0); vertical-align: top; padding: 5pt; overflow: hidden; overflow-wrap: break-word;"><span style="color: rgb(0, 0, 0);">\#main-title</span>

</td></tr><tr style="height: 0pt;"><td style="border-width: 1pt; border-style: solid; border-color: rgb(0, 0, 0); vertical-align: top; padding: 5pt; overflow: hidden; overflow-wrap: break-word;"><span style="color: rgb(0, 0, 0);">Website logo container</span>

</td><td style="border-width: 1pt; border-style: solid; border-color: rgb(0, 0, 0); vertical-align: top; padding: 5pt; overflow: hidden; overflow-wrap: break-word;"><span style="color: rgb(0, 0, 0);">\#main-logo</span>

</td></tr><tr style="height: 0pt;"><td style="border-width: 1pt; border-style: solid; border-color: rgb(0, 0, 0); vertical-align: top; padding: 5pt; overflow: hidden; overflow-wrap: break-word;"><span style="color: rgb(0, 0, 0);">Website logo image</span>

</td><td style="border-width: 1pt; border-style: solid; border-color: rgb(0, 0, 0); vertical-align: top; padding: 5pt; overflow: hidden; overflow-wrap: break-word;"><span style="color: rgb(0, 0, 0);">\#main-logo img</span>

</td></tr><tr style="height: 0pt;"><td style="border-width: 1pt; border-style: solid; border-color: rgb(0, 0, 0); vertical-align: top; padding: 5pt; overflow: hidden; overflow-wrap: break-word;"><span style="color: rgb(0, 0, 0);">Alternative logo container</span>

</td><td style="border-width: 1pt; border-style: solid; border-color: rgb(0, 0, 0); vertical-align: top; padding: 5pt; overflow: hidden; overflow-wrap: break-word;"><span style="color: rgb(0, 0, 0);">\#main-logo-alt</span>

</td></tr><tr style="height: 0pt;"><td style="border-width: 1pt; border-style: solid; border-color: rgb(0, 0, 0); vertical-align: top; padding: 5pt; overflow: hidden; overflow-wrap: break-word;"><span style="color: rgb(0, 0, 0);">Alternative logo image</span>

</td><td style="border-width: 1pt; border-style: solid; border-color: rgb(0, 0, 0); vertical-align: top; padding: 5pt; overflow: hidden; overflow-wrap: break-word;"><span style="color: rgb(0, 0, 0);">\#main-logo-alt img</span>

</td></tr><tr style="height: 0pt;"><td style="border-width: 1pt; border-style: solid; border-color: rgb(0, 0, 0); vertical-align: top; padding: 5pt; overflow: hidden; overflow-wrap: break-word;"><span style="color: rgb(0, 0, 0);">Main menu / Navigation</span>

</td><td style="border-width: 1pt; border-style: solid; border-color: rgb(0, 0, 0); vertical-align: top; padding: 5pt; overflow: hidden; overflow-wrap: break-word;"><span style="color: rgb(0, 0, 0);">\#main-menu</span>

</td></tr><tr style="height: 0pt;"><td style="border-width: 1pt; border-style: solid; border-color: rgb(0, 0, 0); vertical-align: top; padding: 5pt; overflow: hidden; overflow-wrap: break-word;"><span style="color: rgb(0, 0, 0);">Main menu headers (top)</span>

</td><td style="border-width: 1pt; border-style: solid; border-color: rgb(0, 0, 0); vertical-align: top; padding: 5pt; overflow: hidden; overflow-wrap: break-word;"><span style="color: rgb(0, 0, 0);">\#main-menu div &gt; ul\[role="menu"\] &gt; li</span>

</td></tr><tr style="height: 0pt;"><td style="border-width: 1pt; border-style: solid; border-color: rgb(0, 0, 0); vertical-align: top; padding: 5pt; overflow: hidden; overflow-wrap: break-word;"><span style="color: rgb(0, 0, 0);">Main menu headers (all)</span>

</td><td style="border-width: 1pt; border-style: solid; border-color: rgb(0, 0, 0); vertical-align: top; padding: 5pt; overflow: hidden; overflow-wrap: break-word;"><span style="color: rgb(0, 0, 0);">\#main-menu ul\[role="menu"\] li</span>

</td></tr><tr style="height: 0pt;"><td style="border-width: 1pt; border-style: solid; border-color: rgb(0, 0, 0); vertical-align: top; padding: 5pt; overflow: hidden; overflow-wrap: break-word;"><span style="color: rgb(0, 0, 0);">Main menu sub-menu</span>

</td><td style="border-width: 1pt; border-style: solid; border-color: rgb(0, 0, 0); vertical-align: top; padding: 5pt; overflow: hidden; overflow-wrap: break-word;"><span style="color: rgb(0, 0, 0);">\#main-menu ul\[role="menu"\] li &gt; ul</span>

</td></tr><tr style="height: 0pt;"><td style="border-width: 1pt; border-style: solid; border-color: rgb(0, 0, 0); vertical-align: top; padding: 5pt; overflow: hidden; overflow-wrap: break-word;"><span style="color: rgb(0, 0, 0);">Sign in button</span>

</td><td style="border-width: 1pt; border-style: solid; border-color: rgb(0, 0, 0); vertical-align: top; padding: 5pt; overflow: hidden; overflow-wrap: break-word;"><span style="color: rgb(0, 0, 0);">\#btn\_signin</span>

</td></tr><tr style="height: 0pt;"><td style="border-width: 1pt; border-style: solid; border-color: rgb(0, 0, 0); vertical-align: top; padding: 5pt; overflow: hidden; overflow-wrap: break-word;"><span style="color: rgb(0, 0, 0);">Language selector</span>

</td><td style="border-width: 1pt; border-style: solid; border-color: rgb(0, 0, 0); vertical-align: top; padding: 5pt; overflow: hidden; overflow-wrap: break-word;"><span style="color: rgb(0, 0, 0);">\#main-languages</span>

</td></tr><tr style="height: 0pt;"><td style="border-width: 1pt; border-style: solid; border-color: rgb(0, 0, 0); vertical-align: top; padding: 5pt; overflow: hidden; overflow-wrap: break-word;"><span style="color: rgb(0, 0, 0);">Individual languages</span>

</td><td style="border-width: 1pt; border-style: solid; border-color: rgb(0, 0, 0); vertical-align: top; padding: 5pt; overflow: hidden; overflow-wrap: break-word;"><span style="color: rgb(0, 0, 0);">\#main-languages a</span>

</td></tr><tr style="height: 0pt;"><td style="border-width: 1pt; border-style: solid; border-color: rgb(0, 0, 0); vertical-align: top; padding: 5pt; overflow: hidden; overflow-wrap: break-word;"><span style="color: rgb(0, 0, 0);">Selected language</span>

</td><td style="border-width: 1pt; border-style: solid; border-color: rgb(0, 0, 0); vertical-align: top; padding: 5pt; overflow: hidden; overflow-wrap: break-word;"><span style="color: rgb(0, 0, 0);">\#main-languages a.lang-selected</span>

</td></tr><tr style="height: 0pt;"><td style="border-width: 1pt; border-style: solid; border-color: rgb(0, 0, 0); vertical-align: top; padding: 5pt; overflow: hidden; overflow-wrap: break-word;"></td><td style="border-width: 1pt; border-style: solid; border-color: rgb(0, 0, 0); vertical-align: top; padding: 5pt; overflow: hidden; overflow-wrap: break-word;"></td></tr><tr style="height: 0pt;"><td style="border-width: 1pt; border-style: solid; border-color: rgb(0, 0, 0); vertical-align: top; padding: 5pt; overflow: hidden; overflow-wrap: break-word;"><span style="color: rgb(0, 0, 0);">Page title</span>

</td><td style="border-width: 1pt; border-style: solid; border-color: rgb(0, 0, 0); vertical-align: top; padding: 5pt; overflow: hidden; overflow-wrap: break-word;"><span style="color: rgb(0, 0, 0);">\#main-pagetitle</span>

</td></tr><tr style="height: 0pt;"><td style="border-width: 1pt; border-style: solid; border-color: rgb(0, 0, 0); vertical-align: top; padding: 5pt; overflow: hidden; overflow-wrap: break-word;"><span style="color: rgb(0, 0, 0);">Page container</span>

</td><td style="border-width: 1pt; border-style: solid; border-color: rgb(0, 0, 0); vertical-align: top; padding: 5pt; overflow: hidden; overflow-wrap: break-word;"><span style="color: rgb(0, 0, 0);">\#main-content-container</span>

</td></tr><tr style="height: 0pt;"><td style="border-width: 1pt; border-style: solid; border-color: rgb(0, 0, 0); vertical-align: top; padding: 5pt; overflow: hidden; overflow-wrap: break-word;"><span style="color: rgb(0, 0, 0);">Page content</span>

</td><td style="border-width: 1pt; border-style: solid; border-color: rgb(0, 0, 0); vertical-align: top; padding: 5pt; overflow: hidden; overflow-wrap: break-word;"><span style="color: rgb(0, 0, 0);">\#main-content</span>

</td></tr><tr style="height: 0pt;"><td style="border-width: 1pt; border-style: solid; border-color: rgb(0, 0, 0); vertical-align: top; padding: 5pt; overflow: hidden; overflow-wrap: break-word;"><span style="color: rgb(0, 0, 0);">Page widgets</span>

</td><td style="border-width: 1pt; border-style: solid; border-color: rgb(0, 0, 0); vertical-align: top; padding: 5pt; overflow: hidden; overflow-wrap: break-word;"><span style="color: rgb(0, 0, 0);">\#main-content .heurist-widget</span>

</td></tr><tr style="height: 0pt;"><td style="border-width: 1pt; border-style: solid; border-color: rgb(0, 0, 0); vertical-align: top; padding: 5pt; overflow: hidden; overflow-wrap: break-word;"></td><td style="border-width: 1pt; border-style: solid; border-color: rgb(0, 0, 0); vertical-align: top; padding: 5pt; overflow: hidden; overflow-wrap: break-word;"></td></tr><tr style="height: 0pt;"><td style="border-width: 1pt; border-style: solid; border-color: rgb(0, 0, 0); vertical-align: top; padding: 5pt; overflow: hidden; overflow-wrap: break-word;"><span style="color: rgb(0, 0, 0);">Footer</span>

</td><td style="border-width: 1pt; border-style: solid; border-color: rgb(0, 0, 0); vertical-align: top; padding: 5pt; overflow: hidden; overflow-wrap: break-word;"><span style="color: rgb(0, 0, 0);">\#page-footer</span>

</td></tr><tr style="height: 0pt;"><td style="border-width: 1pt; border-style: solid; border-color: rgb(0, 0, 0); vertical-align: top; padding: 5pt; overflow: hidden; overflow-wrap: break-word;"><span style="color: rgb(0, 0, 0);">Hosting information</span>

</td><td style="border-width: 1pt; border-style: solid; border-color: rgb(0, 0, 0); vertical-align: top; padding: 5pt; overflow: hidden; overflow-wrap: break-word;"><span style="color: rgb(0, 0, 0);">\#main-host</span>

</td></tr></tbody></table>

#### <span style="color: rgb(102, 102, 102);">Location of CSS files</span>

<span style="color: rgb(0, 0, 0);">&lt;where to put CSS ? &gt;</span>

#### <span style="color: rgb(102, 102, 102);">Making custom header scroll with the page</span>

- <span style="color: rgb(0, 0, 255);">I’ve added this CSS for this site to make the (custom) header scroll with the rest of the page. </span>  
    <span style="color: rgb(152, 0, 0);">Ian: it resulted in a large gap between the header and the content, to be investigated</span>

div.heurist-website{  
 overflow-x: hidden;  
 overflow-y: auto;  
}  
\#main-content-container{  
 position:relative !important;  
 top:0px !important;  
}  
\#main-header{  
 position: relative !important;  
}

#### <span style="color: rgb(102, 102, 102);">Positioning elements</span>

<span style="color: rgb(0, 0, 0);">The main thing I can recall that was useful was to divide the site mentally into two kinds of page: “static” pages with project information, team members etc, and “dynamic” pages with facetted searches or other exploratory tools. The CMS generally speaking is set up to make the dynamic pages work without much trouble. It was funnily enough the “static” pages that required more fiddling, so they would scroll correctly and fill the screen properly.</span>

<span style="color: rgb(0, 0, 0);"> As a concrete example, on a static page you often want the width to be capped. It can be difficult to read text if it stretches right across the screen. By contrast, you often want the dynamic pages to fill the screen. Heurist sites often look their best on a big wide screen, where you can have the facetted search and a nice big map fully visible.</span>

<span style="color: rgb(0, 0, 0);">This division between ‘static’ and ‘dynamic’ is really about the layout of the page, rather than its hydration with data. For example, I would often use a custom report for the ‘Project Team’ page, so that new team members could simply be added to the Heurist database. Thus the page is ‘dynamic’ in data terms, but ‘static’ in layout.</span>

<span style="color: rgb(0, 0, 0);"> Another point was – I often found it difficult to position elements, because they had the wrong “position” attribute in the CSS. Basically there is a tricky set of rules about how ‘static’, ‘relative’ and ‘absolute’-positioned elements interact with each other. From memory, there were too many elements with position:absolute in the CMS template, and as a result I would often find it impossible to make parts of the page behave properly. You would set something as having “height:100%” in the web editor, and it would have no effect because it was a child of an absolutely positioned element, for example. As much as possible, absolute and relative positioning should be eliminated from the public websites, if you would like the editing panel to do what it is supposed to. The most common workaround was for people to give a fixed size in pixels to elements on the screen (e.g. width:500px). This has the obvious downside that the element will no longer scale with different devices.</span>

#### Responsive design

####   


#### Javascript

####   


#### Domains and Redirects, Apache

####   


#### Custom reports

- I want to use the title (or the family name) of the Person who was interviewed to insert in the Interview extract (Extract is child of interview is child of person). Interview has a pointer to Person that has a title (Family Name = field #1), so you first need to load the person record, then you can access the family name or other fields in Person.

{$person=$heurist-&gt;getRecord($f247.f15)} {\* Person \*}  
{$person.f1} {\*Family name \*}

- How do you retrieve fields from the relationship record (as well as the related record). getRelatedRecords returns an array of related records with additional header fields: recRelationType\*, recRelationNotes, recRelationStartDate, recRelationEndDate.

{$rel\_record = $heurist-&gt;getRecord($Relationship.recRelationID)}  
{$src\_info = $heurist-&gt;getRecord($rel\_record.f1160)}  
Source de l'Information: {$src\_info.recTitle}

**Getting info from relationship records**

<span style="color: rgb(0, 0, 0); background-color: rgb(255, 255, 255);"> {\* Get infromation from the relationship record \*}</span>  
<span style="color: rgb(0, 0, 0); background-color: rgb(255, 255, 255);"> {$rel\_record = $heurist-&gt;getRecord($Relationship.recRelationID)}</span>  
<span style="color: rgb(0, 0, 0); background-color: rgb(255, 255, 255);"> {$src\_info = $heurist-&gt;getRecord($rel\_record.f1160)}</span>  
<span style="color: rgb(0, 0, 0); background-color: rgb(255, 255, 255);"> Source de l'Information: {$src\_info.recTitle}</span>  
<span style="color: rgb(0, 0, 0); background-color: rgb(255, 255, 255);"> Start Date: {$rel\_record.f10}</span>  
<span style="color: rgb(0, 0, 0); background-color: rgb(255, 255, 255);"> End Date: {$rel\_record.f11}</span>

![](https://docs.heuristref.net/uploads/images/gallery/2026-07/embedded-image-sznseod2.png)

#### Embedding IIIF in reports

I've tested the method for displaying a viewer in a report and it works for an IIIF image. However, I couldn't get it to work for an IIIF manifest. I imagine there are some small changes to be made, could you tell me what they are? I need to display a manifest in the registry.tpl template.

There are 3 ways

1. Via wrap function (preferred)  
      
     {wrap var=$r.f1200\_originalvalue dt="file" width="1200" height="800"}&lt;br/&gt;
2. Via direct manifest URL :   
      
     &lt;iframe width=1200 height=800 src="https://heurist.huma-num.fr/heurist/hclient/widgets/viewers/miradorViewer.php?  
     db=pret19\_test&amp;recID=&amp;url={urldecode($r.f1200)}"&gt;&lt;/iframe&gt;
3. Via file obfuscation ID {$r.f1200\_originalvalue\[0\].ulf\_ObfuscatedFileID}  
      
     &lt;iframe width=1200 height=800 src="[https://heurist.huma-num.fr/h6-alpha/hclient/widgets/viewers/miradorViewer.php?](https://heurist.huma-num.fr/h6-alpha/hclient/widgets/viewers/miradorViewer.php?)  
     [db=pret19\_test&amp;iiif={$r.f1200\_originalvalue\[0\].ulf\_ObfuscatedFileID](https://heurist.huma-num.fr/h6-alpha/hclient/widgets/viewers/miradorViewer.php?db=pret19_test&iiif=%7B%24r.f1200_originalvalue%5B0%5D.ulf_ObfuscatedFileID)}"&gt;&lt;/iframe&gt;

#### <span style="color: rgb(102, 102, 102);">Displaying images, PDFs, Carousels</span>

<span style="color: rgb(0, 0, 0);">We need PDFs to open inline. In Beyond1914 they are handled by a fancybox gallery plugin. There is quite a bit of custom code written by artem to get fancybox to accept and display pdfs with heurist url obfuscation. The code doesn’t seem to be in a custom report (in fact I don’t even see the page as a custom report) so I don’t really know how he did it.</span>  
<span style="color: rgb(0, 0, 0);">PDFs in heurist are served with a http response header that indicates they should be downloaded (probably somewhere in a php file) : Content-Type: application/pdf</span>  
Content-Disposition: attachment; filename="filename.pdf"  
In order to be opened, the http response header should be   
 Content-Type: application/pdf  
 Content-Disposition: inline; filename="filename.pdf"

- Database must be in js\_in\_database\_authorised.txt
- Need to use wrap function {wrap var=$r.f38\_originalvalue dt="file" width="300" height="auto" mode="link" fancybox="1"} Mode can be “link” or “thumbnail”
- It adds all required scripts and style into &lt;head&gt; automatically

#### Making websites public

<span style="color: rgb(0, 0, 0);">Pour rendre son site web consultable sans avoir besoin d'un login utilisateur, il suffit de marquer les enregistrements CMS\_Home et CMS\_Menu-Page visble au publique, </span>

![](https://docs.heuristref.net/uploads/images/gallery/2026-07/embedded-image-ro8vg8v2.png)

<span style="color: rgb(0, 0, 0);"> ainsi que tout les enregistrements qu'on veut qu'il/elles puissent voir (pour ce dernier il suffit de faire une recherche des enregistrements à rendre publique et choisir la fonction sous Share): </span>

![](https://docs.heuristref.net/uploads/images/gallery/2026-07/embedded-image-wmakvcxm.png)

<span style="color: rgb(0, 0, 0);">et ensuite choisir Public (Record is editable by peut-être n'importe quel personne ou groupe):</span>

![](https://docs.heuristref.net/uploads/images/gallery/2026-07/embedded-image-tf2liihb.png)

#### <span style="color: rgb(0, 0, 0);">Links and listeners </span>

<span style="color: rgb(0, 0, 0);">You can add link via “Insert Link” and specify page record id as URL. Or https://heurist…./h6-ao/588</span>

<span style="color: rgb(0, 0, 0);">Or directly in code &lt;a href=”588”&gt;Project Aims&lt;/a&gt;</span>

<span style="color: rgb(0, 0, 0);"> Concerning links between pages, specify the target page and search\_group for widget that will listen for source events. </span>

<span style="color: rgb(0, 0, 0);">For example:</span>

- <span style="color: rgb(0, 0, 0);">for search widget search\_group=sr3 search\_page=”Discover” </span>
- <span style="color: rgb(0, 0, 0);">On discover page make sure that result List widget belongs to sr3 search group.</span>

<span style="color: rgb(0, 0, 0);">At the moment it triggers/listens fortwo event types ON\_REC\_SEARCHSTART and ON\_REC\_SELECT</span>

#### Client side functions

<span style="color: rgb(0, 0, 0);">A client-side function to get the databaseID: </span>

<span style="color: rgb(0, 0, 0);">window.hWin.HAPI4.sysinfo.db\_registeredid</span>

<span style="color: rgb(0, 0, 0);">Besides there are helpers to convert concept codes back and forth to/from local ids</span>

<span style="color: rgb(0, 0, 0);">$Db.getConceptID and $Db.getLocalID (hclient/core/utils\_dbs.js)</span>

<span style="color: rgb(0, 0, 0);">There are two parameters: \[rty | dty | trm\] and \[ID\]</span>

<span style="color: rgb(0, 0, 0);">$Db.getConceptID('rty', 10) returns 2-10 concept code for Person record type </span>

<span style="color: rgb(0, 0, 0);">$Db. getLocalID ('rty', '2-10') returns 2 local id for Person record type </span>

#### <span style="color: rgb(0, 0, 0);">Multilingual websites</span>

<span style="color: rgb(0, 0, 0);">We specify the language with a parameter such as &amp;weblang=es ; if this is omitted the website uses the first or only (default) language, whatever that is. If a data value has no version for the specified language, it uses the first (default) value.</span>

<span style="color: rgb(0, 0, 0);">This capability can be use to define alternative site title and menu entries / rollover labels (in fields </span>*Menu label/page name*<span style="color: rgb(0, 0, 0);">, and </span>*Menu rollover descriptions)*<span style="color: rgb(0, 0, 0);">. </span>

<span style="color: rgb(0, 0, 0);">The first vlue is the default, additional values should start with a 2 character language code (standard international list) and a version in this language. If you switch to the non-default language and the requested language is missing from the menu entries, the default language is used. </span>

![](https://docs.heuristref.net/uploads/images/gallery/2026-07/embedded-image-cdhkavwc.png)

- <span style="color: rgb(0, 0, 0);">The same system can be applied to Saved search/filter names and filter fields and facets in facet searches</span>
- <span style="color: rgb(0, 0, 0);">Language-specific values can be inserted (with the aid of Deepl translate) by clicking on the language button </span>[![image.png](https://docs.heuristref.net/uploads/images/gallery/2026-07/scaled-1680-/image.png)](https://docs.heuristref.net/uploads/images/gallery/2026-07/image.png)<span style="color: rgb(0, 0, 0);">left of the field. This button pops up a formlet to enter alternative language versions and store them separately (translated fields must be set to be repeating value fields; within the definitions forms the fields are automatically set this way).</span>
- <span style="color: rgb(0, 0, 0);">Use single line or memo as appropriate.</span>

![](https://docs.heuristref.net/uploads/images/gallery/2026-07/embedded-image-uypej9pt.png)

![](https://docs.heuristref.net/uploads/images/gallery/2026-07/embedded-image-7hglcszw.png)

### Website programming

<span style="background-color: rgb(255, 255, 255);">Common class to init layout - HLayoutMgr</span>

1. <span style="background-color: rgb(255, 255, 255);">Separate widgets/page configurations (json) and html content. </span>
2. <span style="background-color: rgb(255, 255, 255);">Store json in the separate field and it is common for all lang versions of page</span>
3. <span style="background-color: rgb(255, 255, 255);">Separate html content allows:</span>
4. <span style="background-color: rgb(255, 255, 255);"> Avoid issues with escaping/encoding</span>
5. <span style="background-color: rgb(255, 255, 255);">More human friendly/readable format - can be edited directly</span>
6. <span style="background-color: rgb(255, 255, 255);">Ability translate entire page</span>

##### <span style="background-color: rgb(255, 255, 255);">Web publication:</span>

1. <span style="background-color: rgb(255, 255, 255);">While editing, Cms content can be accessed as usual via url \[server\]/heurist?db=\[db-name\]&amp;website=\[rec-id\]&amp;page=\[rec-id\]</span>
2. <span style="background-color: rgb(255, 255, 255);">Published website: \[server\]/\[db-name\]/web/\[rec-id\]/\[pagename\].html</span>

<span style="background-color: rgb(255, 255, 255);">Pagename is unique per website, human friendly name of page. </span>

<span style="background-color: rgb(255, 255, 255);">On publishing, heurist generates html pages in generated-website folder. These html are crawler enabled (have full page header, can be loaded independently)</span>

##### <span style="background-color: rgb(255, 255, 255);">Smarty reports… </span>

<span style="background-color: rgb(255, 255, 255);">Cms localization:</span>

1. <span style="background-color: rgb(255, 255, 255);">Widgets - dialog (via configuration widget dialog) with list of strings and html snippets that can be translated semi-auto</span>
2. <span style="background-color: rgb(255, 255, 255);">Html content -auto translation with web service</span>

#### Custom PHP plugins for Smarty

<span style="color: rgb(0, 0, 0);">Custom plugins can be located in vendor/smarty/smarty/libs/plugins/ (from Nov 2024). The system adminstrator can place any number of php files into this folder (the ability to do so is not part of the Heurist web interface for security reasons). Sample code :</span>

<span style="color: rgb(0, 0, 0);">&lt;?php</span>  
<span style="color: rgb(0, 0, 0);">use Smarty\\Smarty;</span>  
<span style="color: rgb(0, 0, 0);">array\_push($heurist\_security\_policy-&gt;allowed\_modifiers, 'date\_format\_fr');</span>  
<span style="color: rgb(0, 0, 0);">$smarty-&gt;registerPlugin(Smarty::PLUGIN\_MODIFIER, 'date\_format\_fr', 'smarty\_modifier\_date\_format\_fr');</span>  
<span style="color: rgb(0, 0, 0);">function smarty\_modifier\_date\_format\_fr($value, $date\_format\_fr=null){</span>  
<span style="color: rgb(0, 0, 0);"> $datetime = new \\DateTime($value);</span>  
<span style="color: rgb(0, 0, 0);"> if(!$datetime){ return $value; }</span>  
<span style="color: rgb(0, 0, 0);"> if(!$date\_format\_fr){ $date\_format\_fr = "d-m-Y";}</span>  
<span style="color: rgb(0, 0, 0);"> $newdatestring = $datetime-&gt;format($date\_format\_fr);</span>  
<span style="color: rgb(0, 0, 0);"> return $newdatestring;</span>  
<span style="color: rgb(0, 0, 0);">}</span>  
<span style="color: rgb(0, 0, 0);">?&gt;</span>

#### Adding custom styles in memo fields

- Heurist allows the addition of styles in the WYSIWYG editor, in addition to Headings 1-6, preformatted and quotation.   
    This is done through a file HEURIST\_FILESTORE/&lt;dbname&gt;/settings/text\_styles.json,as shown below. Make sure all the keys and string values are enclosed in double quotes, otherwise PHP considers it invalid. <span style="color: rgb(0, 0, 0);">Make sure it is owned by apache:heurist.</span>

<span style="color: rgb(0, 0, 0);">"formats": {</span>  
<span style="color: rgb(0, 0, 0);"> "Beleg": {"inline":"span", "classes": "Beleg", "styles": {"font-weight": "bold", "background-color": "#F2E3F9"}},</span>  
<span style="color: rgb(0, 0, 0);"> "Ergaenzung": {"inline":"span", "classes": "Ergaenzung", "styles": {"font-style": "italic", "color": "#808080"}},</span>  
<span style="color: rgb(0, 0, 0);"> "Glosse": {"inline":"span", "classes": "Glosse", "styles": {"text-decoration": "underline"}},</span>  
<span style="color: rgb(0, 0, 0);"> "BelegGlosse": {"inline":"span", "classes": "BelegGlosse", "styles": {"font-weight": "bold", "background-color": "#F2E3F9", "text-decoration": "underline"}}</span>  
<span style="color: rgb(0, 0, 0);"> },</span>  
<span style="color: rgb(0, 0, 0);"> "style\_formats": \[</span>  
<span style="color: rgb(0, 0, 0);"> {"title": "Beleg", "format": "Beleg"},</span>  
<span style="color: rgb(0, 0, 0);"> {"title": "Ergaenzung", "format": "Ergaenzung"},</span>  
<span style="color: rgb(0, 0, 0);"> {"title": "Glosse", "format": "Glosse"},</span>  
<span style="color: rgb(0, 0, 0);"> {"title": "Beleg Glosse", "format": "BelegGlosse"}</span>  
<span style="color: rgb(0, 0, 0);"> \],</span>  
<span style="color: rgb(0, 0, 0);"> "block\_formats": \[</span>  
<span style="color: rgb(0, 0, 0);"> \]</span>  
<span style="color: rgb(0, 0, 0);"> }</span>

#### Debugging browser behaviour

Sometimes the application appears not to have changed something you know you have changed.

The first step is simply to delete browsing data (downloaded files only, NOT the cookies) and reload the page.

If this does not work, try the following.

<span style="background-color: rgb(255, 255, 255);">1) First prove what Chrome is actually executing</span>

1. <span style="background-color: rgb(255, 255, 255);">DevTools → Network</span>
2. <span style="background-color: rgb(255, 255, 255);">Tick Disable cache (works only while DevTools is open)</span>
3. <span style="background-color: rgb(255, 255, 255);">Reload</span>
4. <span style="background-color: rgb(255, 255, 255);">Click the request for editCMS\_SelectElement.js</span>

<span style="background-color: rgb(255, 255, 255);">Look at:</span>

- <span style="background-color: rgb(255, 255, 255);">Status / Size: if it says (from disk cache) or (from ServiceWorker) you’ve found the culprit.</span>
- <span style="background-color: rgb(255, 255, 255);">Response tab: search for your edited lines and confirm whether the response contains them</span>

![](https://docs.heuristref.net/uploads/images/gallery/2026-07/embedded-image-66z6dtj4.png)

<span style="background-color: rgb(255, 255, 255);">If the response still shows old code, it’s caching upstream (CloudFlare Service Worker)</span>

<span style="background-color: rgb(255, 255, 255);">2) If it’s a Service Worker (very common)</span>

<span style="background-color: rgb(255, 255, 255);">In DevTools:</span>

![](https://docs.heuristref.net/uploads/images/gallery/2026-07/embedded-image-mklgpryd.png)

<span style="background-color: rgb(255, 255, 255);">Application → Service Workers: tick Update on reload</span>  
<span style="background-color: rgb(255, 255, 255);">Application → Storage: click Clear site data (or “Clear storage”)</span>

<span style="background-color: rgb(255, 255, 255);">Then reload again with Network tab open.</span>