Ch 05: Modifying record structure & connections
Documentation rédigée le xxx par Guillaume Porte
One of the most powerful features of Heurist is the ability to modify record structures at any time without rebuilding the database or reprogramming the interface, and to do this while you are in the middle of data entry. This is the key to the iterative nature of structure development in Heurist.
To open the structure modifying interface :
- Either : Design → Record Types → [click on the pen next to the Record Type name] → [bottom of the pop up window] Modify record structure (fields, tabs etc.) - was Edit fields in older versions.

or

Or : Create a new record or open an existing record of the appropriate type for editing
and click Modify structure (at the top of the form).
We recommend using this method to dynamically change structure as you start to develop your data

Note: Shifting to Modify structure mode will save the record data without checking it for validity. It can be useful to temporarily save a record but you should use Admin > Test integrity to check for any records which have been incompletely described. Incomplete records do not cause Heurist any problem, it is just that data which should be there is missing so counts, record titles or formatted output could be affected.
Modify Structure will open the data entry/strcuture modification window :
You can continue to edit the data while you are in structure modification mode - it is a useful way to test that the structue you are creating coresponds with your real needs.

The example above shows a complex form with 12 tabs and nearly 150 fields, before cleanup, imported from a legacy database. The navigation tree is synched to the fields so that one can navigate in either the form or the tree, and move or delete fields from the tree. The form on the right is updated immediately. The tree also shows details of the field on hover.
Navigation panel
Clicking on Modify structure opens a navigation panel on the left, which we describe in detail below.
Options (above the tree)
- << chevrons - clicking on the chevrons will shrink the navigation panel, but you are still in Modify Structure mode. The chevrons will reverse to >> which allows you to reopen the panel
- Export fields as CSV : gives a list of fields with their parameters and usage count. Note also that there is a Template download link towards the right of the data entery form which downloads a CSV file which can be opened in a spreadsheet to use as a base for data collection.
"Field name","Field type","Multivalue","Requirement","Usage count"
"Person H-ID","Built-in","Multivalue","Required","N=273"
"Gender","Terms list","Single","Optional","N=246"
"Role","Terms list","Multivalue","Optional","N=263"
"Start date","Date / temporal","Single","Optional","N=198"
etc...- Update Counts : update usage counts shown to the right of each field - blank means the field is never used
Tree view of Fields and Tabs
The tree view is a powerful way of reorganising the order of fields, including moving several fields at once by dragging the tab or heading which contains them.

- Each field in the tree shows:
- the field name
- the number of times that this field is used in this record type (multiple values are counted, it is not just the number of records which use the field)
- the tick icon opens a search on all records using that field
- the cross-out icon opens a search on all records not using that field
- On hover, you see the internal code and concept code and the description of the field
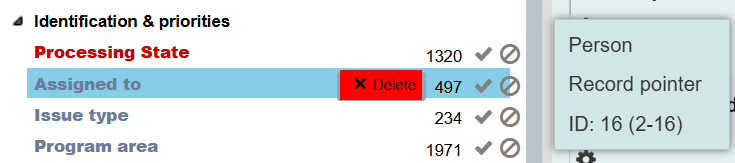
Note that all fields, including hidden fields, appear when in Modify Structure mode, since otherwise there would be no way of resetting their status or deleting them.
You can refresh the counts if they are not showing (they are not calculated automatically if there are a very large number of records, > 100,000 in a single type) by clicking on the word Count.
Deletion of fields

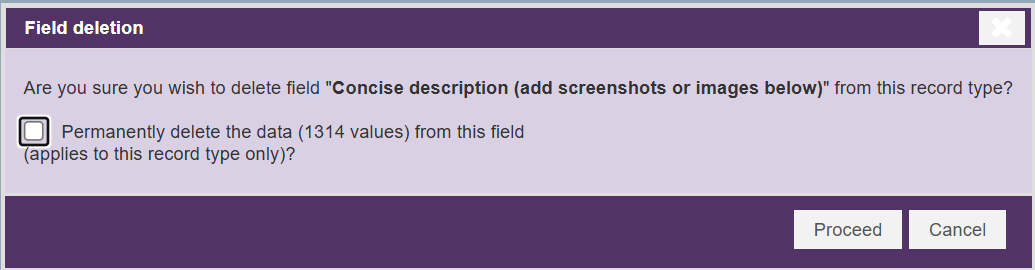
Note that deleting a field does not in itself delete the data associated with a field. To delete the data as well, you will need to check the box on the popup warning. If this box is not checked, the existing data will appear at the bottom of your form in a section “Non-standard data for this record type” . This can also be useful for copying data into the fields which remain before deleting the values individually. If the data is really not required check the box to permanenly delete the data for that field.
Deleted fields which still have data can be recovered by clicking on the upwards arrow next to a value (which will reinstate the field for all records of that type) and then renaming the field (which will be identified by its base field name and description; the revised name and description assigned to it for the particular record type are no longer available, so for example "Title of painting" might be reinserted as "Name or title").
If there is no data anywhere in the database which uses the base field on which this field is based, you will be asked whether you want to delete the base field completely. It is a good idea to keep standard base fields which were part of the initial set up of the database, as they may come in handy later and they promote standards across many databases, and to get rid of base fields you have added to the database (generally through adding a field to a record type, which creates a base field at the same time) if you no longer need them.

You can delete an individual value from a field by clicking the X icon which appears at the end of the field when your mouse pointer is over the field. This will not delete the values from any other record.

Edit a field
[TODO]
Field settings icon
The gearwheel icon left of each field displays a small dropdown on rollover:
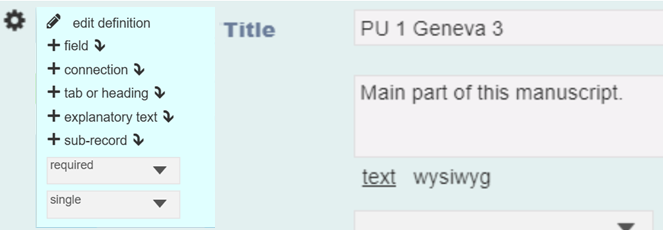
The bottom section allows rapid adjustment of cardinality (requirement and repeatability) and of field width.
By default new fields are set to Recommended.
Fields can also be marked as Hidden. In that case neither the field nor its value (if any) is shown in any mode except structure modification. Hidden fields are particularly useful, and were originally developed, to allow a template to contain many fields for different uses so that they are available to be unhidden as required, rather than presenting the user with a plethora of fields which is highly confusing/off-putting, that they then need to delete (and in the process lose, requiring more thought than simply exposing an existing field).
The other entries in the menu are discussed in the following pages.
- Edit definiton gives access to all the settings associated with an existing field – its name, help, width and height, cardinality, target record types etc.
- + field allows insertion of new fields
- + connection is a shortcut method for inserting the connection field types (record pointers and relationship markers). It exists to encourage users to think about, and use, these very useful functions
- + tab or heading allows insertion of new structural and layout elements such as tabs and dividers within tabs (these are shown as expansible sections in the navigation tree and may be dragged to move blocks of fields associated with them).
- + explanatory text allows insertion of a block of text which will show up on a grey background in the data entry form. It can be used to provide instructions or make notes on record structure changes which are needed (it will appear on every record). It has a title, which appears even if help is off, and a body which appears only if help is on
- + sub-record allows a set of fields to be designated as a sub-record, transferred to a new record type, linked to the current record type by a child record pointer field, and then all the data is transferred and the record pointers updated.
Field types
//TODO
- Text field
- use only for names etc which can be represented by a single line text
- handling URLs
- Memo fields
- text vs wysiwyg vs code
- processing URLs within text
- inserting media
- linking to other records simply by H-ID
- Terms
- Vocabularies - see more detailed discussion of vocabularies later??
- Adding terms
- Importing terms
- Hierarchical terms, importing, retrieval
- Terms as checkboxes/radio buttons
- Image terms
- Description and standard code
- Term translations
- Linked terms
- Relationship terms - see under relationship markers
- Checkboxes and radio buttons
- Dates
- Years, years-months and simple dates
- Date ranges, different ways of representing
- Fuzzy start and end
- Different calendar and conversion
- Import and auto-correction of dates
Entering historical dates: When entering a date, simply type the year in the box to instantly jump to that year, then select from the calendar dropdown
- Numeric
- Dealing with integers and whole numbers
- Record pointers
- Pointer mode
- Filter browse list
- Child records
- Relationship markers
- //TODO
Insert field
We strongly recommend adding a record of each type and adding fields using Modify structure from within the data entry mode, because this allows you to test how it works as you go along. This is much more effective than creating a set of fields or a form in the abstract and then finding that it is unusable in practical terms.
Choosing existing base field(s)
The top half of the form allows one to browse for existing base fields and insert them into the current record type definition/form via the Choose base fields button. The text on this part of the form gives some guidelines: explains the process:
_Rather than defining every field from scratch, you can pick some frequently used pre-defined fields from the existing Base fields. The base fields chosen should have a similar sense of meaning, e.g. use Start date for Birth date, Creator for Author, Short __description for Abstract, Extended description for Notes. You can rename the fields to what you actually want once selected - the new name applies to the current record type only (the base field retains its name).
Do not completely redefine a base field f_or a different purpose than it appears to be intended for, for instance redefining Family name as Street, Length as Count, or Format as Condition. Significant change to the meaning of a field may later lead to confusion and reduce the degree of interoperability between databases.
Fields which use the same base field will reference the same vocabulary (for term-list dropdowns and relationship type) or the same target record types (for record pointers and relationships) - you cannot change the vocabulary or target record types for on_e without changing it for all the others.

There are over 200 pre-defined Base fields. Use the Search for field function at top right of the list of fields to find ones that are useful (remembering to search for English words – sorry to speakers of other languages).
Only Base fields not already used by the record type will be shown – a Base field can only occur once in each record type (although it may contain multiple/repeating values).
Creating a new field from scratch
If none of the Base fields seem to correspond with your need, fill in the details for the new field you wish to create in the lower part of the form:

The Field name will show a list of possible matches against existing Base fields as a dropdown once three characters have been typed. If none of them looks useful, continue typing your desired name and select it from the list |(it should be marked as NEW). Add the help/description text and select a data type, at which point it may ask you to select or create a vocabulary for a term list field or relationship marker, target record types for a record pointer or relationship marker field. You can also select cardinality and enter semantic reference URI(s).
The result will be a new field for your record type. However, at the same time, Heurist creates a new Base field with the same name, description, data type, vocabulary and/or target record types. This Base field can then be re-used as a field in any other record type; its name and description will default to the Base field name and description, but these can be edited separately for each record type.
Normally you will click the simple **Create new field **button. However, if you click the Create and customise new field button it will create the field and immediately go into field structure edit mode to adjust details such as cardinality, width and height, default values and incrementing, and field visibility. This may also be useful if you want to use a very generic name to ensure a generic name for the Base field, and then change it to specific version for the current record type.
Insert tab / divider
Tabs and other dividers (formerly known as separators) can be used to make your forms much more usable. You will first be asked what sort of separator is required, and after initial creation you will be able to enter the name and description (which will show as the text below the name if Help is on).


- Tabs run across the top of the edit form, unless you choose Tab (new group) in which case it will start a new section below the existing set of tabs.
- Forms can also be broken up with static or collapsible blocks (which can be initially open or initially).
- Within tabs and blocks you can create Section headings which can also be static or collapsible and initially open or closed. These dividers will appear with a horizontal line at the point of division, as well as a help text which appears beneath it if help is on. The help text will often be left blank.

Edit field structure
The edit field form opens up within the data edit form and gives access to all the settings specific to the current record type (field name, help/description, cardinality, field width and height, default value and incrementing). Checking the box “also change base field name and help”, provides a convenient way of updating the name and description of the base field – this will not change the name and description in any other record type.
Some settings (the field type, the vocabulary used, the target record type(s)) are functions of the Base field used by the local field type for this record type and are thus shared with all record types which use this base field. They may only be edited through the Base field editor).
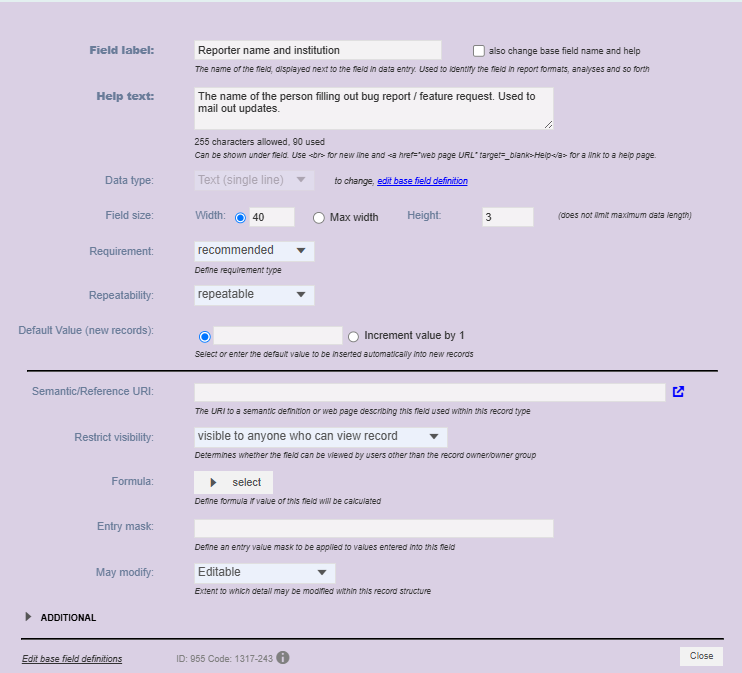
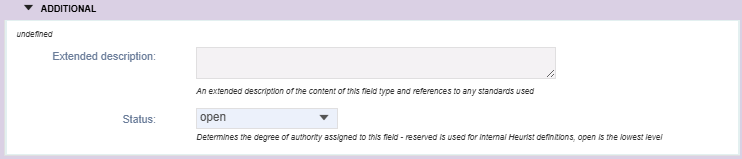
The Additional section of the field structure edit form allows for an extended description of the field simply for documentation purposes (it does not appear anywhere in the interface, but is included in XML and archive output). It also allows the Heurist team to block certain fields from modification through the Status dropdown.
For multi-line (memo) text fields this form also allows setting the height of the field – the default is 3 lines.
The default value is applied to the field for all new records. Where it is a controlled value, it is chosen from a dropdown (terms) or browse for records (record pointer), or it is simply typed in for text, date and numeric fields (“today”, “yesterday” and “tomorrow” are acceptable values for dates which will be converted to actual dates).
For simple text and numeric fields one can alternatively define an increment. This will provide a default value for new records which increments the largest number found at the end of any of the values for the field. |So if the field contains values such ACR-1, ACR-2, ACR-5, ACR-6, ACR-95, it will automatically generate ACR-96. If the numbers are ACR-0001 …. ACR-0095 it will generate ACR-0096. If the last value was XYZ-0095 it would generate XYZ-0096 (it takes its cue from the highest number that it finds at the end of any value). The default value generated is editable.

Note that Heurist does not have an indexing function suitable to avoid duplication of values, although this is on our development roadmap 2027 ... Surprisingly we have had very little call for such a function in the 20 years that we have been working on Heurist, in part because we have a very flexible duplicate detector (Admin > Duplicates) which is often more useful for Humanities data which includes variants and uncertainties. It uses fuzzy criteria to detect duplicates and merge records (including retaining all connections and redirecting merged record identifiers to the result of the merge).
The most interesting part of the form are the two options allowing control over visibility and modification at the field level:
Individual field/value visibility
The Restrict visibility dropdown allows control of visibility of individual values by members of the public (not logged in) or to the owners of the record alone. By default all values are visible to anyone who has access to view the record.

- Visible to anyone who can view the record: if the record is public the value of the field will be visible.
It is however possible to hide individual values by clicking on the eye symbol which appears at the end of the field on rollover:

Clicking the eye hides the value from the public as indicated by the greyed field (it is still editable):

- Visible to anyone + hide from public checkbox: the same functionality as the above but displays an explicit checkbox under the field and the eye icon at the end of the field is always visible. Clicking on either the checkbox or the eye will hide the value from the public.
This is intended to make the user think about whether the field should be made immediately available to the public eg. where further editorial work or vetting is likely to be required.

- Visible to logged in users only: the value will always be hidden from the public
- Visible to owner/owner group only: only the owners of the record will be able to see the value
Individual field locking
The May modify dropdown allows for locking a field so that it cannot be edited. This is useful for fields which are automatically populated or have been previously filled with data which is not to be modified further eg. an incremented field or source data from a legacy database. The default value is Editable.

An intermediate value Edit discouraged is provided which allows the value in the field to be modified but pops up a warning message that this is discouraged. This may be useful where the value does not normally require modification but may occasionally require correction. It also avoids accidental inadvertent modification of the fields without the user being aware of it.
Calculated / computed fields
Heurist provides an ability to compute field values in a variety of ways, enabling users to integrate statistical analysis into the process of data entry, or the generation of websites. A particularly useful way of using this is to automatically split up a complex field, such as a bibliographic reference or a complex item identifier, into its components.
The calculation can be based solely on fields within the record (e.g. combining the length and breadth of a painting to calculate its area) or can combine information from linked records (e.g. counting all the children of a particular Person).
There is no special field type for computed fields; any text, date, or numeric field can be used as a computed field; Heurist will perform a calculation based on data in the database and store the result in the field.
Click on Formula: select to bring up a form to specify the computation:
Either select a compute formula from the list or click on the ADD NEW CALCULATION button which will lead to the calculation construction form, where one can develop the code using SMARTY syntax in the same way it is used for custom reports. You can simply ask an AI to write Smarty code for you and replace the variable names it uses such as {$pages} with the appropriate Heurist field such as {$r.f1118}.
The final line of the code must print a value which is the value which will be inserted into the field. For example, to extract the 'short title' and page numbers from a reference such as "Nakada1982_01: 152-3, II-197" in in field 1118 you simply need one of these lines in the formula:
{{$r.f1118}|regex_replace:'/\s*:.*$/':''} --> Nakada1982_01
{{$r.f1118}|regex_replace:'/^[^:]*:\s*/':''} --> 152-3, II-197
//TODO-link

To use data from the current record, you can use the pre-existing variable $r.
For date, numeric and textual data, you should ensure that there are no html tags in the output. For a memo text field, you can output html elements as you would for a custom report.
Computed field examples
Examples of simple requests:
Area calculation: {$r.f1014 * $r.f1013}
My full name: {$r.f18} {$r.f1}
In neither of these cases is the output wrapped in html tags such as <p> or <div>
Examples of aggregation requests: count of linked life events
{$heurist->getRecordsAggr(array('id','count'), '{"t":"48","linkedto":"[ID]"}', $r) }
average height of persons linked to given record $r
{$heurist->getRecordsAggr(array(1014,'avg'), '{"t":"10","linkedto":"[ID]"}', $r) }
It is possible to execute several aggregation requests per call. The first parameter of getRecordsAggr is an array of pairs using either sum, count or average: field id: sum | count | avg
It is also possible to perform defined query and work with the result set as usual in smarty:
{$records = $heurist->getRecords('{"t":"48"}')}
{foreach $records as $r} {* Start records loop, do not remove *}
{$rec = $heurist->getRecord($r)}
{$rec.recTitle}
{/foreach}
An optional second parameter for $heurist->getRecords can be the record ID
$heurist->getRecords('{"t":"12","linkedto":"[ID]"}', $r)
Hints and examples of good structure
Proposal @todo: need examples @todo: Keep fields separate EG family and given names
- Clarity and Simplicity
- A well-designed structure should be clear and simple. Avoid overloading forms with too many fields. Use tabs and collapsible blocks to organise fields in a logical and intuitive way. Each field should have a specific purpose and contain only relevant information.
- Strategic Use of Hidden Fields
- Hidden fields are useful for storing additional information that may be needed later without cluttering the user interface. For example, you can hide fields that are filled automatically or used for background processes.
- Reuse of Base Fields
- When creating fields, consider using base fields to reuse them in other record types. This ensures consistency and avoids data duplication.
- Organise Linked Data
- For record pointer fields, ensure that the relationships between records are well-defined. This guarantees that information is easily accessible and remains consistent when updated or modified.
- Use Section Headings and Dividers
- Use section headings to divide forms into logical parts. This helps users navigate long and complex forms. You can also use horizontal dividers to visually mark sections and make the structure clearer.
- Use Default Values and Smart Increments
- For fields like serial numbers, use default values or increments to simplify data entry and ensure consistency in values.
- Controlled Data
- Use term lists for fields where only certain values are allowed. This prevents entry errors and ensures data consistency.
Practical Examples:
- For a person record, you could have fields like "Name", "First Name", "Type", and "Home Country".
- An event record might include fields like "Title", "Start Date", "Location", and "Participants", where "Participants" could be a multivalue field with record pointers to people.
Document your database
Don’t cop out on writing proper help texts and descriptions of record types, fields and terms, even if you are the only person using the database.
A few extra minutes spent writing an explanation of the content of each field will ensure that the database is still interpretable way into the future, by you or by others if deposited in an archive (your descriptions automatically become part of the archive package). Do it as you are setting up the database, because you will never come back to do it later …
Download Structure
You can download the structure of your database in XML or plain text format using the "Structure (XML)" or the "Structure (Text)" links under the "Download" section in the Design tab.
Vocabulary and Terms
One of the most important features of Heurist is its ability to describe categorisation and provide structured terminology for data. Vocabularies allow users to define and standardise terms used across different records, ensuring consistency and accuracy in data entry and retrieval. By creating term lists and defining relationships between terms, users can easily classify and manage data according to predefined categories. This feature is particularly useful when dealing with large datasets, as it helps prevent errors, reduces ambiguity, and ensures that data can be analysed and compared meaningfully across different record types.
A term list is the set of predefined 'enumerated' values ('terms') that can be used within a particularly drop-down (i.e. a term list field type). Term lists are based on all or some items in a 'vocabulary'.
A **vocabulary **(parent term) is the underlying top level category of related 'child' terms (e.g. 'Language' is a vocabulary, while 'French' is a child term). Vocabularies can be nested (i.e. any child term can in turn become a vocabulary). The lowest level values are the terms. A term list can comprise a hierarchy of nested terms (i.e. nested), with any 'leaf term' being potentially a new term list. Term lists may be used for any form of classification or categorisation of preconfigured data, such as raw material, condition, period, religious affiliation, language, country etc. For example, a Language dropdown might have the following structure:
Language (this is the name of the field or term list)
- English (term)
- French (term)
- Italian (term)
- Spanish (term)
- Etc.
When defining your database structure, you can create a new field based on the Terms List data type. You can then select what terms are to appear on the list, from the set of available vocabularies (Heurist provides a set of default vocabularies which you can edit and add to as required) and preview your choice. If a term is missing from a list you can quickly add it. The heading for the term list dropdown is the field name you have chosen for this field type.
Term lists are also used for specifying sets of relationships for Relationship Markers. For example, Family (Is Parent OF, Is Child Of etc.).
Selecting a Vocabulary and Terms

You can select the required term from the Terms List in the Vocabulary dropdown within the field. If a particular term does not exist in your chosen vocabulary, you can add a new term by clicking the gear icon. The Manage term window will open, allowing you to edit (pencil icon) existing terms or create a new one (+ ADD icon). The same applies to vocabularies.

The following options are available:
- Add Terms. Use this to add a term to the current vocabulary (this does not add it to the base Vocabulary, just this instance).
- Edit Terms Tree. Use this to edit the base vocabulary. (See Terms.)
- Add Vocabulary. Use this to create a new vocabulary. (See Terms.) The new term is appended to the end of the term list (this also updates the base vocabulary).
The Manage Terms Screen
You manage the vocabularies that underlie term lists via the Manage Terms screen. Here you can edit the standard vocabularies, or create new vocabularies and terms. Click a vocabulary to show its available terms. Terms Pane
Actions for a vocabulary or term are available in the title bar of this pane:
 Add a term
 Import terms
 Export terms
 Find terms in all vocabulary groups
Editing a vocabulary or term
Select the vocabulary or term from the vocabulary hierarchy and edit its properties as appropriate.

Finding a term
Before adding a new vocabulary or child term to the vocabulary hierarchy, check if it already exists, by entering all or part of its name into the Find field to show all matching terms. If it does exist, it will appear in the box. You can click on the entry to highlight the term.
Creating a new, top-level vocabulary
If the new term does not already exist (see above), complete its properties as follows and click Add Vocabulary:
Term. The label for the vocabulary in the hierarchy.
Description. A user friendly description.
Standard Code. For standard codes such as three letter country indicators.
URL. For example, pointing to a semantic definition.
Image. You can use this field to attach an image (ideally 400x400 pixels) to a term (these will then show as a visual description next to the term on data entry screen). New terms must be saved first.
Status. You can set the status for any term (e.g. setting the Status to Approved prevents any additional changes to a term).
The term (vocabulary) is added (alphabetically) to the vocabulary hierarchy.
Adding a child (root) term
Check if the term you wish to add already exists (see above).
Select or hover over the vocabulary (or term if you are creating a hierarchy of vocabularies) you wish to add to and click Add Child (or click the Add Child button in the Properties dialog).
The new term is temporarily added to the hierarchy with the default name 'new term'.
Change the default name 'new term' to the name of the term you are adding and complete the other properties as appropriate (see above).
Click Save Term. New terms are added alphabetically but can be repositioned.
Repeat this process for each new term you wish to add (ensure you select the correct vocabulary).
Note. Adding a term to a vocabulary does not add them to the individual term lists for different fields, since these are individually selected from the complete vocabulary. You need to update the lists for each field to which these terms should be added.
Moving and deleting terms
To reposition a term/vocabulary, go to the Terms pane, then simply drag and drop it in the hierarchy (child terms are automatically included in the move):

To merge a vocabulary into another (i.e. combine their child terms), go to the **Vocabularies pane** drag and drop it onto the vocabulary you wish to keep:

To delete a term (or vocabulary), select it and click Delete.
Important. If you delete a vocabulary, all of its child vocabularies and terms are also deleted, and cannot be restored.
However it is not possible to delete any vocabulary or term which has been used in a record in the database.
Importing/Exporting a Vocabulary
Import

To import a vocabulary, select the vocabulary (or child term) and click the Import button
Step 1, prepare data for import as a comma or tab-separated file.
Paste the data or upload an existing CSV file (e.g. a previously exported vocabulary).
Step 2, define the parse parameters. Click Analyse, and preview the data to be imported in the lower pane.
Step 3, map columns to term field. When ready to import, click Import.
Export
To export a vocabulary, select it and click the Export button  The vocabulary is exported as a CSV file.
TUTORIAL
Accessing the ‘Vocabularies’ menu
The aim of this tutorial is to modify the structure of the database so that we can record, for example, the ideological affiliations of each world leader in the database. To do this, we need to create a Vocabulary of different political ideologies that our world leaders might espouse.
You can view, add and edit all the Vocabularies in your database by accessing the ‘Vocabularies’ menu in the ‘Design’ pane. Add a new Vocabulary called ‘Political Ideologies’:

Adding Terms to a Vocabulary
Once you have created a new vocabulary, you can select it in the Vocabularies menu, and then start adding terms to it. Add some terms such as ‘Communism’ or ‘Neoliberalism’ to your new ‘Political Ideologies vocab’:

Creating a relationship Vocabulary
Relationships are defined by Vocabularies. To create a Vocabulary for a relationship, the process is exactly the same as for creating a basic Vocabulary. However, you must ensure to tick the box ‘Use for relations’ when you create your new vocabulary. Add a new relationship vocab called ‘Poltical Offices’:

And you should also use a different naming convention. It is best to use verb phrases such as ‘is Prime Minister of’ for relationships, rather than simple nouns such as ‘Prime Minister’ (e.g. ‘Angela Merkel’ → ‘is Kanzler of’ → Germany). Add a few terms to your Political Offices vocabulary such as ‘is Prime Minister of’ and ‘is Dictator of’:


Hierarchical terms
Question : est-ce qu’on peut importer un thésaurus ou un vocabulaire controlé existant (ex. Opentheso) ?
À priori OUI à partir du moment où l’export peut se faire en csv ou SKOS (?) -> @todo lien vers opentheso Lookup
Heurist recognises a period-separated term suh as Stone.Igneous.Granite and Stone.Sedimentary.Limestone as creating a three level hierarchy (one can also specify that the periods can be treated as just periods within the labels).
Vocabulary terms can be structured as a hierarchy by dragging under any other term, thus creating a tree structure.

A simple example of such a structure (trees are not limited to two levels):
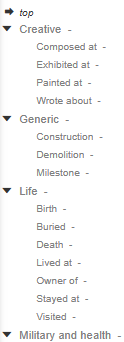
Clicking on merge into target term allows terms to be combined when dragged onto anotehr term - any term which is merged with another will be replaced in any records that use it with the result of the merge. A verification popup is displayed before any merge as the result is irreversible.
Reordering terms in the vocabulary tree
The  icon which appears on hover over a term will pop up a window which allows terms in that branch of the vocabulary to be reordered by drag and drop
Effects on search
Controlled tree vocabularies are useful for drop down choices as they allow search on a general term (eg. all Bénédictins) or on a more specific term (eg. Ordre de Fontevraud)

###To be continued !!! 04/03/2025
Editing terms
Term descriptors:
standard value, label, semantic you are i, image
flag terms
Setting Inverse Terms
By default, terms are 'non-directional'; that is, the same relationship term is used whichever the direction of the relationship (e.g. Painting > Linked to < Artist). However, if the relationship term does have an inverse that needs to be described (e.g. Versions > IsEditionOf has the inverse Versions > HasEdition), you can add it. Note. An inverse term must already exist in the Vocabulary tree list; if not, create it first.
Link terms
change field type
CSV export and import to modify field content
Record ownership
Add record URL with tags and field values and ownership
Sustainability - no plugins
@todo This does not belong here
Many systems provide basic functionality in the core product and depend on plugins for for quite common functions such as field formatting for data entry or export of common file types. This is a recipe for disaster, for example Drupal has more than 40,000 modules many of which only apply to specific versions, have not been completed to usable condition or no longer work.
=== Define Connections ===
Connect Data
A powerful feature of Heurist is the ability to relate or link records together to connect your data in a meaningful way without the complexity one might be familiar with in relational systems. Relationships are immediately available between ANY record types, without any further work, but these can also be constrained through a constraints menu so that only particular relationship types are allowed between particular pairs of record types, and this also allows constraint of the number of relationships allowed (e.g. one can only have two parents or a specimen bag can only belong to one context). However we also have two powerful methods for embedding connections directly in the records so that they appear contextualised in the data entry form: Record Pointers & Relationship Markers. For step-by-step instructions to create new pointer fields or relationship entities, click the links below:
Below, we explain the theory behind pointers and relationships. Which should you use, when and why?
Making connections
- Record pointers
- 'dropdown' presentation with search
- adding new values automatically linked to record
- Child record pointers
- Only one parent
- Invisible back pointer, but it is in fact accessible as
- cannot/should not use as stand-alone
- 'knows' its parent so cn make use of fields in parent
- In which direction should you make connections???
- Use of the visualisation diagram to make connections
- Relationship markers
- Relationship terms
- Relationship vocabularies
- Inverse terms / reflexivity
- Pros and cons of using relationship markers
- Mediaeval monks as an example
- Intermediate records
- Referencing bibliography types
- Sub-records
- Use for varying attribute sets
- Use to describe elements eg. of a tool or a structure
- Sub-record creation function
- Use with caution, non-reversible
Record Pointers
The simplest way to connect two records to one another is using a Record Pointer field. In most cases, a record pointer will be sufficient. For example, if you wish to record that a particular Building is situated in a particular Place, it would usually be sufficient to have a field called 'location' in the Building record which simply points to the 'Place' where it is located. However, Heurist provides many additional ways of linking records to one another, when the simple Record Pointer solution is inconvenient.
A record pointer is a field within a record that defines or references a one-way link to one or more specific record types. You define pointers between data when you create the database structure. The type of a pointer can be constrained so you can only select a record of a particular type (or types).
Similar to term lists, pointers allow a field to be populated from a controlled list, but in this case the list is all records in the database of a particular type, or types. This effectively ‘embeds’ all the information from the chosen record in your current record (but it is only stored once, however often it is ‘embedded’).
Typically, record pointers are used when there is a specific known relationship. For example, to identify people (authors, owners, actors, ..), multimedia items (pdf, images, video), events, places, organisations etc. with specific relationships to a record. Record pointers can define relationships between heterogeneous records (e.g. event with person, building with date etc.).
For example, imagine a record about a chapter in an edited book. It has one or more authors and it belongs to a book. But it may share the author(s) with many other books, book chapters, articles and so forth, and the book with a dozen or so other chapters, each with different authors. Rather than entering the author(s) as text fields and repeating this information for every chapter in the book, you can create records for each of these Author entities and link them into the record for the chapter. You can then use the Author(s) field (which in this cases is a repeatable field) to select exciting authors in the database, or if they do not already exist, create them. In the same way you can create book records, series records, publisher records and so forth, and simply point to these records instead of re-entering the data.
Using pointers saves typing, reduces data entry errors, and ensures a continuous connection between records that share the same source material (e.g. authors, books, publishers etc.).
Use record pointer and relationship marker fields
Record pointers are the workhorse for quickly and easily building simple relationships between records. Use a record pointer field to establish a hierarchical relationship through a pointer to a parent record (e.g. a chapter belonging to a book or a photograph belonging to a collection) or to indicate records with a specific role in relation to the entity being described (e.g. the author of a book, the producer of a film, the venue where a play is performed, a birth or commemoration event, a qualification).
Relationship markers are similar to pointers but carry additional information; minimally, a relationship type, but also commonly a date range over which the relationship is applicable. Relationships are useful where there are lots of potential types of relationship (e.g. roles that people may play in relation to a theatre production), as an alternative to defining a separate pointer field for each role.
They are also useful where the relationship has a limited duration (e.g. relationships of employment, patronage, residence or exhibition/loan).
As a general rule, use a pointer field, constrained to a specific record type (e.g. place, person, series, component), where you will record a single value (e.g. parent) or a small number of values (e.g. authors) which have an unequivocal relationship with the entity being described and where multiple pointers are all equivalent (although they may be ordered—authors being a good example).
Use a relationship marker field where you do not know a priori which relationships will be present and/or there are numerous possible relationship types, or the relationships have a temporal range, or the relationships are subject to interpretation and you need to provide supporting information through notes or references.
Relationship markers
Relationship marker fields provide a built-in method for connecting entities with typed relationships and dating. This is very useful for things like relationships between people eg. family or associates, or between people and groups eg. organisations, associations. It is valuable because Heurist can automatically 'reflect' the relationship so that a relationship marker placed in both records will show the relationship from the perspective of the record where it is located. So if A is shown as Master Of B in A's record, B will be shown as Student of A in B's record (see example of Briuno of Cologner and Willigis, Archbishop of Mainz below).
Relationship records can include start and end date of the relationship as well as other attributes such as notes and bibliographic references, and the user can add additional attributes if they wish, as with any other record type
However, although relationship markers can define the set of relationships which are allowed and the types of entity which are to be related - so we can have family connections of people and stratigraphic relations of archaeological contexts in the same database - relationship records are limited by the fact that there is only one type of Relationship record. So, if one adds additional attributes they will be added to all Relationships.
This may not make a lot of sense if one starts to add, for instance, fields for stratigraphic drawings, photos and field notes describing the stratigraphic relationships, which will then appear for family relationships; although its is perfectly OK just to ignore them, it's inelegant. This is where intermediate records connecting entities come in to play. They take on much the same role as relationship records, but each type of relationship will have its own record type with the attributes specific to that relationship.
However it may be worth creating an intermediate record even if there is only one type of relationship in order not to overload relationship records with additional fields and with a view to adding other intermediate record types in future.
Relationship markers A relationship marker is a record that defines a two-way link between two records that you wish to connect. Relationship markers allow connections to be established between any two types of entity, but also allow the type of connection to be recorded via a separate relationship record. What the relationship marker does is build in the relationship to the databases structure and prompts the user as they build their database. It provides structure as to what relationships the user can build.
**Note. **Relationship pointers differ from relationship markers in that they create a direct one-to-one link between records, without an intermediate relationship record, which in some instances may be the preferable solution.
(See ‘When to use a pointer and when a relationship?’ below).
The relationship marker is implemented as a separate record that links two records together, regardless of type. All relationship details are stored in the relationship record itself, which has two fields that point to the source record and the target record of the relationship. The relationship marker field is embedded directly in the data entry form – it does not actually contain any data itself, instead it acts as a marker (or prompt) to the user to create a new relationship record (‘show this type of relationship at this point in the form’).
Relationship markers may be further constrained to specific record types and a limited set of relationship types appropriate to that point in the form; the constraints restrict the term list (of relationships available) and the target record types. Relationship markers are useful in recording connections that are less standardised. For instance, have lots of different options (such as stratigraphic relationships or family relationships by birth) or have a time-limited component (such as museum loans or personal relationships by marriage or association) or otherwise require additional information (such as assignments of connections which require interpretation and explanation).
A good example of a relationship is that between a brother and sister. You can use a relatinship to represent Jack being Jill's brother, as in the diagram. In this case, there are three entities at play: Person(Jack) + Relationship(Siblinghood) + Person(Jill). In this case, Heurist automatically deals with Jack and Jill's genders, and implies that Jill is Jack's sister as soon as you enter that Jack is Jill's brother.
Child Record Pointers
A somewhat similar usage is to break down sets of attributes which apply to components of an entity or only appy to particular subtypes of an entity. For example:
- Components: individual scenes (components) of a painting or decoration panel might be recorded as sub-records, and they might have further sub-records describing individual figures or motifs.
- An architectural structure might similarly be broken down into components, some of which may be repeated eg. rooms, doorways, while others may only occur once eg. roof, with each of these component types having its own distinct set of attributes.
- Subtypes: A stone artefact might have general attributes such as type of material, weight, dimensions, measurements and artefact class eg. ground axe, core, scraper etc., and then for each of these classes a sub-record, of which only one will be present, describing the more specific attributes relating to that class of object.
- In the Intermediate records section, we used the example of a database about plays and the theatres where they were performed. In that example, we suggested that you might create a 'Production' record type to link plays to theatres. Now each 'Production' would usually, by definition, be a 'Production' of only one particular play – this would be a good use case for a Child Record Pointer. By making the 'Production' a child record of the 'Play' record type, you ensure that each Production is linked to a play and to only one play. This also makes it easier to read your database, as the 'Productions' will be neatly listed in the data entry form for each Play, and the Play for each Production will appear prominently at the top of the data entry form for each Production. In all of these examples, the sub-records are records in their own right, and can be seen as such in the database, but they 'belong to' a specific parent record. This is implemented by making the pointer from the parent record to the component or subtype record a child record pointer (the lefthand image shows only the most relevant fields from the record pointer field modification form, the righthand image shows how the child record indicates its parent):
Sub records and child records / Intermediate records
Relationship markers are ideal when you wish to record many different types of relatively simple relationships between different records. For example, Relationship Markers are ideally for recording family relationships – there are many different types of family relationship, but from a data perspective most family relationships are quite simple (some simply is someone else's mother). However, if you want to record a more complex interconnection between two records, then you may need an intermediate record type. For example, imagine that you wish to record where a particular play was performed. You have a number of plays in your database, and a number of theatres. Now a play is not simply performed in a theatre – each production potentially has a different cast and crew, runs for a different number of weeks, uses a particular text or version of the play and so on. So instead of creating a Record Pointer or Relationship Marker that directly connects a play to all the theatres where it was performed, you may wish to create an intermediate record type, such as 'Production', which sits in between plays and theatres. The 'Production' would record which play was produced and in which theatre(s). You could also record any other information you liked about each Production, such as the cast and crew, acting style, budget and so on. Sometimes you may need to create a number of intermediate record types to link two records together. Thinking about linking records in this way can be a good way of building the structure of your database.
Deletion of child record pointers
Move fields into sub-records
This is a complex funciton. We recommend, therefore, making a backup copy of the database with Admin > Clone before running it (and perhaps trying it on a clone before running it on your production database).
Using data in intermediate and sub-records/child records
Having recorded data in records which are connected to the records of interest, either one step or two steps removed, how do I access the fields in these records, for instance to find all the books illustrated by a particular illustrator, the images containing a particular type of motif, all the buildings with peristyles longer than 10 metres or the silcrete artefacts with polish on the lefthand edge? We can access these fields in several places: Constructed title Filter builder Facets builder Custom reports
Pointer or Relationship? The primary difference (as shown in the diagram opposite) between a record pointer and a relationship marker is that in the first instance the relationship details are stored in the record whereas in the second instance the relationship details are stored in the intermediate relationship record, which gives you more control over the relationship (e.g. specifying the type of relationship, date range, label, annotations etc.). The simple rule is, if you simply need to identify a fixed type of relationship, such as an incontrovertible whole-part or a specific function such as Excavator, use a Pointer field. If you want greater richness, such as specifying an open-ended list of roles, e.g. for a film Director, Producer, Gaffer, Actor, Cinematographer, etc. and to enrich those roles with temporal limits, annotation and so forth, then use a Relationship Marker field. When to use record pointers
- Aim to use a record pointer if possible, that is where the relationship between two records is not time-limited. Record pointers can also be set to parent-child (whole-part) where there is such a relationship.
- If you have several types of relationship you can use several record pointers.
However, if there is a long list and/or time limits eg. in family relationships, or where you wish to add notes and referencing information to explain each relationship individually:
- Either: use a relationship marker field (which allows a list of relationship types in the relationship type field, plus space for additional fields such as time, notes and referencing information);
- Or: use a record pointer field to a new record type (intermediate record) which expresses the relationship and any other information you wish to record. In this case you are effectively introducing a typ of relationmship record, but one which does not use the special functions (notably inverse relationship types) of relationship records.
- Where some entity (e.g. an author), is referenced by many records. The data about that entity (name, title, date of birth, location, roles etc.) can be entered once into the record describing the entity and then referenced from as many other records as you wish. This is preferable to listing all the related records in the single record to which they are related (which is why we reference an Author for each book or artiucle they wrote, rather than listing al lthe books and articles under each author).
- For resource pointer fields, where you wish to constrain the pointers to one or more specific record types. This is useful, for example, if you want a pointer to a person or organisation (e.g. as the owner of copyright) and want to make sure that this pointer can only point to one of these entities and not to, say, a website or an artefact. When to use relationship markers
- If the relationship is not permanent (i.e. it has a time range, such as a person as emperor of an empire)
- There are several different types of relationship possible between any pair of entity types (for example, an organisation can be related to people as director(s), owners(s), member(s), student(s) etc. Rather than creating separate pointer fields for each of these relationships, they can be created as relationship records with a range of relationship types)
- The relationship is not unequivocal or has rich information associated with it, and therefore requires commentary, justification or bibliographic references (which can be entered as Interpretations or notes in the relationship record – there is nowhere to store additional information in a pointer field);
- The set of relationships is open-ended or requires complex constraints, such as genealogical relationships which might be extended with new relationships, and where one might wish to specify, for example, that a person can have no more than four grandparents, only two of whom can be grandfathers.
- By using relationships, you can record additional information about the relationship, including the type of relationship (from a list of allowable types), the date range of the relationship and notes about the relationship
Constructed titles and Title masks
One of the most powerful and underutilised features of Heurist is hidden-in-plain-sight. It is the title used to represent records in the results list, in connections, in reports and many other places.
The Constructed title is like the reference you might find in the bibliography at the end of a book: it uses a concatenation of important fields, sometimes shortened, to uniquely identify and summarise the database record in question. The constructed title is generated on-the-fly when the record is created or modified.
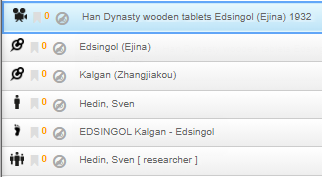
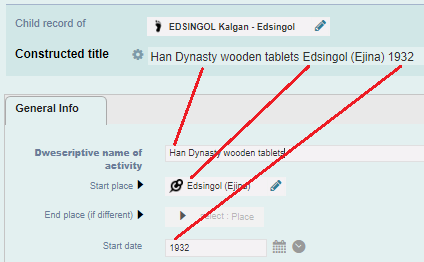
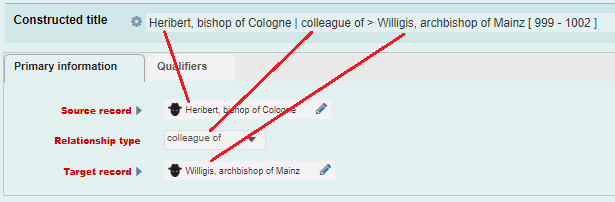
Constructed titles are used to represent records when they are listed in search results and as the visible representation of the record referenced in a pointer field (first image below) or relationship marker field (second image below).
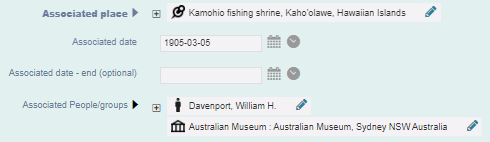
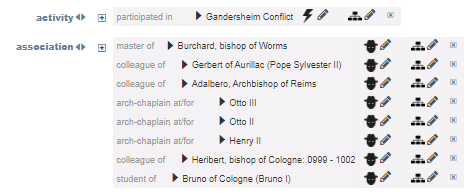
Constructed titles can also be used in reports and visualisations, for sorting, in other constructed titles, and as the constructed title of connected records. We strongly recommend putting a little thought into the design of the constructed titles, as well-designed constructed titles can greatly improve the clarity and ease of use of the database.
The Title Mask defines the choice of fields in the constructed title. Title masks are one of the most useful, and perhaps misunderstood or under-used features of Heurist. A separate title mask, with different fields, is defined for each record type. The constructed value is used as the extended title displayed in search results and other lists.
The title mask builds a constructed title from the values of fields in the record.
- Fields are identified by [ ] e.g. **[Title], pp. [Start_Page]-[End_Page] **might generate: "Alice in Wonderland, pp. 37-39" Conditional text
- Add optional text before a field (if it has a value) or a different set of text if a value is not available by adding {\Text for existing value \Text for missing value} after a field, for example: [Starting_date] {\Starting date: \Start date unknown} will either generate: "Starting date: 04-11-1974" if there is a date, or "Start date unknown" if Starting_date is empty. You can also leave the value blank, in which case nothing will be output in the case of a missing value.
- Inserting a literal square-bracket : use two consecutive square-brackets ([[ or ]]).
- Inserting fields from the tree : The element names in square brackets should match field names for the record type, and this is ensured by providing a tree of available fields which can be inserted

Constructed titles can use fields in the parent record (connected by a parent-child record pointer), as we can see in this example:

Constructed title aka Record title or RecTitle
Setting the constructed title
To set the constructed title for a record type, edit any record of that type (or simply add a new blank record) and click on the Constructed title link left of the title at the top of the edit form:

which will bring up a dialogue allowing you to select the fields which you want to use to construct the title for every record of that type. **HTML tags in Constructed Titles.
Admin > Rebuild Record Titles
This option recalculates all the constructed (composite) record titles, compares them with the existing title and updates the title where the title has changed (generally due to changes in the title mask for the record type). At the end of the process it will display a list of records for which the titles were changed and a list of records for which the new title would be blank (an error condition). Note. To check the validity of title masks, see Administration | Verify Title Masks. Result Title fields are scanned and title usage updated where applicable. The scan shows a list of records for which the titles were changed. This includes: number processed number marked for update number left as is (these are left blank due to incorrect formatting etc. and need to be checked manually via the next step) To view all updated records in the Search Results Pane (in a new browser window), click the view updated records link. Note. If the title is blank, update the record appropriately (see Define New Record Type | Title Masks).
Content to be merged or eliminated
<so underused …> show lots of tips and tricks of how to use them, notably when dealing with hierarchical entities Title masks allow you to define composite titles that can be constructed dynamically from field values.
**You can add simple html tags in the constructed title eg. for bold or link to put link to open an image referenced in the record purely by its name. Please remember to close tags. Bold, italic, underline, strong, emphasis and superscript are allowed, Others are stripped out automatically. If you need others, contact the Heurist team. Note. To verify title masks, see Masks provide the ability to build a composite title based on information taken from other fields in the record, on the fly. The title mask is a string into which field values are inserted to create an extended title for the record. The constructed value is used as the extended title displayed in search results and other lists. Fields in the record are indicated by square brackets. The element names in square brackets should match field names for this record type. For example, a Person record might have the fields: Given Name(s), Family Name, Title. In this case you could create the following title mask: [Family Name], [Given Name(s)] ([Title] A person whose Family Name = 'Smith', Given Name(s) = 'John', Title = 'Dr' will be rendered in the Title field as: Smith, John (Dr) Other people will be rendered appropriately. Fields in records that are referenced by the record through pointers can also be used. For example: [personpointer].[Last name] This pulls out a person's name from a person record pointed to by the current record. Additional text or punctuation can also be included. For example: [Title], pp. [Start_Page]-[End_Page] This renders the Title field and Start and End Page fields as, for example: Alice in Wonderland, pp. 37-39 To insert a literal square-bracket, use two consecutive square-brackets ([[ or ]]). Fields in records referenced by the record through pointers can also be used: [personpointer].[Last name] This gets a person's name from a Person record pointed to by the current record. To create a title mask
- Once you have saved your record type, select the Edit Mask button. Note. To later edit the Record Type page, navigate to the Record Type page (go to Database | Manage Structure, select the relevant group and click the Edit icon for the record type.) The Record Type Title Mask Edit dialog displays:
 Note. You can enter a mask directly into the field if you wish, or build the mask as follows.
 - Position the cursor in the Build Mask field.
- Select the field(s) you wish to insert from the left hand column (this shows all available field markers in the current record, plus fields in records pointed to by this record) and click Insert Fields. You can repeat this step for each field or set of fields.
- To add additional text around the field markers, enter the text without square brackets in the appropriate location.
- When ready, you can test the mask using actual data. From the Test Mask dropdown, select any record, then click Test to view the result:

- When the mask is correct, click Save Mask to save it. The mask will now appear in the Mask field.