
Ch 04: Data entry
Documentation rédigée le XX/XX/XXXX par Y mise à jour le 25/06/2026 par Oanez Hélary
When you create or edit a record it opens automatically in data entry mode. It is a form where the fields to fill are specific to each entity type and the values given to the fields change for each record.

The data entry form is also a data structure modification form - click Modify structure at the top (available to database adminstrators only). This allows direct modification of the structure for the record type being edited so that the changes can be tested as you work. See later, and the following chapter.
1. Opening and Navigating Records
1.1. New Record
To create a new record and fill its data entry form, you can click the [New] button. The type of the record you add by doing so is indicated in italics under "New". It will be the same type as the last record you added. To change it, just stay over the button without clicking it : a slide tray appears and allow you to click the correct record type (entity type).

Another way to add new records is with the [Populate] menu. See chapter 6 for further details.
1.2. Existing Record
To edit an existing record, you first need to find it. This can be done with the [Explore] section. You can access it by clicking on the Heurist logo or on the button in the left menu. See chapter 7 for further details
.
Double-click on the record you want to edit, or click on the pencil icon or new tab icons
 which appear when you roll over it in the results list. You can also click the pencil icon on the Record tab in the righthand pane or wherever it is used to view information on a record.
2. Layout of the Data Entry Form
The Data Entry form allows you to edit the record you're consulting and its metadata ([Record Summary]). It also give you easy access for editing the structure of its record type ([Modify Structure]).

The heart of the Data Entry is the form which allows you to indicate the values of your record. At the right of the form, there is an expandable column with metadata about the record. At the top of the form are some buttons, either related to the record type ([Modify Structure] and [Constructed title]) or to the form itself (in green on the screenshot). Finaly, two horizontal bars frame the windows : they govern the window itself and the interactions the latter allows with the database. We will examine each of the components of this form in turn.
2.1. Top and bottom bands
2.1.1. Top band
The top band gives a summary about the record : its record type, unique ID number for the database, and its constructed title (which is the name of the record in the database). On the right side of the top band, there is a [Fullscreen] and a [Standard] button : the first one expands the window, the other centers a smaller view of it. When screen scaling is changed, the form automatically resizes to keep the controls onscreen.
2.1.2. Bottom band
At the left of the bottom band are the navigation controls. If the record has been opened from a set, you will have the option of stepping to and fro through it (the order is determined by the filter applied to reach the data, if non it is antechronological by last modification). If any change has been made, you will be proposed to save the changes.
Some buttons are disabled if no changes have been made to the data, but even when apparently disabled the [Save] button can be clicked to update the record title or the personal data which do not trigger the changed data flag.
2.2. Record type related buttons

In the top left corner are the icon and name of the record type to which the data belongs.
2.2.1. Modify structure of the record type form
Click [Modify Structure] to modify the fields of the record type. A new windows will open with a summary of the fields to be completed for a record of this record type on the left, and the Data Entry form on the right.
This is an extremely powerful function, as it allows you to modify the structure of your database on the fly without affecting existing data (other than intentional deletion of fields and associated data, which comes with adequate warnings). Fields can be added, renamed, reorganised, grouped under headings and to some extent field type changes are permitted (without loss of data).
The numbers next to the tree show how many times a field has been used; this is particularly useful when importing legacy data to identify little-used fields which one may wish to remove or combine with other fields. The tick and crossed-out circle icons allow one to open a new browser window for all the records with / without the given field.
See chapter 5 for further details.

A gear icon appear at the left of the fields. Rollover displays a short menu of frequently used changes. Clicking on it allows you to edit the field in question.
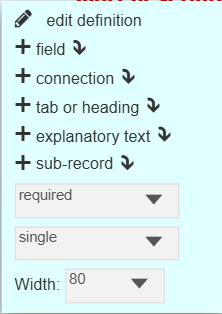
Strucural changes will be applied to the entire record type, thus modifying the structure of all records for that type. Values entered in the form relate to the current record and can be saved exactly the same way as in standard data entry mode.
2.2.2. Modify the constructed title
Click the gearwheel left of [Constructed title] to modify the title mask for the record type.

The title mask gives you a summary of the record content which is displayed in lists of results and where a record is referenced through a record pointer or a relationship marker. The form you get by clicking on [Constructed title] allows you to personalise it by selecting the fields which are concatenated to provide the title. See chapter 5 for further details.
2.3. Form options
At the right of the record type related buttons are several options :

- When checked [Show help] shows the Help text, which specifies the expected value of the field under it. This help text corresponds with the Description of the field entered when defining the field (and can be changed)
- The [Optional fields] checkbox allows you to show or hide optional fields in the form

[Hide from public] : when clicked, only the registered users can see the record. When unclicked the record is readable by anyone. The visibility of the record is indicated in the [Record Summary] (see 2.4), at the end of the record view (which everybody can see with the HTML link if the record is public, even if the database is not), and in the result view with the color (blue if public) and eye symbol.

[Refresh structure] : refresh the structure. Useful if modifications have been made to the record type or to the constructed title from the data entry form to apply them to the actual record.
[History] : open the History section of the [Record Summary] (see 2.4)
[Template] : download a csv summary of the form for the record type with details about the fields and their accepted values, starting with the values automatically asked for all the records, regardless of their record type (H-ID : the unique identifier automatically attributed to the record ; rec_URL : the record URL ; rec_Tags : the tags attributed to the record).For use in offline or highly repetitive data collection using a spreadsheet. Lists of terms can be used to control data entry (requires setup in the spreadsheet). Data can be imported back to Heurist with Import > Delimited text / CSV.
[Bug report] : open a form to report a bug
2.4. Record Summary
On the right side of the form is a tab titled [Record Summary] giving several pieces of information relating to the data but distinct from the values which compose it. The righthand panel is organized in seven parts: general information about the record and six sections in accordion-style: Private; Tags; Linked records; Scratchpad; Discussion; History.
2.4.1. General information
Opening the right side panel shows the record type of the record. Click on it to change it. The values of the previous fields will be relocated in other fields (for example the value of the field "Family name" will be assigned to the field "Title") if the field of the source record type is not in the record type of destination.
Under the name of the record type are indicated the record access and ownership. By default, the record is viewable by anly logged-in user and the owner is the one who have created it. The later can change ownership and visibility of the record by clicking on the pencil icon.
- Ownership can be reattributed to "Any logged-in user", everyone, a specific user, or a specific workgroup (about workgroups, see chapter 10)
- Visibility can be changed to be the same as the ownership, "any logged-in user" or public (everyone can access it)
Under access and ownership are :
- the name of the person who has added the record
- the date of creation
- the date of last update
Those cannot be changed (except for the third one which changes automatically when the record is edited).
2.4.2. Private
This section concerns the management of the record by the logged-in user. It contains two parts who can be edited using the pencil icon.
Bookmarks : this part is personal and cannot be consulted by other user. It allows you to define a password reminder, to rate the record and to write personnal notes. Writing something in this section will trigger the bookmark icon, who will appear orange in the database. If you have write a password reminder, a little key will show as well.

The content is not encrypted. Do not enter important passwords verbatim, as the security on on this data is basic. We suggest using a prompt whih is meaningful only to you, rather than an actual password.
To remove the bookmark, go to the result section, select the record, click [Selected], then unbookmark it. It will remove the bookmark itself as well as its content, the tags of the record and the password reminder.

The Data Entry form doesn't allow you to unbookmark a record, only to clear the content of the bookmark if you created one prior.
Note: The bookmark's icon doesn't appear anymore in the later version of Heurist.
Reminders : allow the setting of immediate and periodic reminders to either an individual user, a workgroup or specific email addresses. The minimum frequency is daily, but monthly or yearly might be more appropriate.
2.4.3. Tags
Tag retrieval functions are rather limited (tag:eat will find anything with"eat" in it; tag=eat will only find the word Eat or eat) and they cannot be used in facet searches, crosstabulation, linked open data, or organised hierarchichally. We therefore recommend setting up any controlled categorisation using Term list fields which have many more retrieval and organisational functions.
Note: Tagging a record creates a bookmark on that record.
2.4.4. Linked records
This section shows any records which have record pointers or relationship markers connecting to the current record. The listing is clickable so that one can navigate either to the linked record or to the relationship record linking the two records.
Note: The indenting is purely due to the length of the relationship terms – it has no hierarchical significance.
2.4.5. Scratchpad
The Scratch space section is merely a text field which can hold data until it is organised. It is saved as part of the record but it is not accessible in any way except as a cut-and-paste space during data entry.
2.4.6. Discussion
This is a deprecated function which is not expected to be resurrected.
2.4.7. History
Click on [History] on the main form for the record to retrieve its history. It show the changes done to the record and allows to revert them by checking the version you want to keep. The user who made the changes is identified by their ID number. You can bulk check by modification date.
2.5. Record form
The form body contains all the values that make up the record. Depending on the record type's structure, the fields may be divided into different tabs (these are purely for organizational convenience; they do not change the data in any way). The different fields of the record type are then displayed one after the other, along with their corresponding values for that record.

you can tab from field to field during data entry
2.5.1. Field categorization
Fields can be required, recommended, or optional.
- Required fields are bold and red. The form cannot be saved until they are completed.
- Recommended fields are bold and blue. They will always be displayed in the form.
- Optional fields are blue and can be hidden by unchecking "optional fields".
If you really must save a record even though you have not completed all the required fields, you can click Modify Structure (at the top of the form). It will ask if you want to save the data - reply Yes. Althogu you are now in Strucute mode, you can simply exit nd the data will have been saved. It will show up as an error in Admin > Test integrity, but it will not cause a problem (other than that it is not there when it is meant to be)
2.5.2. Field behaviours
As you roll over a data field you will see a number of icons at the beginning or the end of the field.
 clear (delete) the value
 hide (currently everybody can see the value) or
 show (currently only the registered users can see the value) the value to public. You can show a record to public (see 2.3) but hide some of the values of it by doing so.
 open the vocabulary editor (directly at the vocabulary used by the field). Allowing you to act (add, edit, creating sub-term, merge, rearrange, delete) upon the terms it contains
 add new term to the list from where the value is taken
 add a value to the field. It is to the left of the field, only if it can take more than one value
 drag the value up or down. Allows reordering the values of a multi-valued field
 appears under the name of a multi-valued field after a reordering of values. Will undo it.
 show calendar to select a date. It remembers the last date entered to minimise navigation. However, if you wish to skip to a different period or enter a historic date you may type the whole date with dashes, or simply type year and month or just year. If you then select he calendar icon it will jump to the appropriate year and month.
 brings up a more comprehensive date setting with several tabs (see 3.2.1.)
 add a picture by taking it with with the camera on the device you are using
 edit image metadata
3. Field Types
Not all icons appear beside each field, as the actions they trigger isn't always expected. The data entry form is designed to gather data in a structured format. While designing the database (see chapter 5) you specify the required data type for each field :
- Dropdown (terms, may be hierarchical)
- Numeric (integer or decimal)
- Text (single line text)
- Memo text (multi-line text, html or code)
More complex fields - Date / temporal More complex fields with specific behaviours
- Geospatial Used to record locations/areas and build maps
- File or media URL Used for images, audio, video, 3D, and other files (can be on a remote server)
Linking fields - Record pointer / Foreign Key } These fields are the key to linking records
- Relationship marker }
3.1. Simple type fields
Numeric (integer or decimal) A positive or negative number, with or without decimals. Non-numeric characters other than minus or decimal point are ignored.
Text (single line) A single line of plain text, typically used for names, titles and short descriptions. Use multi-line text for longer descriptions. Max 250 characters. If a text value starts with http:// or https:// it is treated as a URL.
Memo Text (multi-line or html) A plain text field which can accomodate multiple lines of text. Use for longer textual content (drag and drop the bottom-right corner to expand the editor). Offers three editors :
- text: write in plain text
- wysiwyg: What You See Is What You Get, interface with several button to format your text so you don't have to know html to do so
- codeeditor: a code editor, it makes it easier to write directly in a structured language such as xml or html or to correct it.

As this type of field deals with html, you can integrate to your text other elements, such as :
- Multimedia elements (pictures, videos, etc.). It will propose you to caption it.
- Hyperlink to be open in the current or a new window
- Link towards another record.
Dropdown (Terms) A flat or hierarchical list of categories, where the terms are drawn from a predefined vocabulary (the vocabulary can include terms from otehr vocabularies by reference). Generally from a single one eg. countries, languages, source, condition, material, colour. Using dropdown terms ensures referential integrity standardizing entries (e.g., avoiding inconsistencies likes "Yes" vs "yes"). Use dropdown when the list is relatively static and the categories do not exist as separate records in the database (in which case use record pointers).
3.2. Special type fields
3.2.1. Date / temporal
A calendar date with or without time of day. Whole years can be used. BCE dates are expressed as negative. Can also accommodate date range and uncertainty.
The date can be entered manually, with the calendar icon, with the [range] button, or with the range icon. The second line of the field allows to select directly yesterday's, today's and tomorrow's date in one click.
- Entering the date manually :
You can write the date in the field using the yyyy-mm-dd format. You don't have to write the whole date until the day's number. - Using the calendar icon :
The calendar automatically open on the last date entered. You can start writing the date manually and then select the day on the calendar to fastering the process.
You can click [clear] to reset the date you started entering, or [Today] to jump to today's date and navigate from there. - Using the [range] button or the range icon : for date estimation.
If the purpose is to obtain a date range, you should use two fields : Start date and End date, which will give you two values. Both of them are date field type. Using only one date field will provide only one value. Thus the range function of date type field is useful for indicating a date whose accuracy is not certain.

- Simple Date : for a single date. To use to specify the degree of certainty about the date (exact, approximate, before, after), the time of the event, the type of determination of the date, the calendar, and to add comment about it.
- Simple Range : for setting a estimation of date based on two other (earliest possible and latest possible). Allows you to precise the probability curve (flat, central, slow start, slow finish), the way the estimation had been made (attested, conjecture, measurement), to precise the calendar and to comment the date.
- Fuzzy Range : same as Simple Range except that the certainty is modulated as the beginning and end date of reference are subdivided in "not before/after" (Terminus Post Quem, Terminus Ante Quem) and "probable begin/end".
- Radiometric : useful for radiometrics values. Can only be used to set a BCE (before common era) or a BP (before present) date. You can precise what is the standard deviation (Std dev) of the value, its positive deviation (pos dev)or negative deviation (neg dev). It is also possible to indicate the Lab Code of the sample used and if the date as been calibrated. The date can be commented.
3.2.2. Geospatial (point, line, polygon ...)
A vector spatial object describing a location on the earth's surface. This field type is recognizable by its little earth icon.
Clicking on the field automatically open a map where you can set the location by using the search bar to select a place, by entering coordinates or by clicking on it after having selected a draw option (polyline, polygone, rectangle, circle or marker).
You can click and drag to navigate the map. There is buttons to zoom in and out, but you can also use your mouse's wheel. The map comes with several features.
At the left of the screen, you'll find :
- Bookmarks : you can bookmark places/areas on the map. You have to name your bookmarks. You can then find them by selecting their name in the dropdown. To edit or remove a bookmark, click at the left of the exit cross. A polygon or a circle cannot be used as a bookmark.
- Drawing options : Simple markers (record type icons or specified markers including cirlces and rectangles) can be used to indicate the place referenced by the geospatial field. Several icons at the left of the screen allow you to do so.
- Editing layers : @todo: JE N'AI AUCUNE IDÉE DE CE QUE ÇA FAIT
- Create new map document : add a new record of type "Heurist Map Document" . Map documents allow you to set u pa series of map layters, data sources and styles to create a specific map representation. For more detail see chapter ??
Record types are composed of fields, which have a field type. For example, the record type "Place" contains several fields which have field types : Place name (text), Place type (dropdown), Country (dropdown), Location (geospatial), etc. A lot of record types and fields are already in the Heurist database (here, the geospatial field type is linked to record types that are present from the start into the database). We advise against deleting them.
3.2.3. File or media URL
A file such as a photo, video, PDF, scanned document, spreadsheet or XML, uploaded and stored in the database or a URL to a remote file or streamed content. This field type is recognizable by its file icon.
Clicking on the field will open a small windows which allows to choose between using a file already uploaded in the database ([Choose previously referenced file]), upload a new one (to Heurist or to external repository, but the later is depreciated), or use an external URL linking directly to the file. You then might indicate some metadata about the file : its name, copyright, copyright owner and visibility (public or logged users)

3.3. Record linking type fields
These fields types create connections between the new record and other records of specified type or types (potentially including the same type as the record you are editing).
There are two kinds of record linking field type :
- record pointers : these simply add a direct link to a particular record (equivalent to a foreign key in conventional relational databases) as a value in the record. The target record type(s) allowed are defined by the record pointer settings;
- relationship markers : these add a new Record relationship record linking the current record with another record. The target record type(s) and types of relationship allowed are defined by the relationship marker settings.
In both cases the link will appear in the network view (see chapter 8b) and if the target record is not yet in the database, the field will allow you to create new records (see chapter 5).
Record pointer / Foreign key A simple connection to another record, normally constrained to specific target record type(s).
- Use where the field represents a direct connection and is permanent eg. parent, author, component, place, period.
- Record pointer fields allow a new record to reference other records of specified type which contain sets of related information, often components of the parent record, eg. a ship's captain, a person's father, etc. The referenced record may be an independent entity (eg. place, publisher, person, work) or group together related information such as the attributes of a person or object, a set of attributes which apply for a specified time period, or the attributes of some part of an object or for a particular type of object.
- The type of relationship, however, is implicit in the field name - father, mother, service, education, place or component all imply a fixed relationship to the parent entity - but not otherwise recorded.
- Typically, selecting the field opens a list of available values, comparable to a dropdown field, except that the options are existing records instead of terms from a vocabulary.
Relationship marker A more complex connection which allows specification of relationship type and period of validity.
- Use where there are numerous possible connection types and/or connections have a time span eg.roles in an event, social relationships, ownership, marriage, address.
- Relationship marker fields create a connection between two entities with an explicit relationship type (selected from a dropdown), as well as a date range and other contextual information.
- They are particularly useful when there is a large list of potential relationships, such as roles of actors in an event, interpersonal relationships, stratigraphic relationships and so forth.
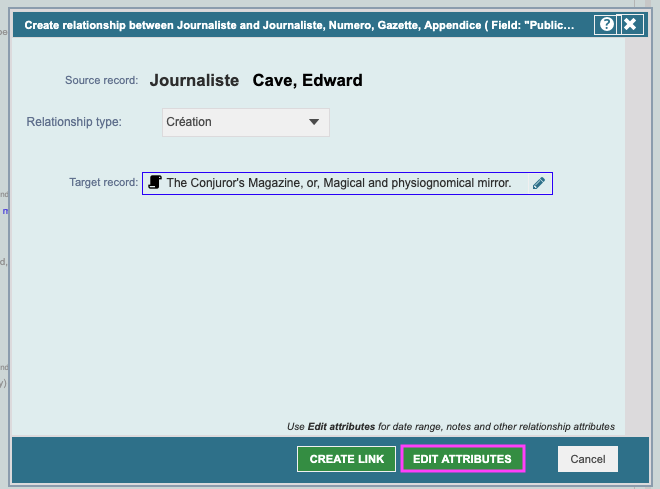
- Relationship marker fields look like a composite field in the data entry form but, rather than creating an attribute attached to the record, they create a separate relationship record which can carry significant extra information about the relationship.
- Filling this field will require to specify the relationship type and the target record. To ad additionnal informations, click on [Edit attributes]. You'll then be able to add start and end date of the relationship, a description, commentaries and title.

4. Optimising Forms for Usability
The few extra minutes you will spend ordering the fields in each record type, splitting them up into sections with section headers, and setting the basic parameters of requirement, repeatability and field width, will make all the difference to ease of data entry and the way you—and other users—feel about entering data.
- Make informative field names. For example "Location of meeting" rather than simply "Place", or "End date" rather that "End".
- Use tabs and dividers to break the data up into logical groups.
- Set field lengths appropriately. Set single line text fields to a length which will fit a normal value, as they will automatically expand as you type or if the value exceeds the indicated length.
- Think about which fields should be Required, Recommended or Optional (use for fields which are rarely filled in).
Keep all of this in mind while structuring your data, which is the subject of the next chapter.
No comments to display
No comments to display