
Ch 10: Adminstration of databases
Admin menu
Functions for creating and managing a database, export and archiving.
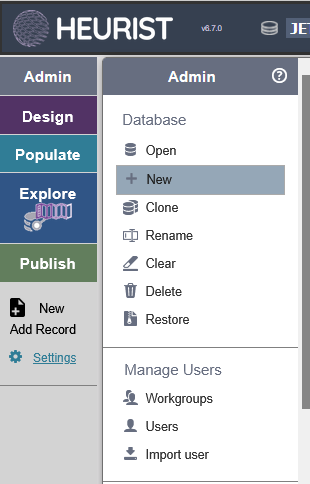
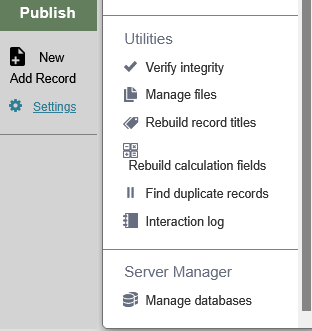
- Database
- Open – browse databases on the server and select a database to open
- New – create a new database with a default set of useful structure and optional test data
- Clone – makes an identical copy of an existing database with exactly the same structure, data and access rights
- Rename – rename the current database
- Clear – delete all data records in the database but leave the users, workgroups and structure intact. Uploaded files are not deleted
- Delete – delete the entire database
- Restore – restore the database.
- Manage Users
- Workgroups – create and edit workgroups, add users to workgroups and assign roles
- Users – create new users and edit existing user information
- Import user – import user credentials from another database on the same server
- Utilities
- Verify integrity – run a range of checks, report errors and allow ficing of errors
- Manage files – view and edit metadata and delete files (images, documents etc.) uploaded to the database
- Rebuild record titles – rebuild the constructed titles used to represent records in lists of results
- Rebuild calculation fields –
- Find duplicate records – find records with similar constructed titles and allow merging as required
- Interaction log –
- Server manager
- Manage databases – functions to help the system administrator manage databases on the server. Requires special password.
DATABASE
Open
Use this to select a database among all the databases on the server. You will be able to look for a database by its name (any string). You can only open databases to which you have access.
You can filter for the database you are after (often identified by your 'prefix', being the 5 first letters of your family name, unless you changed it or the database was created for a specific project). Clicking on its name will open a new tab and prompt your user name and password before accessing it.
New
Creates a new database, owned by you, populating it with a set of frequently used and key record types, fields and vocabularies.
The creator of the database is its owner and can manage it, its structure and users.
Some record types and fields are protected against deletion as they are required by the system, e.g. for mapping or bibliography synchronization, but some may be freely modified or deleted.
Naming the database : avoid not specific enough names. It is important to choose a short but informative name, since there may be thousands of databases on the server. Names are case sensitive ; punctuation is not allowed except underscore. Avoid using "test" in your database name, the word adds nothing, your database is a test until it is not a test ...
Managing users : you can define who, apart from yourself, has access to the database : see @todo link to “Manage users : Workgroups / users / import users”.
The properties of the new database are managed in “General information”: menu Design > Setup > Properties. The creation process only fills in a few fields of information : it is recommended to complete this set. See below @todo link to “General information”
Clone
Makes an identical copy of the current database. That means all structure, all data (attachments included) and all workgroups/users/permissions are copied over. You can copy the structure definitions into a clone database without copying the data. For this, please select “No data (copy structure definitions only)”.
If you want to make a backup, prefer @todo link to Publish > Archive Package.
You can clone a database on which you have limited rights, but you will only have the same rights on the clone.
To clone the database, it should be “registered” (see below @todo link to, menu Design > Register). This action requires an administrator password.
WARNING : Beware of making copies of databases containing many large files, as all uploaded files are copied. Please avoid making clones, particularly of large databases, as they use up lots of disk space and can annoy the IT centers hosting the service. If you need a copy for an experiment, please delete the original or the extra copy once finished.
This function simply copies the current database to a new one with no changes. The new database is identical to the old in all respects including users, access and attachments (beware of making copies of databases containing many large files, as all uploaded files are copied).
Rename
Rename the current database. The new name follows the same rules as the name of the database (see above @todo link to New).
The process will perform the clone and delete functions back to back in order to rename the current database, so please ensure all edits/changes have been saved before proceeding. Archiving file for the database to be renamed is optional.
After successful completion you will be required to login into the newly cloned database.
If Javascript has been enabled for this database you will need to ask your sysadmin to re-enable it for the new name, otherwise your website(s) will not work properly.
Clear
This clears all data records (included bookmarks and tags on specific records) from the current database but database definitions (record types, fields, terms, tags, users) are not affected, uploaded files not deleted and users, workgroups and structure left intact. The record ID counter is reset to zero so new records will have an ID starting at 1.
If the database has been registered, its database ID will not be affected.
Delete
Delete the current database.
WARNING : Be careful, the deletion is permanent, irrevocable!
This deletes the database completely, including all uploaded files and other work. Although deletion makes a temporary archive copy which can be restored for a period, this is not guaranteed and makes significant work for the server manager, so please be sure you want to delete the database.
Archiving all database files is optional.
Restore
#to be documented, asks for an System Administrator password
This allows to restore an archived database. A system administrator password is required.
Properties of your database (id 599??)
You can define the properties of your database in Design > Properties.
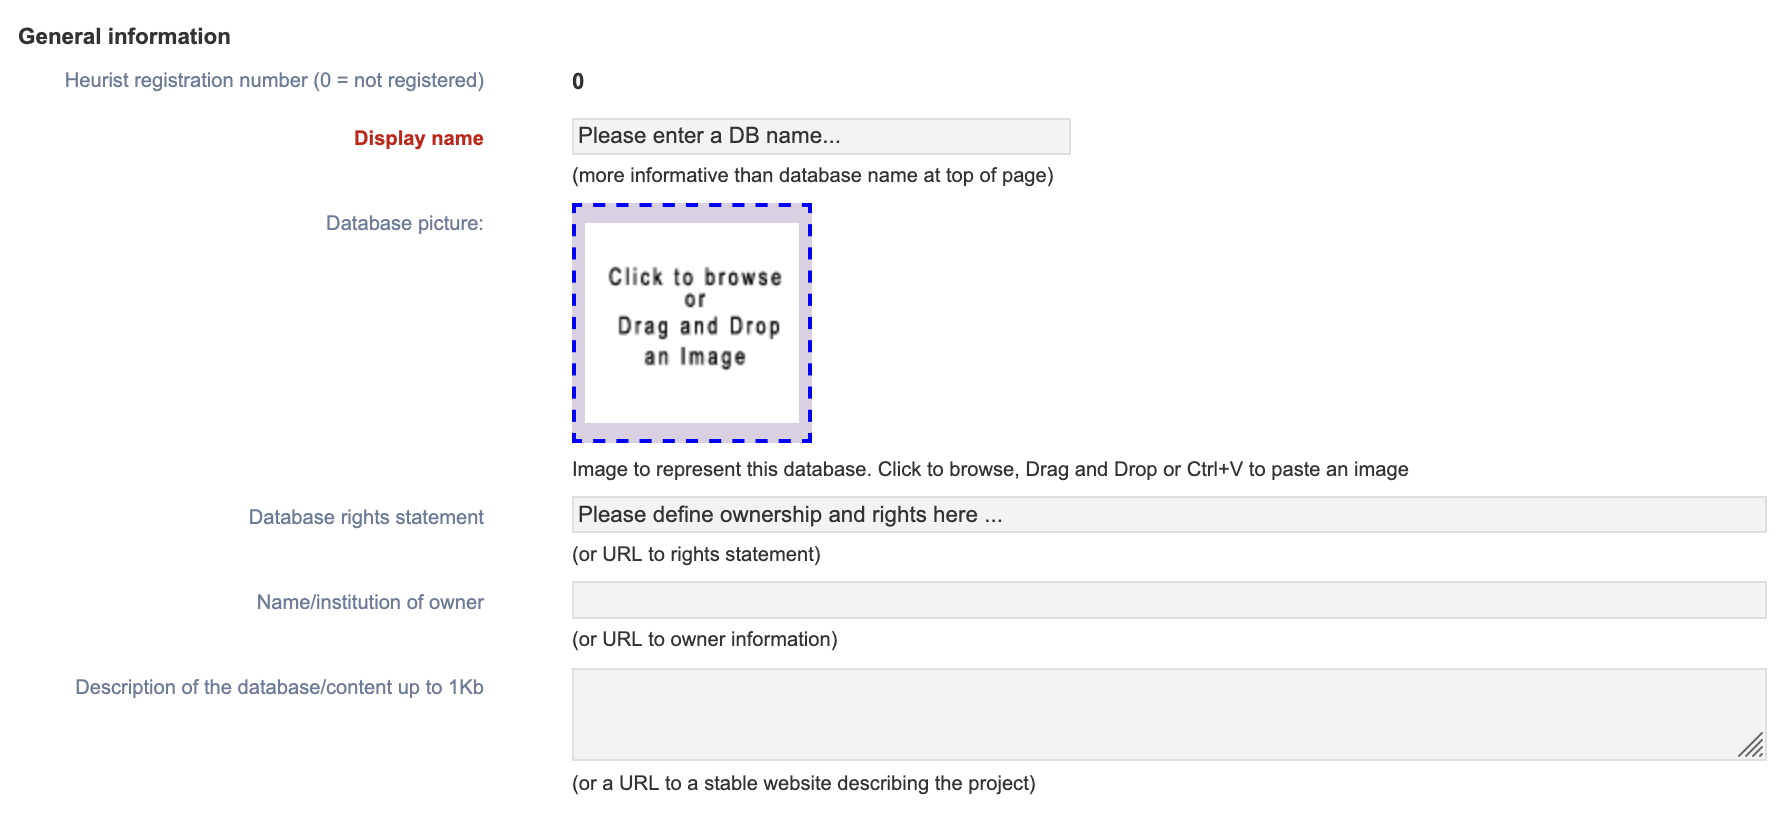
General information
The registration number is created when you Register @todo-link (to register chap 3) the database, if not it displays 0. The database format version number indicates the underlying Heurist database version.
The other details were entered when you created (and optionally registered) the database, and can be edited here. You can determine the name of your database, a photograph associated with the database, the rights to the database and its data, the name of the owner of the database and a description of the database.
Behaviours
### TO BE CONTINUED
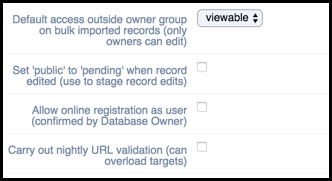
Set specific behaviours, as follows:
Synchronisation and Indexing
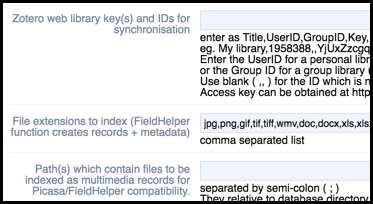
These sections will be described in this help where they are relevant. If you do not understand them then we recommend leave as is or contact the Heurist Team for further details.
MANAGE USERS
See @todo link to Getting started > 4. Collaborative work > 4.1. Workgroups and Users
The conditions of access, management and dissemination of the content (data) are based on the combination of users and workgroups. A user is assigned to one or more workgroups ; a record or a field is managed, displayed according to workgroups.
fin de l’étape de révision
Workgroups
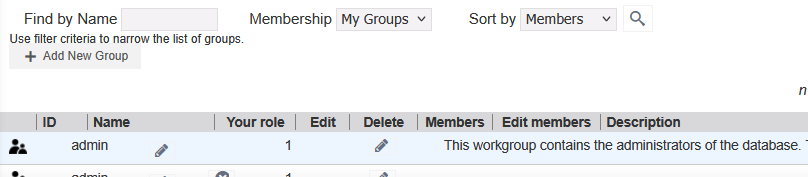
This function manages workgroups, which can be added, edited and deleted. The Database Managers workgroup (= workgroup 1) can’t be deleted. New users can be added.
It allows users to be allocated to workgroups and the setting of access roles (administrator or member) in each workgroup.
Option “Membership” allows to select the displayed information : All Groups / My Groups / Admin Only / Member Only.
When a user logs in to Heurist, he is identified as a Member or Administrator of one or more Groups.
By default, the following groups are created:
- Group 0: All Users (not visible)
- Group 1: Database Managers
- Group 2: (not visible) @todo: to be documented
- Group 3: Other users
Database structure can only be modified by administrators in the Database Managers workgroup, although other users can add terms to term fields (dropdowns) during data entry. Each record is owned by a workgroup, or by an individual user, and only the owner can edit the data within the record.
Other Workgroups can be created, with specific rights on specific parts of the database (eg., Record types etc.). User rights depend on the access control table referenced by the Heurist database into which they log (See Permissions by Role/Group below).
A central control table determines the group a user belongs to and what roles they have (Administrator or Member). By default, Heurist databases will use the central control table in hdb_HeuristSystem. Other Heurist databases may defer to the access control table in another Heurist database. For example, the students in a class might create databases that get their login information from the control table in a shared class database, in which case the rights will extend across all the databases created by other students (allowing students to log in to one-another's databases, although not necessarily to see any information, depending on how the data is locked to groups).
Heurist's security model for database access allows you to manage groups and users and their access permissions in a controlled and centralised manner.
The Workgroup “Database managers” contains the administrators of the database. The first user (user #2) has special status as the master user. They cannot be deleted.
Users
This function allows the editing of user's data such as name, password, email, interests etc. It also allows addition of a new user, deletion of users, or de/re-activating a user.
Modifications can only be made by the user themself or by the administrators in the Database Managers workgroup.
Users
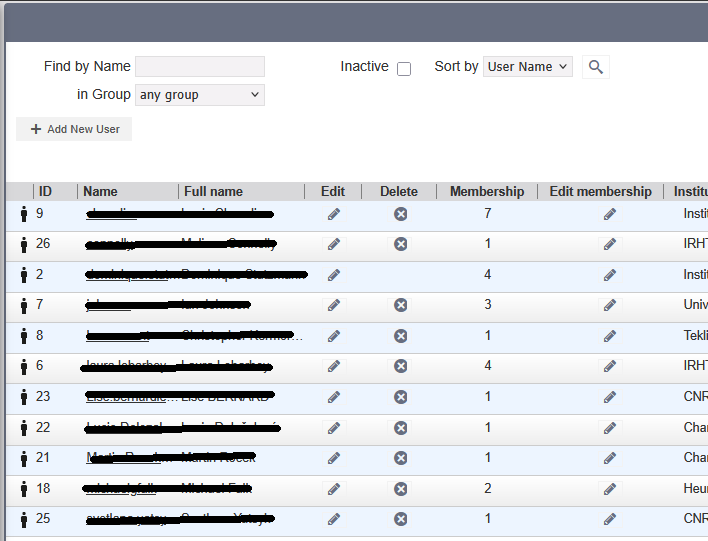
List of users
The list of users is accessible through the Admin > Users menu.
The list can be searched.
Users’ credentials and information can be edited by an administrator of the workgroup “Database managers” (menu “Edit”) and their roles and membership in workgroups can be edited with “Edit membership”.
User creation
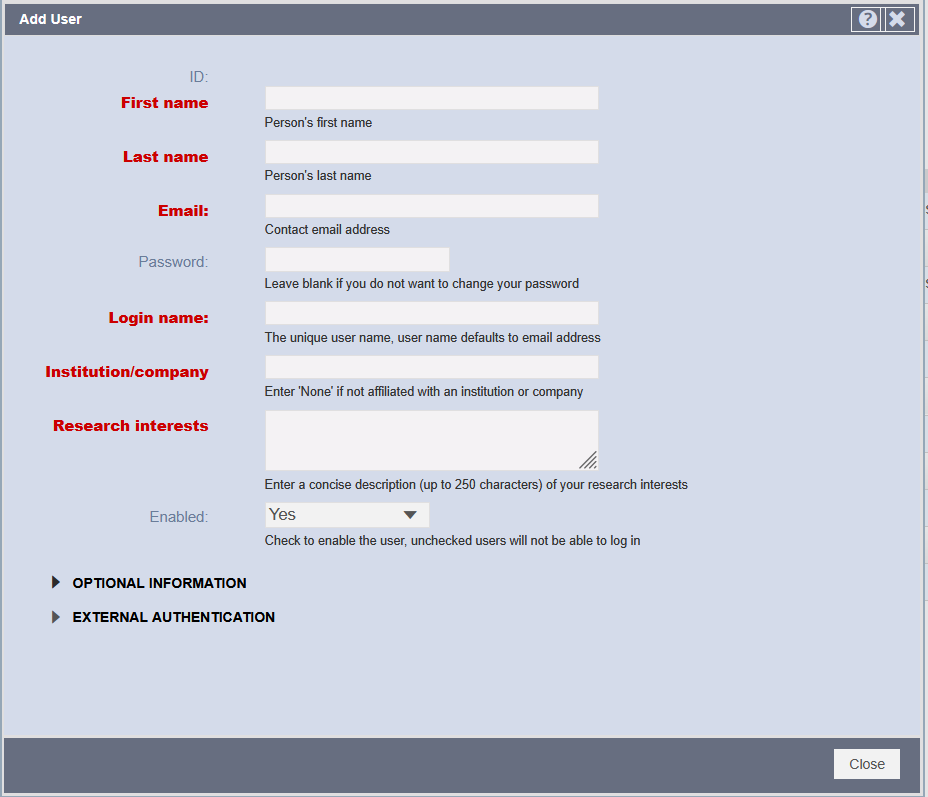
Import user
If a user is required who already has a profile in another database on this server, this function allows selection of the database and import of the user's profile.
The workgroup membership and access rights of the imported user are not assigned automatically, as they may be inappropriate. After import a dialogue allows the user to be assigned to workgroups as required, with a specified role in each (administrator or member).
Verify integrity
Databases are very complex entities, and while the software tries to avoid errors, some can creep in, notably during the import of data where we have preferred to relax data verification in favour of fix-up within Heurist, rather than requiring data to be made perfect before import.
A range of different structure and data integrity checks are run and errors are reported, along with buttons to fix certain structural errors and links which retrieve sets of records with a particular type of error, allowing the records to be corrected.
Errors reported include: structural errors, bad pointer fields, orphaned records, missing values and wrong number of values in a field, invalid characters, bad title masks, errors in dates and unrecognised term values etc. Green text indicates OK, orange indicates a problem.
Manage files
Displays a browser view of all files (images, documents, spreadsheets etc.)uploaded to the database. The files can be filtered by filename, path and file type, sorted by nmame, by size, or by date uploaded, the metadata on the file can be edited, and files can be deleted.
Files can be referenced in multiple records, but can also be orphaned (ie. not referenced by any record). Files can be referenced both as File field values, or as links or images within an html text eg. for CMS web pages or blog pages. Imported files will initially be orphaned, until Index media is run (which creates a Media item record for each file without such a record) or they are referenced manually within a record.
Manage files can also manage links to external files (files referenced via a URL to a stable repository on the internet) which are treated exactly like uploaded files for most purposes. External references to an external video streaming server are recommended for all videos, both to reduce server storage and load and because streaming services will do a better job of serving videos.
Rebuild record titles
Constructed record titles are short(ish) titles generated automatically for each record by combining data values stored in fields in the record. This allows the record to be easily identified in result lists.
Constructed record titles can become out-of-date where one record type references the constructed title of another in its constructed title. This does not in any way affect the operation of the database, it is purely cosmetic.
Running this funtion will rebuild all constructed titles from the data. If there are several levels of dependence you might need to run this function a couple of times to correct all titles.
Find duplicate records
Flexible data entry and repeating fields makes it hard to block the entry of duplicate records. This function compares the constructed titles of all records in the database and reports groups of records that appear to have similar titles. The sensitivity of the comparison can be varied, and the comparison can be restricted to records of the same type or applied across record types. Where duplication is incorrectly suggested, that cobination can be blocked from further reporting.
Controls against each group identified allow merging of records deemed to be duplicates. Fields which occur in more than one of the merged records can be added as repeats or one value can be chosen over the other before the merge is actually carried out.
All pointers to merged records are redirected to the merged result, as are PID references to one of the merged records. Tags and reminders are also attached to the merged result.
Manage databases
This section has a special password set by the server manager. It contains functions for reporting on the databases held on the server, checkign for integrity across all databases and so forth.
URL verification
Integrity checking of the whole database
Verify Integrity
As your Heurist database grows, its structure may change, team members may make mistakes, or you may import imperfectly structured data into the database. Unlike many databasing systems, Heurist is quite forgiving, and will allow you to bring imperfect data into the system. As this imperfect data may create problems, however, we provide you with the ‘verify integrity’ tool in the Admin menu, which will scan through your database and identify any problems in the structure of the data. You should use this tool from time to time, to make sure that all your filters work correctly and your data analysis is accurate. As soon as you click on the tool it will conduct the scan, looking for 16 common kinds of error:
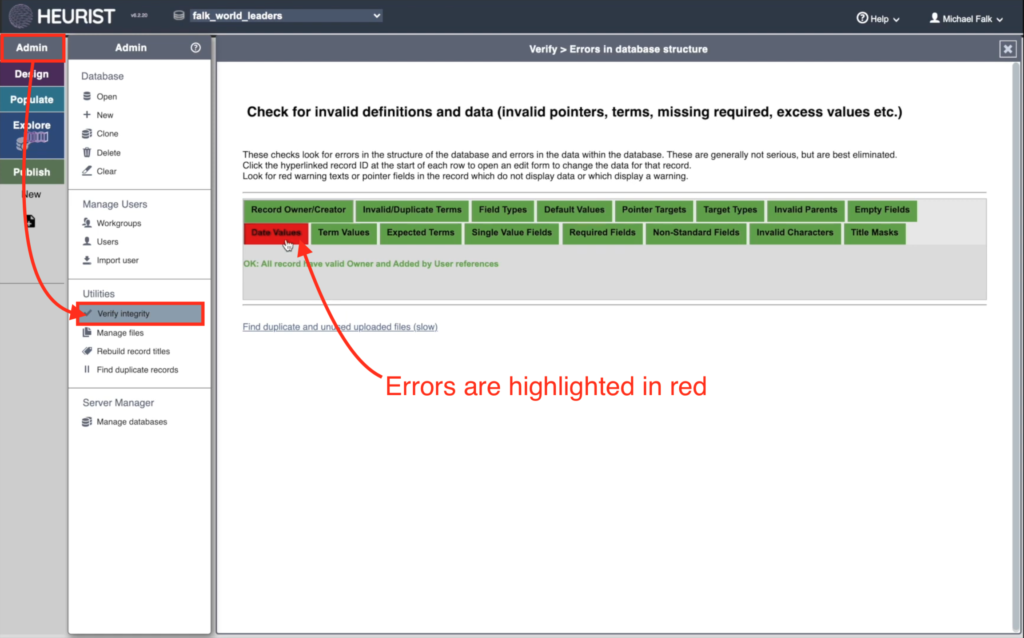
If it detects a particular kind of error, simply click on the highlighted heading to open up the correction menu. In this case, some dates in the database are recorded in an ambiguous or inefficient format. Heurist has fixed some of the dates because they could be interpreted easily (e.g. 31-Aug-1945). Others are ambiguous (e.g. is 8/5/2011 the 8th of May 2011 or the 5th of August?). In these ambiguous cases, Heurist will ask you to confirm the date format for particular dates before you click ‘Correct’ and convert them into a standardised format. Like other databasing systems, Heurist prefers the ISO datetime format: YYYY-MM-DD HH:MM:SS.
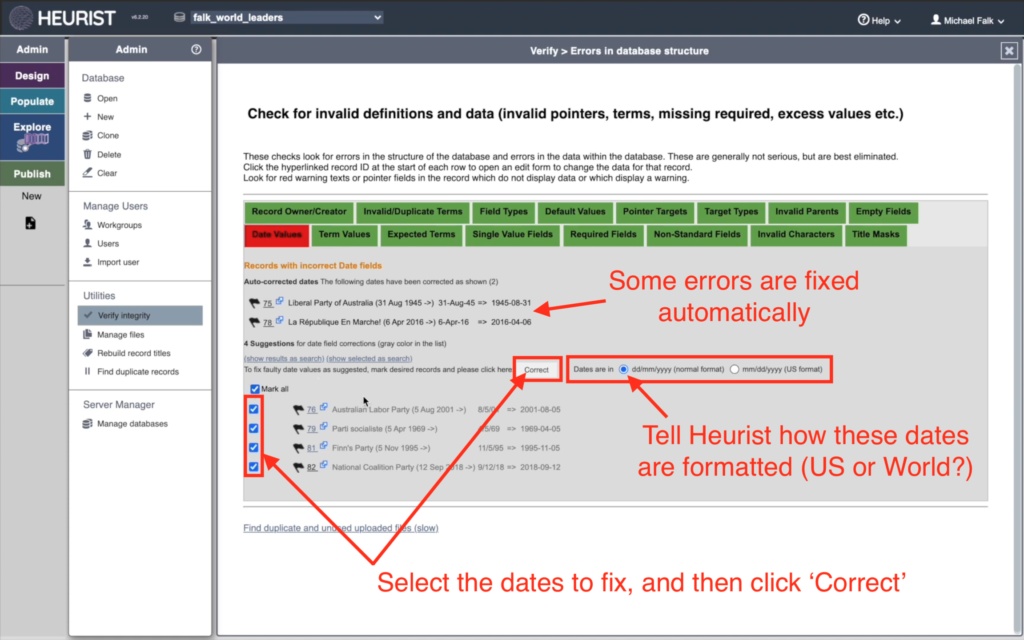
The other error types will present you with a different correction screen, but the principle is the same: Heurist will try to fix errors automatically where possible, but you may need to provide some input to remove errors.
webpage: Verify Structure id 632
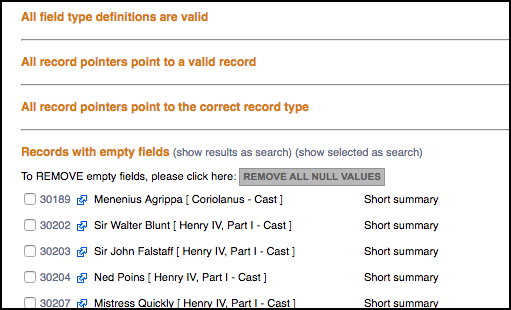
Finds errors in the database structure,
This option scans for errors and inconsistencies within the database and data (such as invalid record types, field codes and term codes, as well as records with a wrong or inconstant structure) allowing you to fix them, as follows:
record pointers which point to an invalid record (no record for that ID)
record pointers which point to the wrong record type
records which have unrecognisable term values (id does not exist)
records which have invalid terms (terms are not as specified for a field)
records with single value fields with more than one value
records with missing or empty required values
records with extraneous fields (fields not defined in record type structure)
invalid references within the Heurist database structure for Field Type Definitions (these should arise rarely)
A scan is run as soon as you select the option. Any inconsistencies are identified.
If inconstancies are found, you have the option of correcting the error(s) by:
Clicking the Edit Record option at the start of any record to edit that record.
Selecting one or more records and displaying these in the Search Results pane: click show results as search.
Selecting any option provided. For example, to remove faulty pointers, select the relevant check boxes, and click Delete All Faulty Pointers.
Or by otherwise following the instructions.
Once you apply any fixes it is best to select the Refresh option, then select the Verify option again, until all errors are removed.
Users and Groups
webpage: Manage Your User Info id 571
Access | My User Info
This option shows your user details (your profile) entered when you registered or were added as a Heurist user.
You can change the properties as required (a password change requires logging in again).
webpage: Users id 514
You can create an edit users in the database in the Admin menu.
(See Security Model for details of the various groups a user can belong to and their access privileges.)
The Manage Users dialog shows all users or for selected groups (based on your Filter settings).
Create User
Select Create New User. Complete the user details, including the Additional Details section if required, and click Save.
Note. By default, the Login Name field mirrors your email address, as this is something users will remember. You can enter an alternative Login Name if you wish.
The user is created and added to the Users list. A User ID is generated and added to the user's details.
If required, supply the new user with their login details (via their email) and request them to update their password.
Note. To add the user to an actual database, and give them a role, see My Workgroups.
Edit User
You can edit a user's registration details by selecting the Edit icon for that user.
Note. If you have changed the password, the user needs to log out and log back in with the new password.
webpage: Change database ownership id 709
Users and groups administration
Add a New User
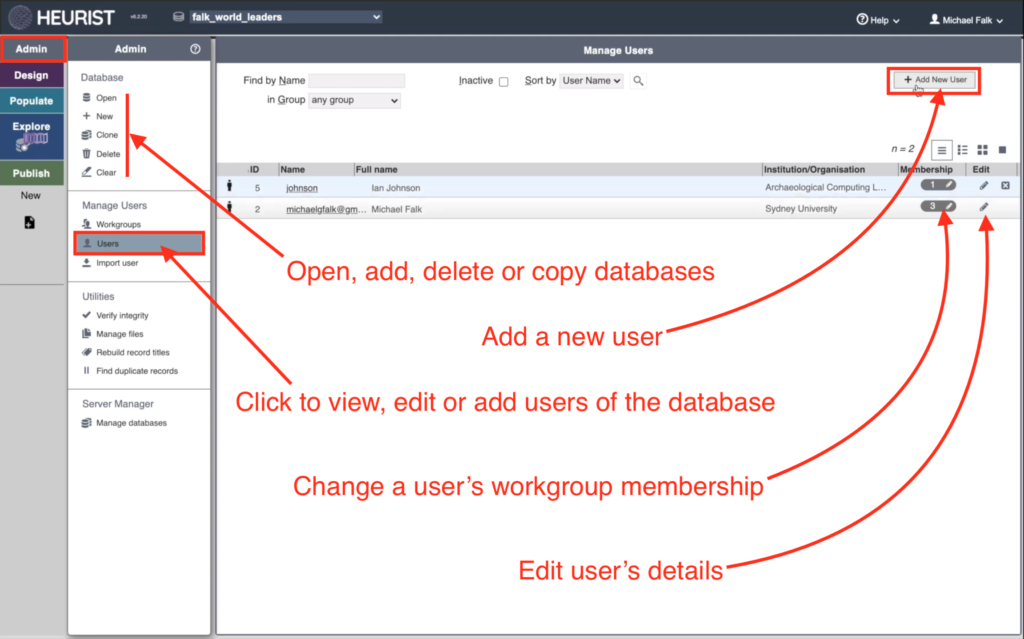
When you create a database, you are the only user (other than Heurist designer Dr Ian Johsnon, who is added automatically to every database to provide support). To add more users, go to the ‘Users’ tool in the ‘Admin’ menu. It is good practice to give each user of the database their own account, rather than sharing a login. To add a new user, simply click ‘+ Add new user’ at the top right of the screen:
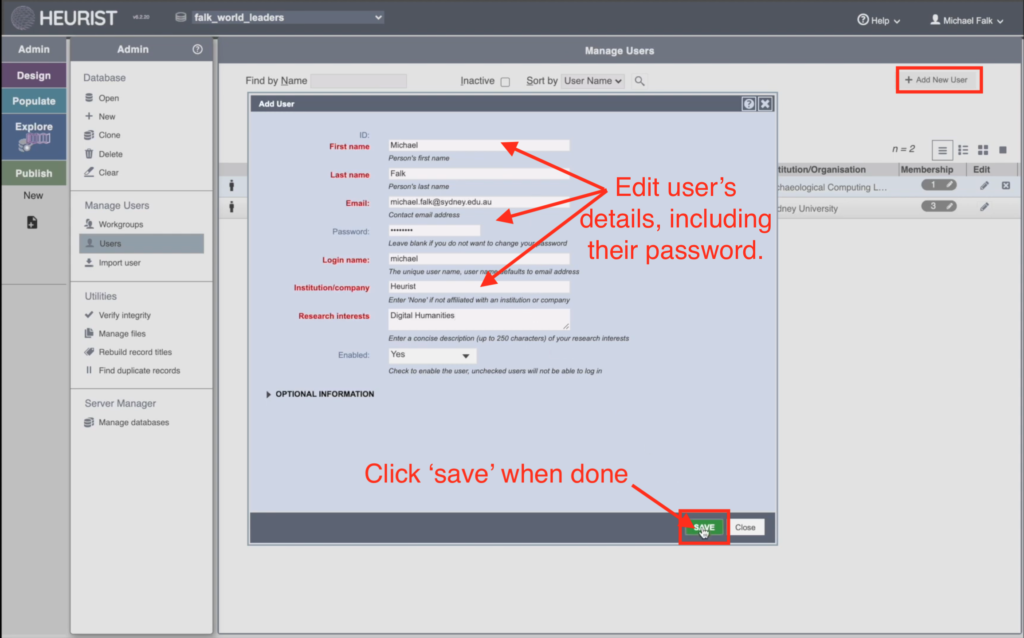
This will bring up the ‘Add User’ menu. For new users, do make sure to include a password. New users will recieve an email from Heurist providing them a link to the database and also their username and password.
Managing Workgroups
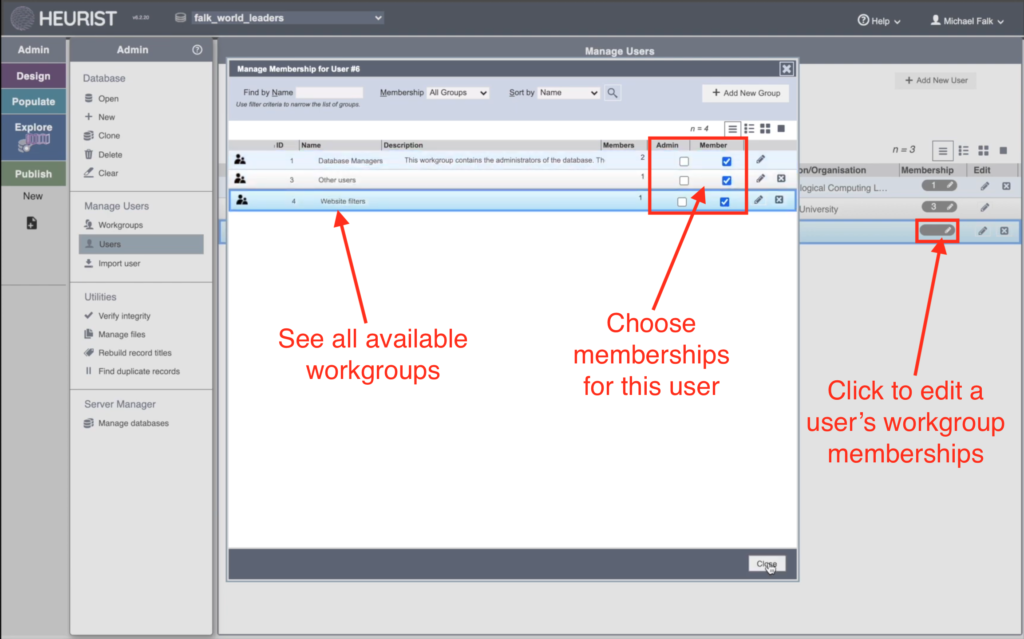
All users should be assigned to ‘workgroups’ in the database. Workgroups are an essential part of Heurist’s ‘permissions’ system. When you add or edit records in the database, you can choose which workgroups are able to view or edit records. Some sensitive or important records (e.g. the project website) may only be editable by Database Adminstrators. Other records may be editable by any user, or just by research assistants. To define such permissions, you first need to assign your users to different workgroups. In the ‘Users’ tool, you can change a particular user’s workgroup membership by clicking on the grey membership icon in the membership column:
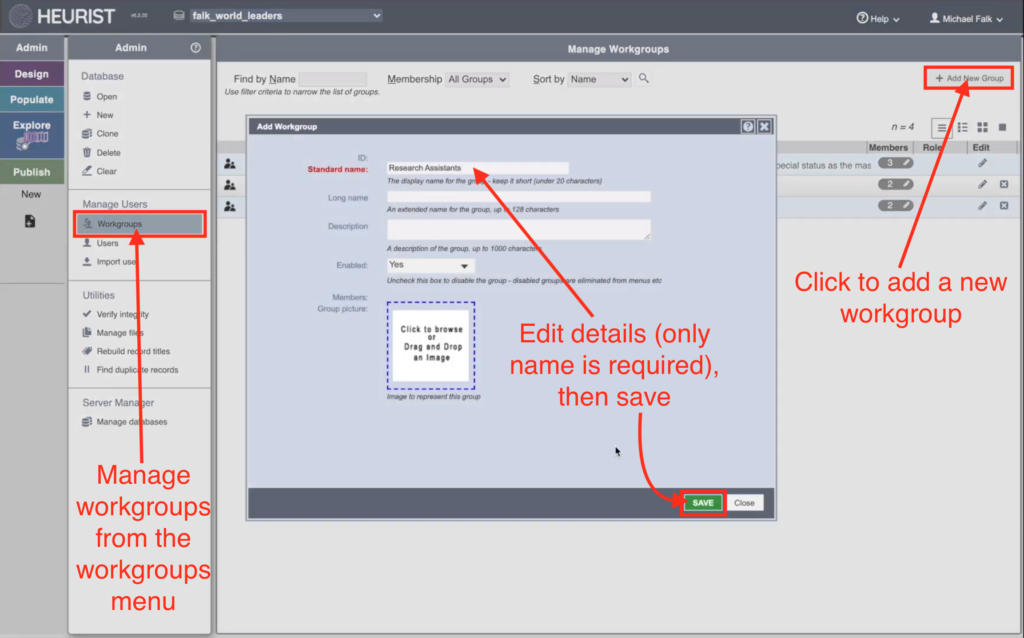
While it is possible to add or edit workgroups from the previous screen, you can also gain an overview of all the workgroups in your database from the ‘Workgroups’ tool. You can create a new workgroup by clicking ‘+ Add new group’ in the top right. In the below example, I create a specific workgroup for ‘Research Assistants’.
Managing user permissions
We will cover this in more detail in a later tutorial. For now, I will just direct you to a few of the ways that you can manage users’ permissions in Heurist. In Heurist, user’s permissions are recorded seperately for each record in the database. Each particular record is ‘owned’ by a particular individual or workgroup, can be edited by a particuar individual or workgroup, and can be viewed by particular individuals, by particuar workgroups, or by the public. You can set the permissions for a new record by clicking ‘permission settings’ in the new record pane:
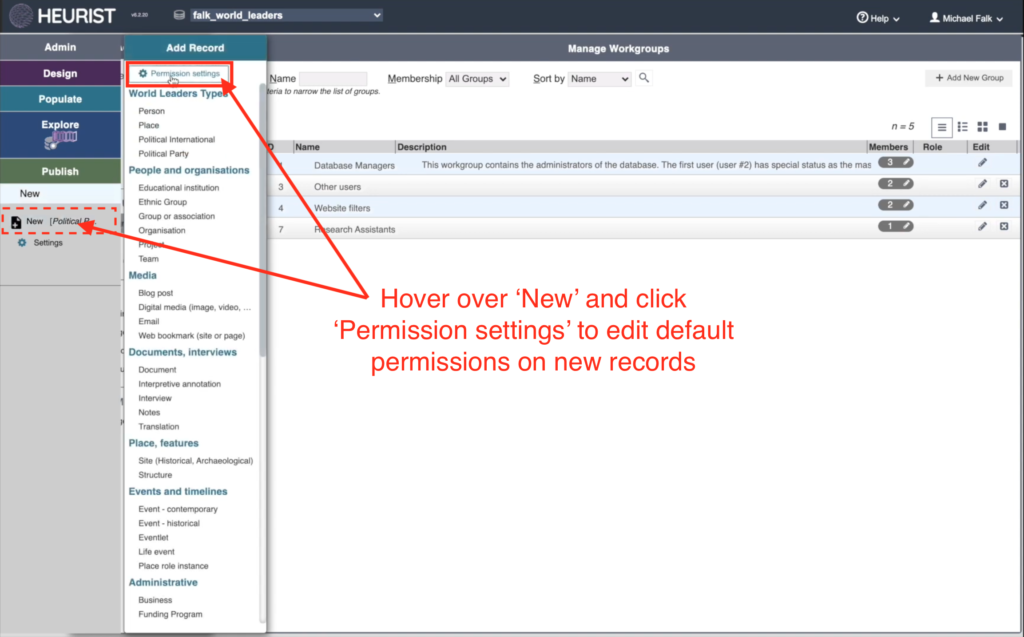
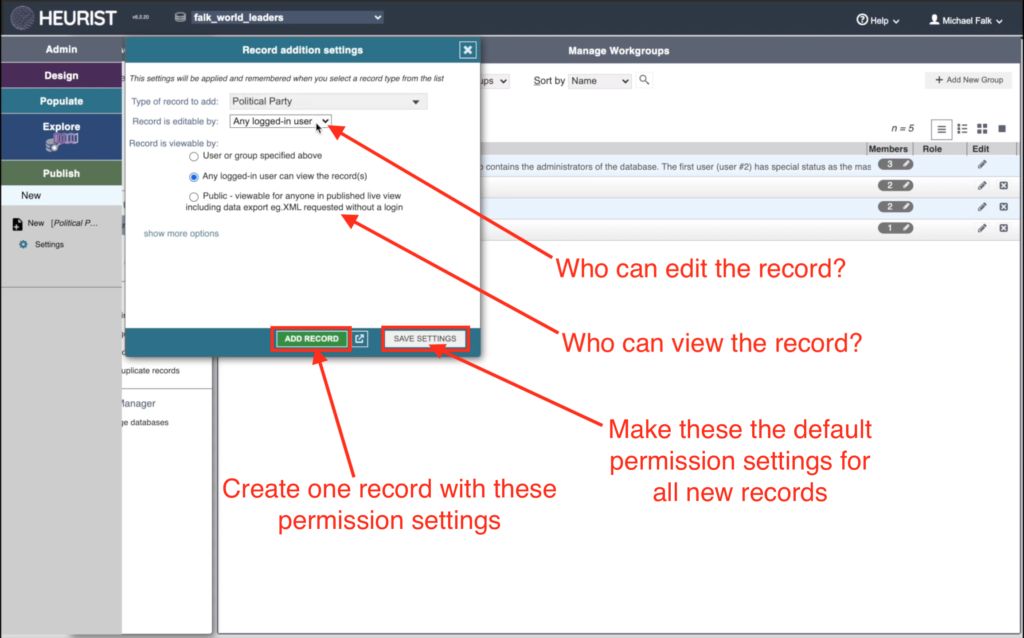
In the ‘Record addition settings’ popup, you can choose who is able to view or edit a particular record. Click ‘Add record’ to create one record with you chosen settings, or click ‘Save settings’ to make your chosen settings the default for all new records.
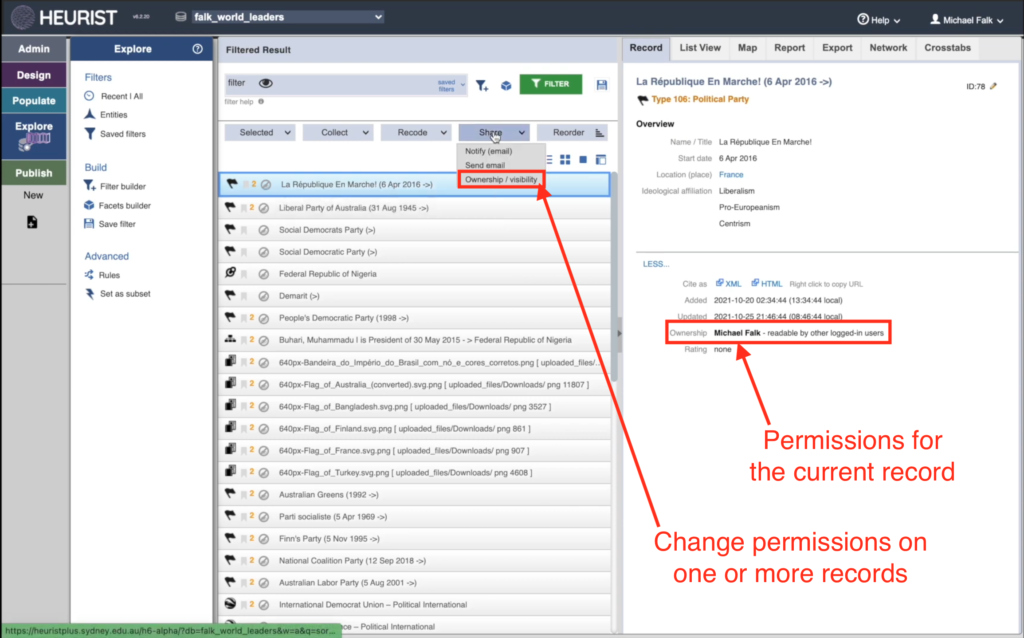
You can easily alter the permissions for existing records using the ‘Share’ tool in the ‘Explore’ menu. This allows you to change the permissions for selected records, or for all the records in the resultset for your current filter (see Tutorial 4).
Find duplicate records
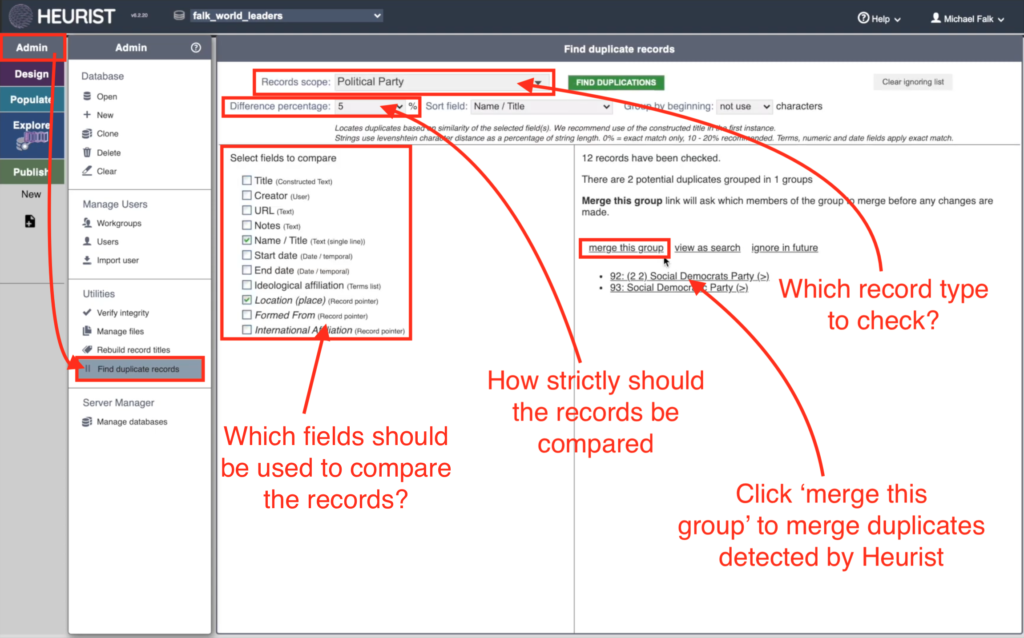
If you are running a large project, or importing data into Heurist from other sources, it is likely that you will end up with duplicate records. While it is possible to manually merge records using the ‘merge’ tool in the Explore menu, you can also search through the whole database and look for duplicates using the ‘Find duplicate records’ tool in the Admin menu. Choose which record type to check, set how strictly the records should be compared, and choose which fields should be used to compare the records. In the video, I search for Political Parties, comparing them by their Name/Title and Location, and allow up to 5% difference between them. After you click ‘Find duplications’ Heurist will list any possible duplicates on the right of the screen. If you think they are in fact duplicates, you can click ‘merge this group’. If you are certain they are not duplicates, you can click ‘ignore in future’:
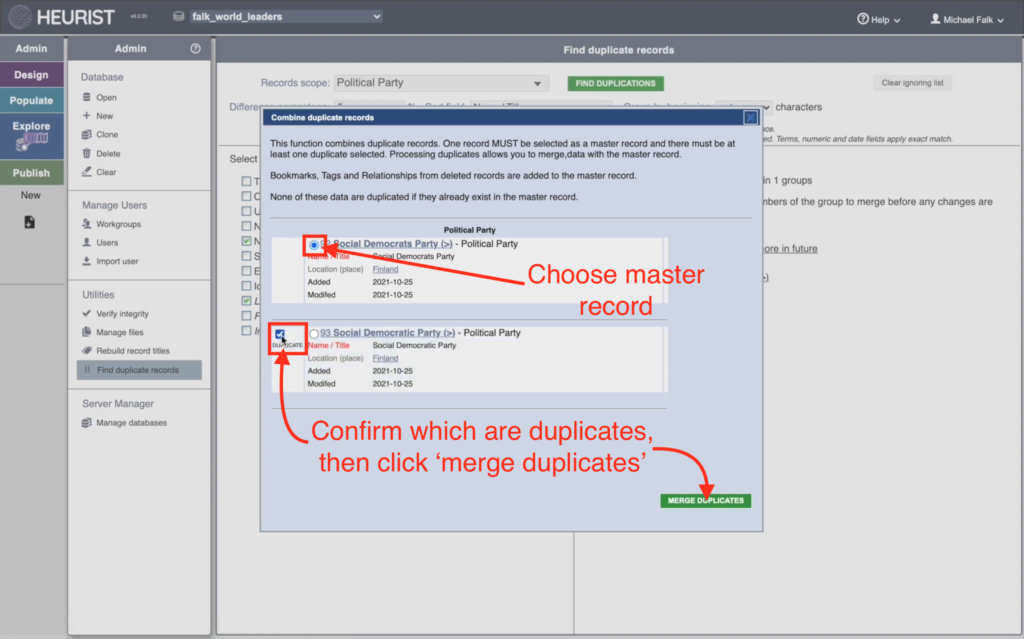
Once you click ‘merge’, you will be asked to select a ‘master record’, and then tick the ‘duplicate’ checkbox next to each other record that you think is a duplicate:
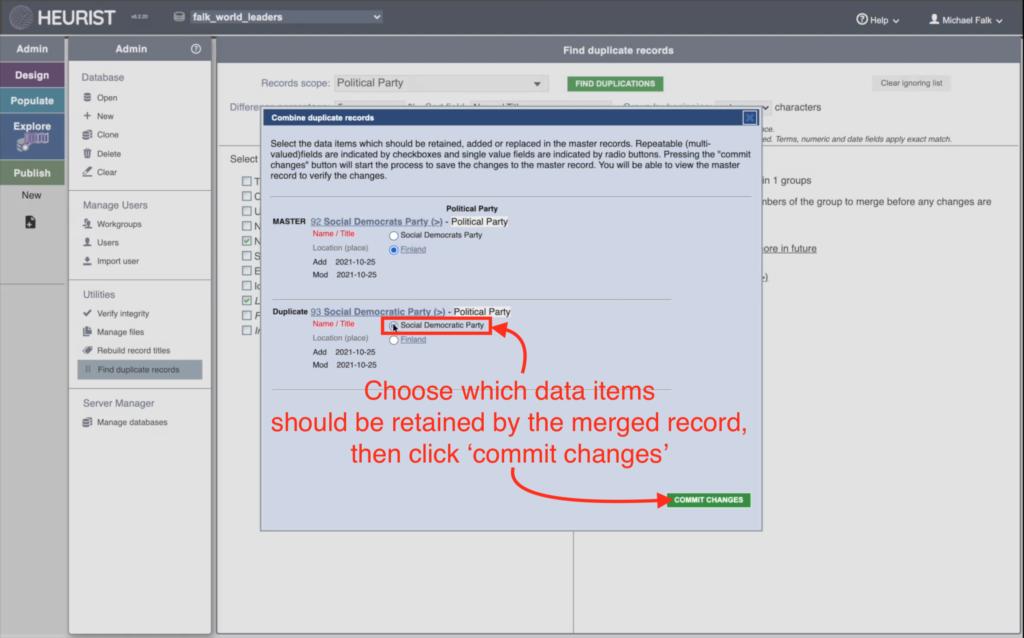
On the final screen, you will be asked to pick which data items should be preserved when the records are merged. For example, a Political Party can only have one Name/Title in this database. Which Name/Title should be used in the merged record?
webpage: Workgroups id 515
Access | My Workgroups
The My Workgroups dialog shows groups that you are a member of, sorted by Group Id (select a different Show checkbox to get different views).
Note. Owners and Administrators can manage workgroups and workgroup members (users). The person creating a workgroup becomes an Administrator of that workgroup and cannot be removed from it. You can, however, temporarily remove yourself, as Administrator or user, from any workgroup. As an Administrator, you can create and delete workgroup, add users (workgroup members) to any workgroup, and manage workgroup tags. (See Security Model for details of the various groups a user can belong to and their access privileges.)
Click on the Admins information icon to view the group Administrator(s) The number of members in any group is shown under the Edit Membership column.
About Changing Database Ownership
The creator of a database is automatically added to the Database Owners Group and made Owner of the group. As Owner, you can log into the new database with your existing name and password (the name and password you used to log into the database from which you created the new database).
Note. If you have created the new database when logged into another database with a guest password (e.g. guest + guest), this will be the Owner and password for the new database. Your first step should therefore be to change your user details to your own name (and password).
You can assign another user as Owner by updating your details to those of the new Owner.
Add a Workgroup
Click Add New Group. In the Create New Group dialog, enter details for the new group and click Save. The new workgroup ID is then generated.
Note. You can temporally disable a workgroup by deselecting the Enabled checkbox.
Edit Workgroup Properties
To edit the workgroup properties, click the Edit icon in the Edit column and make any changes.
Edit Workgroup Membership
To add/edit members of the workgroup, click the Edit icon in the Edit Membership column, to show the current members of this group.
To add an existing user, click Find and Add User. Use the Filter options to narrow the list of users. Select the checkbox for the user or users you wish to add and click Add Users to Group. If a user does not exist, you can create them by clicking Create New User (see Manage Users). Select a role for the user via the Role dropdown: Admin or Member.
Click Back to Groups to return to the Manage Groups page.
Note. To remove the member (this does not delete the actual user), click the Delete icon for the user.
Getting user from another database - credentials
webpage: Import Users id 638
Access | Import User
To import a user (from another database), select the database you wish to import from. Then, from the Choose User... dropdown, select the required user and click Insert User.
The user properties can then be edited, via Manage Users and can be added to a workgroup via My Workgroups.
webpage: Self-registration id 754
Self-registration
Heurist is being used in a number of institutions both as a research tool for graduate students and as a teaching platform to teach database principles.
There are two main ways you can use Heurist in teaching:
Students create their own databases. Students are free to create databases on our free hosted services just as their teachers are.
The teacher creates a database, and then adds students to it.
Adding students to an existing database
We will add some notes here on how best to use Heurist in a teaching context.
Creating logins
If you wish to give a class access to a shared database eg. to try out different searches, proceed as follows.
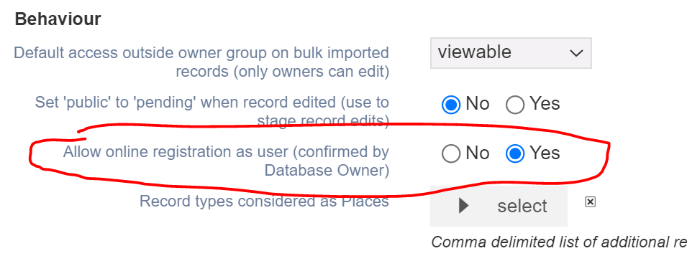
Allow Registration in Design > Properties.
This will allow them to request registration:
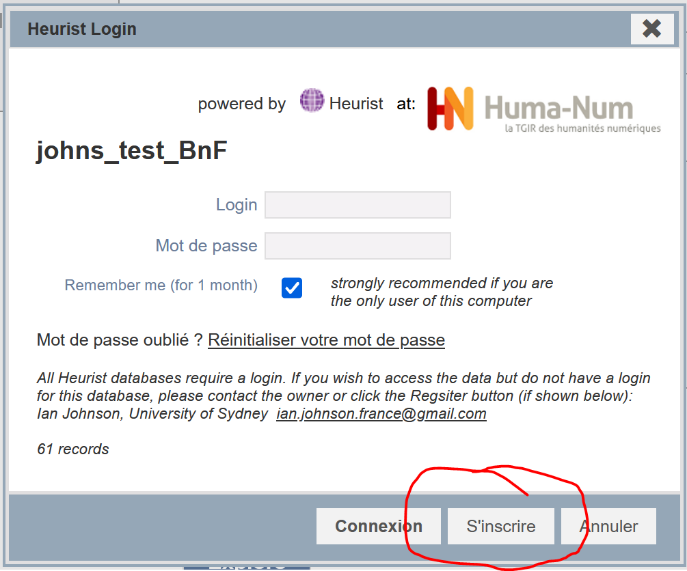
Their profile is automatically added to the database, but disabled. You only have to make them active by clicking on the pencil in the Edit column. It doesn't matter if they receive the email or not, their profile will be established.

You can then also add them to a students group (for example) by clicking on the pencil in the Membership column; it takes longer but gives you more control, for example adding saved searches under that group.
If all records are made visible to all logged in users, but owned by Database owners (or another group of which they are not members), the students can use them but cannot change them.
Change database ownership
Often the creator of a database, and by extension the owner of it, will need to transfer the database to someone else. They may be a research engineer or assistant who has set up the database for a researcher, and once this task is finished the person may leave the project and/or the researcher may wish to become the owner.
The owner of a database (user #2) can make someone else the owner of the database. This is simply a 'swap places', so any resources owned by or accessible to the original owner become the property of and accessible to the new owner, and vice versa.
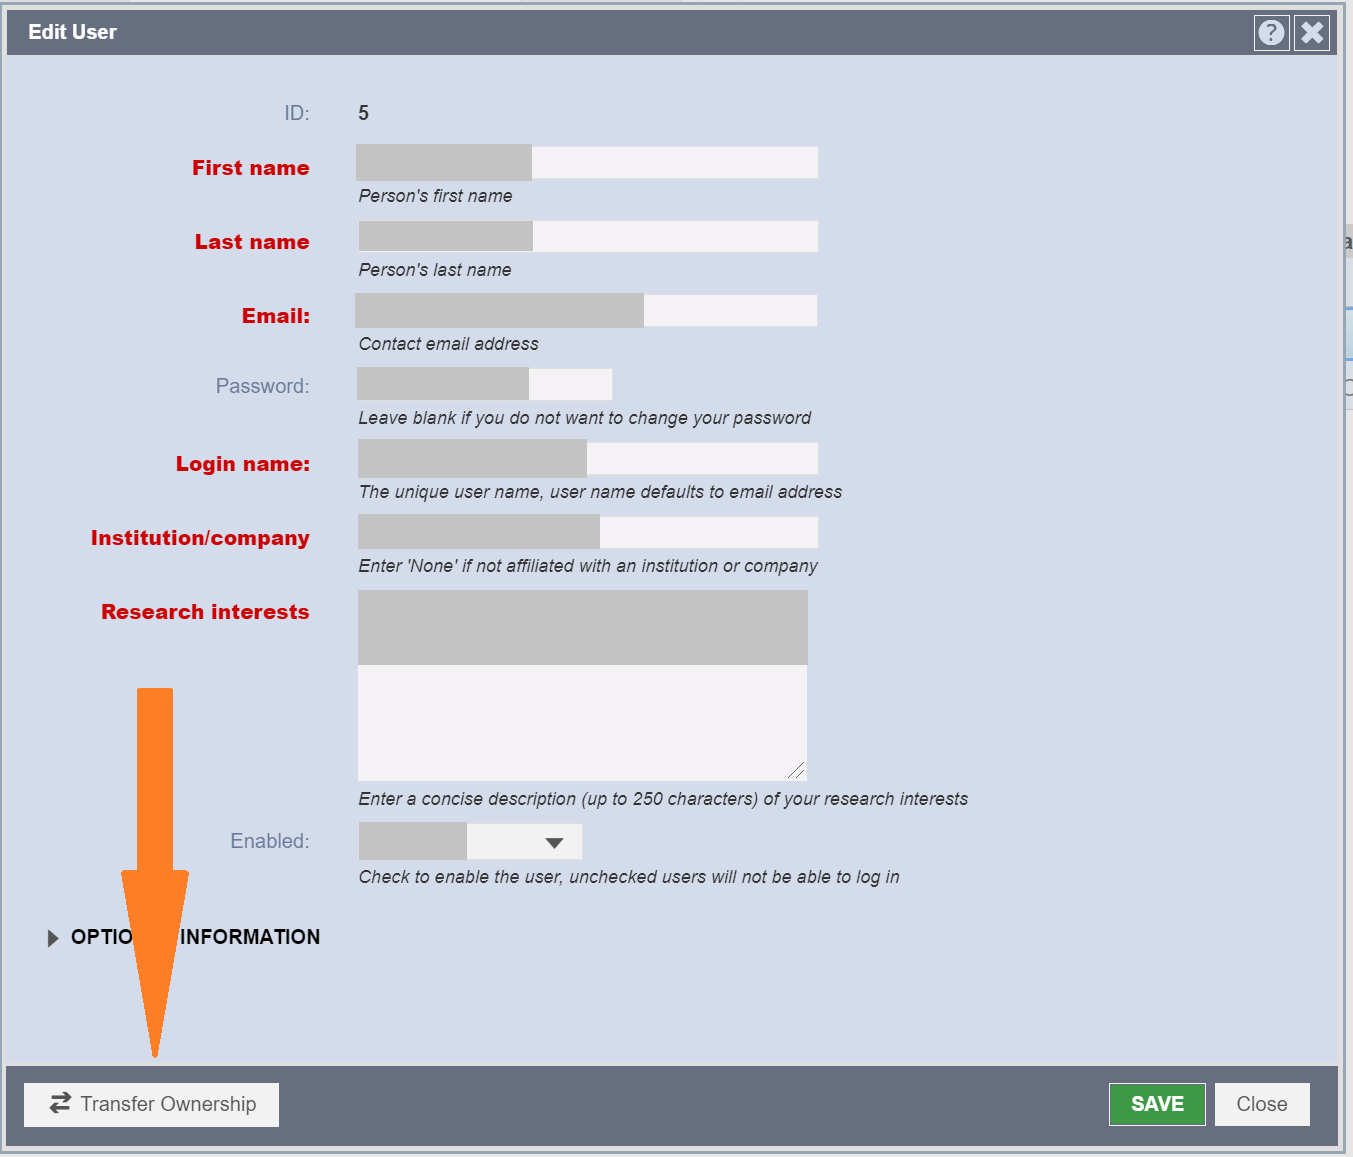
- Edit the user profile of the person hwo is to become the database owner (Admin > Manage Users > Users)
- Click the Transfer Ownership button at bottom left, indicated below.
The new owner will become user #2 and will have the same rights as the original owner, and vice versa.
SAML authentication
webpage: External authentication (SAML) id 796
In order to add SAML authentication (one or multiple authority servers) to a Heurist server, proceed as follows.
A) Install and configure simplesamlphp
https://simplesamlphp.org/docs/stable/simplesamlphp-install.html
https://simplesamlphp.org/docs/stable/simplesamlphp-sp.html
In short:
1. Unzip simplesamlphp to /var/simplesamlphp
2. Add Alias to /etc/httpd/conf.d/vhost_heurist.conf
<VirtualHost *:443>
SetEnv SIMPLESAMLPHP_CONFIG_DIR "/var/simplesamlphp/config"
Alias /simplesaml "/var/simplesamlphp/public"
<Directory "/var/simplesamlphp/public">
Require all granted
</Directory>
3. In /var/simplesamlphp/config/config.php
$config = [
'baseurlpath' => 'https://heurist.huma-num.fr/simplesaml/',
...
'auth.adminpassword' => 'some_pwd',
4. Create a self-signed certificate in the cert/ directory.
5. In /var/simplesamlphp/config/authsources.php define one or several sources:
// An authentication source which can authenticate against SAML 2.0 IdPs.
'BnF-sp' => [
'saml:SP',
'privatekey' => 'saml.pem',
'certificate' => 'saml.crt',
// The entity ID of this SP.
'entityID' => 'https://heurist.huma-num.fr/',
// The entity ID of the IdP this SP should contact.
// Can be NULL/unset, in which case the user will be shown a list of available IdPs.
'idp' => 'https://pfvidppro.bnf.fr/idp/shibboleth',
.....
5. To check installation https://heurist.huma-num.fr/simplesaml/module.php/admin/
6. In order to complete the connection between your SP and an IdP, you must exchange the metadata of your SP with the IdP. The metadata of your SP can be found in the Federation tab of the web interface. Copy the SAML 2.0 XML Metadata document automatically generated by SimpleSAMLphp and send it to the administrator of the IdP. You can also send them the dedicated URL of your metadata, so that they can fetch it periodically and obtain automatically any changes that you may perform to your SP.
You will also need to add the metadata of the IdP. Ask them to provide you with their metadata, and parse it using the XML to SimpleSAMLphp metadata converter tool available also in the Federation tab of the web interface. Copy the resulting parsed metadata and paste it with a text editor into the metadata/saml20-idp-remote.php file in your SimpleSAMLphp directory.
B) Configuration in Heurist
1. in heuristConfigIni.php
$saml_service_provides = array("BnF-sp"=>"BnF Authentication"); You may add more than one service to this array (separated with commas)
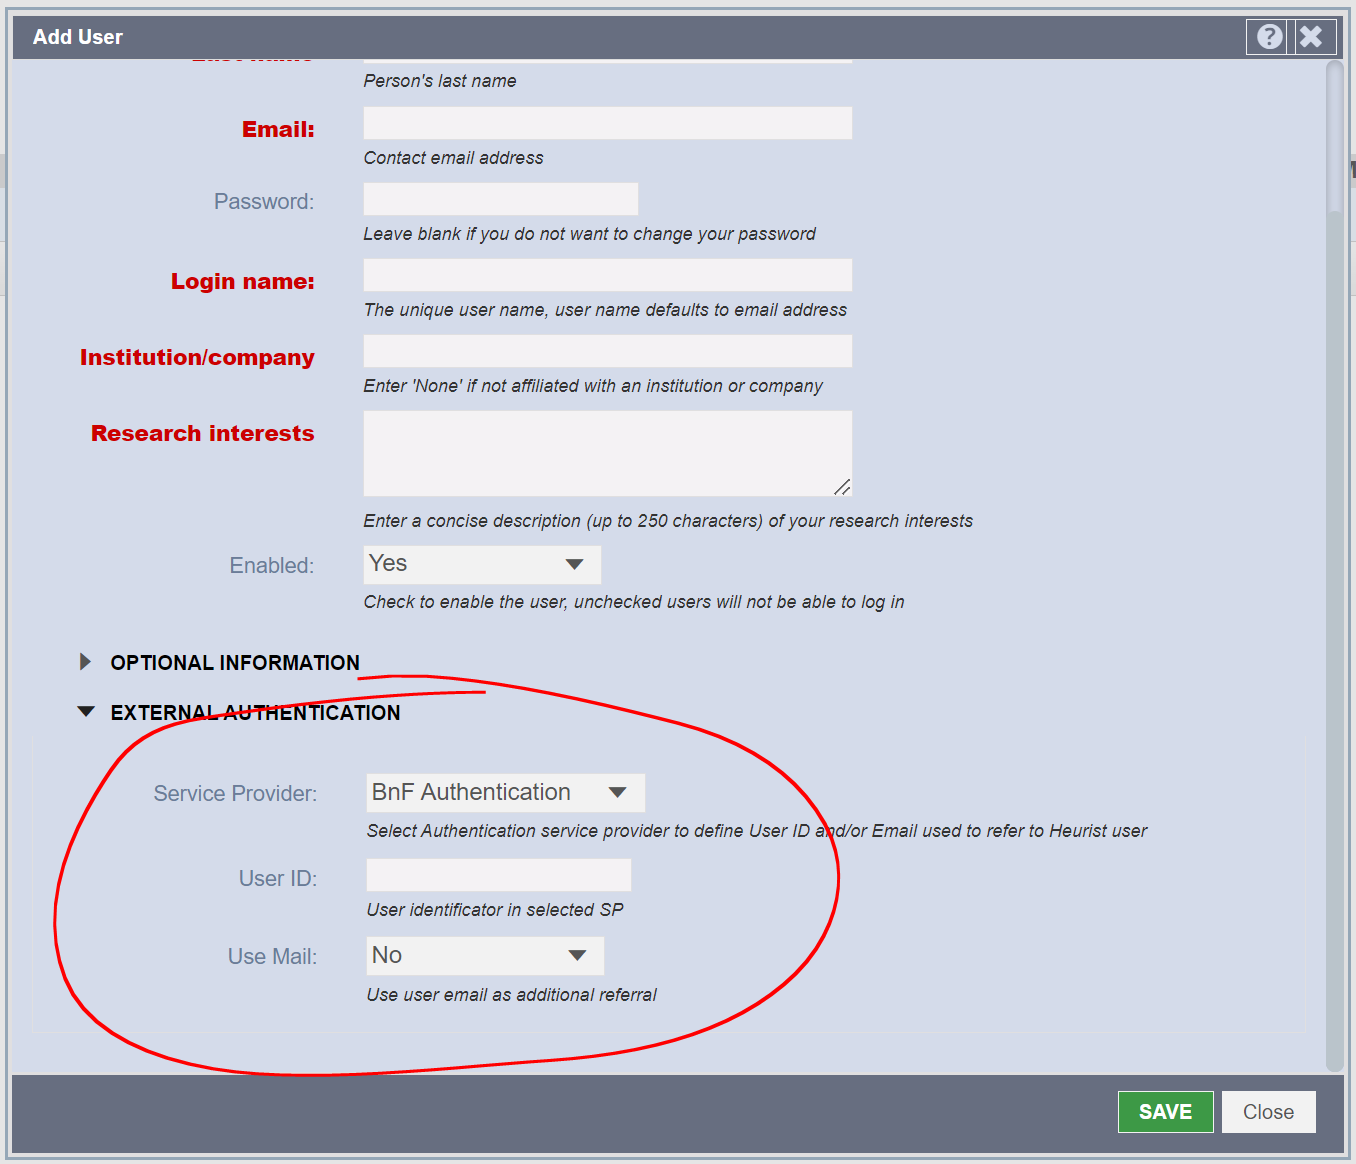
2. In user edit form
Select "Service Provider". Define "User ID" in external service or "Check by User email" or both. These values will be validate against UID and email that will be obtained from IDP after external authentication.
It is possible to define authentication for several Services per user (if they are listed in $saml_service_provides in heuristConfigIni.php)
C) Login
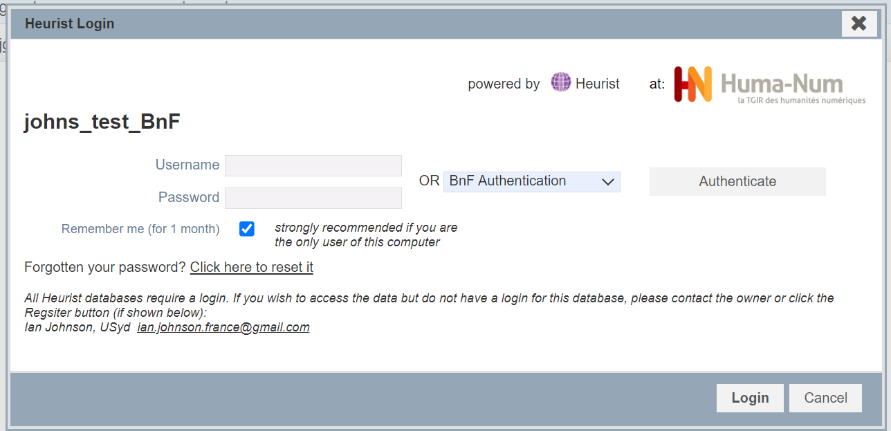
Login with the authentication section on the right of the login form:
Broken URLs
No content
Database functions - open, create, clone, clear, delete
webpage: Open a Database id 577
You have permission to open the following types of database:
Database that you have created and are therefore the owner of.
Database that you have been made a member of (i.e. a member of at least one of the database's workgroups) and to which you have been given login credentials.
Publicly-accessible databases. The Heurist Index makes available to all users all Heurist core databases as well as all registered end-user generated databases.
To open an existing database
If you have just created a new database, you can click the database link in the Confirmation page.
If you are not logged into any database, navigate to the Heurist Project Page and click Browse Databases or navigate directly to the Heurist server address (e.g. http://heurist.sydney.edu.au/heurist/). From the displayed list of registered databases, select the database. You may need to press Login to display the Login page.
Alternatively, if you know the specific URL of the database (e.g. http://heurist.sydney.edu.au/heurist/?db=dbname, where dbname is the name of your database) you can open it directly by entering the URL in your browser (you can bookmark the URL in your browser for convenience.)
If you are logged into a database, select Database | Open Database from the Main Menu (top-right of the Home screen). A list of databases (sorted alphabetically) on the server is displayed:
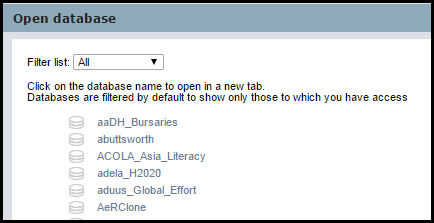
Databases are sorted alphabetically. To find a database in a long list, press Ctrl-F to search for part of the name.
This list can be filtered as follows:
User (the default). Shows only databases that you have access to (i.e. databases available to all users, or databases that you are either the owner of or belong to as a workgroup member).
All. Shows (registered) databases created by everyone, and therefore may include databases that are restricted to you.
Administrator. Shows only databases that you are an administrator of.
Click the database you wish to open.
Note. If your login details have been stored within the browser, you will be logged in automatically. The database opens in a new browser tab; it does not close the original database if one is open. You can therefore have several databases open in separate browser tabs.
If the Login page displays, enter your Username and Password (those you supplied when you registered and which are also contained in your registration confirmation email):
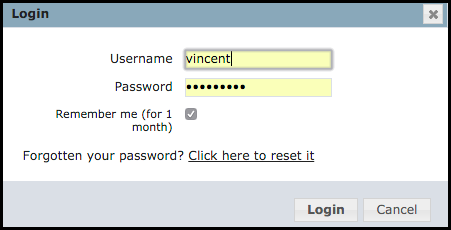
Note. For some publicly-accessible databases you may be able to login as a guest user using the guest credentials (e.g. Guest/Guest).
The default Remember me option is recommended when you are on a secure computer. Your login details are remembered for each database you create (for 30 days), allowing you to open the database without having to re-enter your login details each time.
Note. If you forget your current password, you can apply to get a new password by selecting Click here to reset it. The new (randomly generated) password is mailed to your email address (as registered within your User Profile settings). You may edit the password once it has been reset (see Profile | Preferences). If you do not receive an email within 30 seconds or so after clicking this link, Heurist may not be set up properly to function with your server's email system, in which case you should contact the database owner, or system owner (if you are the database owner), and ask them to change your password.
Click Login. The database opens in a new browser window, showing the Home Screen.
To Log Out Of or Log Into a Database
You can explicitly log out of or log into a Heurist database via the log out / log in button at the top right of the Home screen.

webpage: Ian's Top Ten Tips id 715
Searching for a database
To quickly find a database in the database list, simply use the browser find mechanism (Ctrl + F/Cmd + F) to find part of your database name.
webpage: Clear Database id 787
No content
webpage: Clone Database id 512
webpage: Clone Database id 626

This option allows you to copy (create a clone of) the current database to a new one. The new database is identical to the old one in all respects (other than database name) including access (but is not automatically registered).
A copy of the database is created, with the prefix hdb_ and the name you gave it.
Note. Creation may take a while, dependent on database size.
Upon successful creation, details of the new database are displayed (similar to when you create a new database), including:
- Database name.
- Location of the upload directory (Filestore).
- Database Main Page URL (you can use this to create a hyperlink in your browser).
- A link to the Administration Dashboard page.
Open the database by either:
- Going to the Administration page, by clicking the supplied administration page link in the message.
- Going to the Main Page, using the supplied URL.
When the database login page displays, log in using the login details of the source database. You can change these login details in the new database (if required) once you have logged in. You will remain logged into the source database.
Important. If the database fails to load (this might happen for very large databases of 5000+ records) contact the Heurist Team.
webpage: Making a partial clone of a database id 706
Sometimes one needs to copy some part of a database to a new database eg. to create a playpen for a new user or to publish some data with no risk of accidentally exposing other records.
First however consider whether the requirement can be handled using the permissions (Workgroups / Users / Visibility) settings on the source database rather than duplicating data.
You will generally need to register the database (Design > Setup > Register) before cloning - this is required to assign new Concept IDs to anything defined within the database so that they can be imported into your new database. Only the system administratror can bypass this step.
Method 1:
Clone entire database (Admin > Database > Clone) and delete unwanted records from the clone
Method 2:
Clone entire database but set the No data checkbox
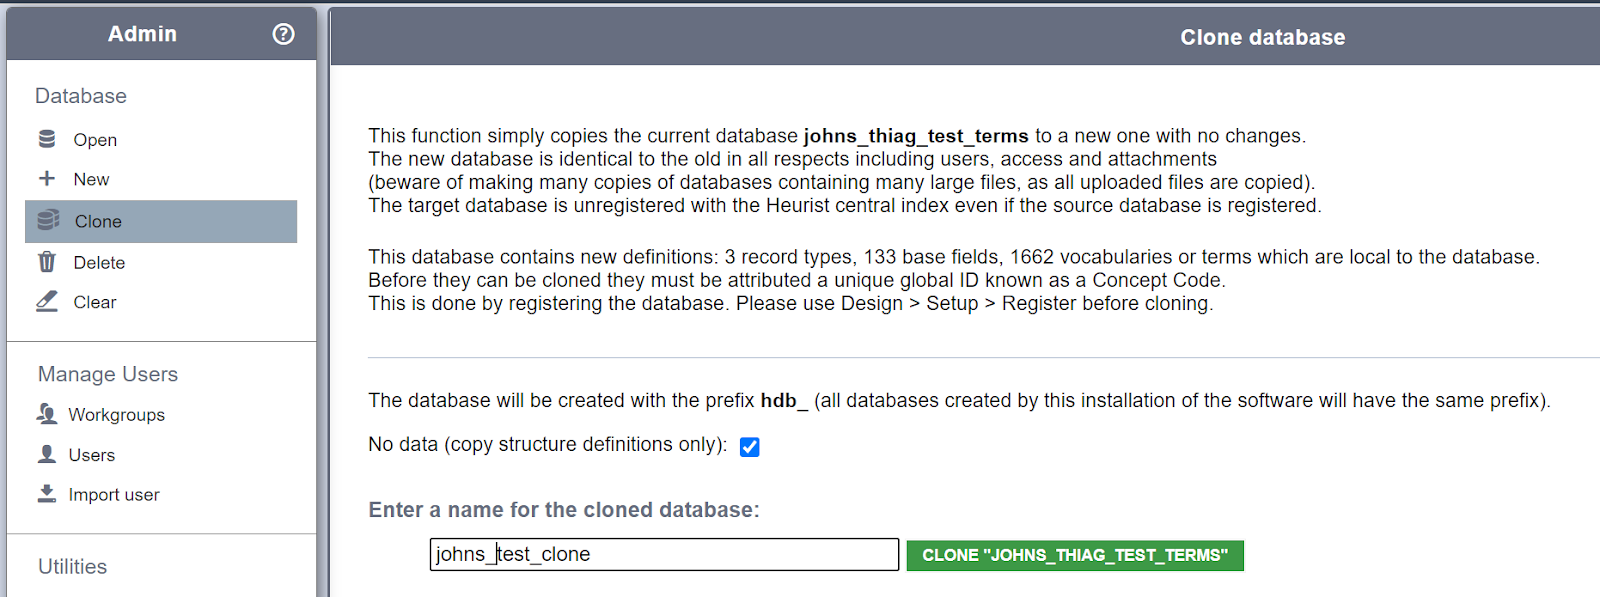
Filter to obtain the set of records in your Results (central panel) and export as XML (Export tab in the righthand panel).
Import the XML file into the new database.
Method 3:
If the source database is registered, it is OK simply to create a new database rather than cloning the existing database,
You can then import the XML file exported from the source (see previous method).
Lookups
webpage: External Lookups id 663
The lookup function allows the record edit form to search one or more external data sources (for example GeoNames or a thesaurus), return a set of records with properties, choose a record and assign its properties to fields in the record from which this function is called.
Lookups to a specific data source need to be programmed (see template file information at the end of this help page), and added to the Heurist source code (make a PULL request), but once programmed the lookup can be used with any database.
- External Lookups: External lookups allow your database to automatically import data from public databases on the web at the click of a button. For example, when you are entering data about a person, you might want to automatically look up their VIAF or ISNI record and create a link to it.
Configuration
The choice of data source and the allocation of fields is handled through a configuration form accessible from Design > Properties.

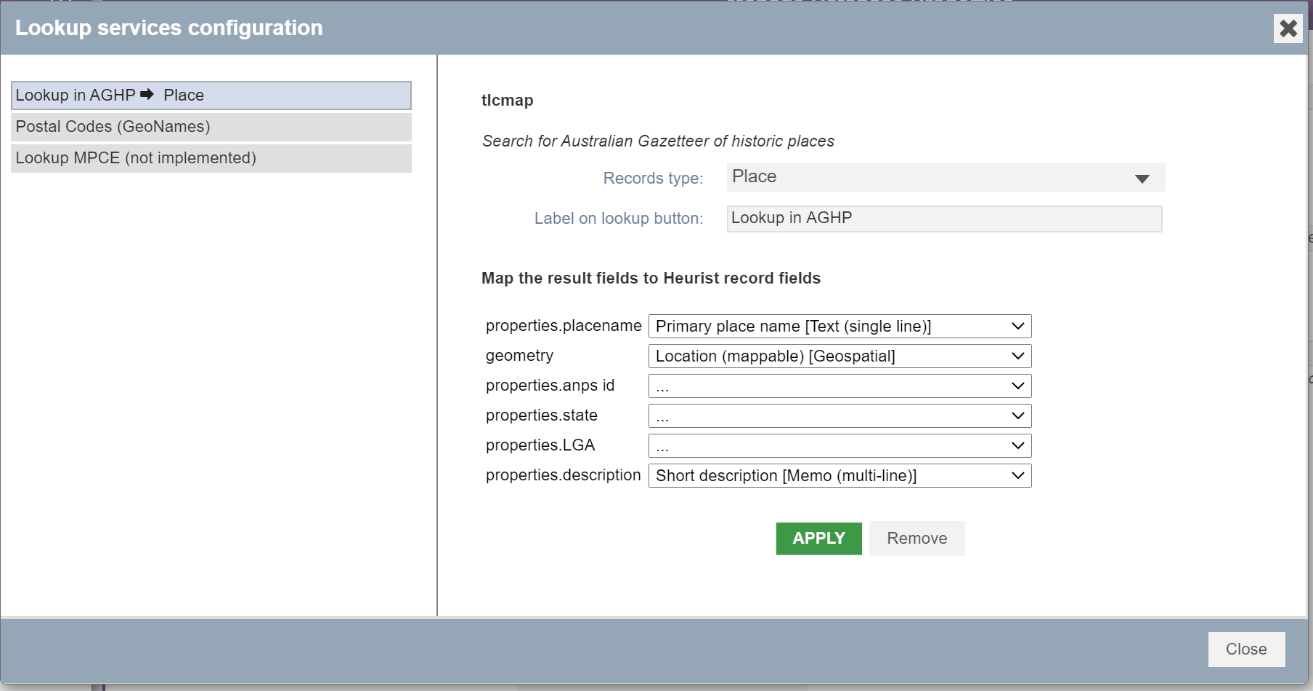
Example: TLCMap Map Finder database
In this case the lookup is to the TLCMap Australian Gazetter of Historic Places (AGHP)
This shows the popup prior to configuration.
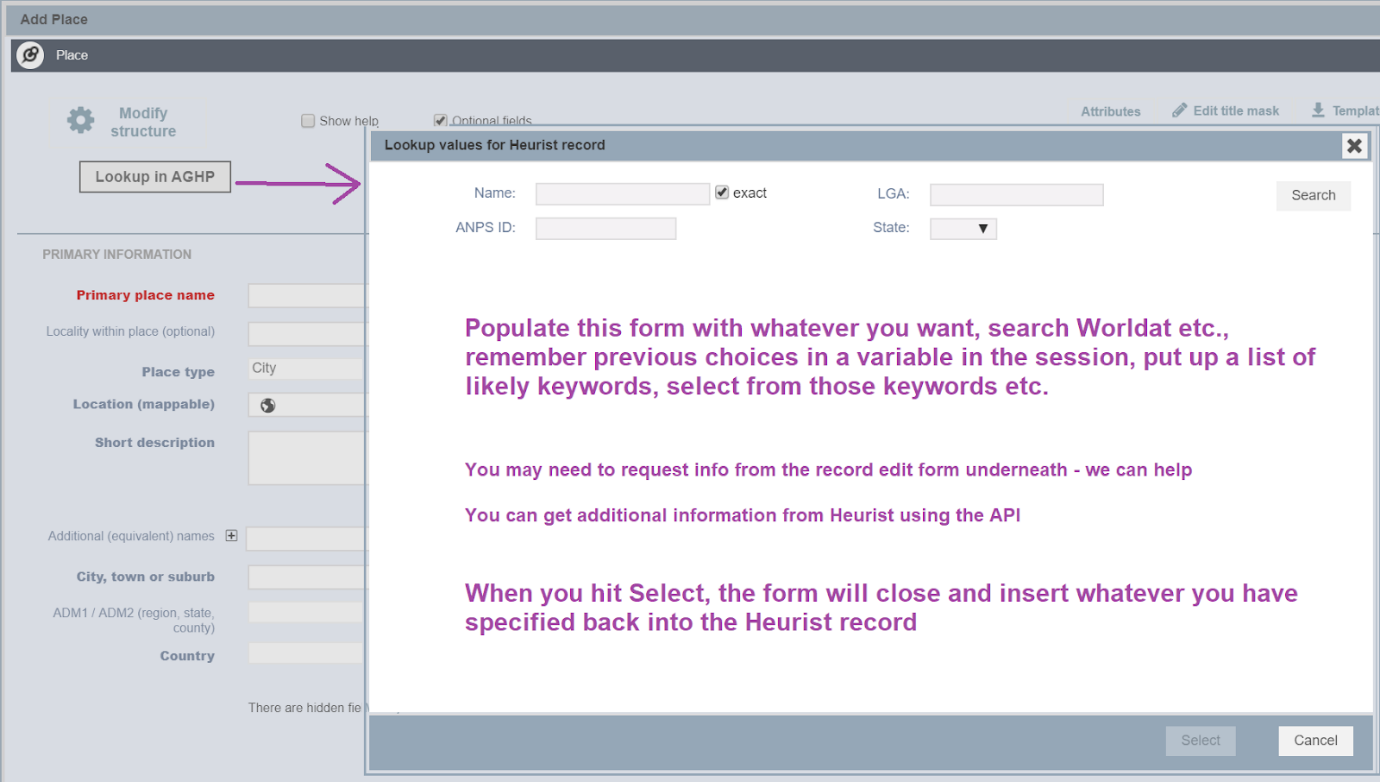
Example: Libraries_Readers_Culture_18C database (Simon Burrows, Western Sydney University)
The user is editing a Work and needs to set Parisian Keyword and Project Keywords, involving lookup of external resources (the ECCO collection, accessible as a Heurist database) and/or using previously used keyword to suggest options.
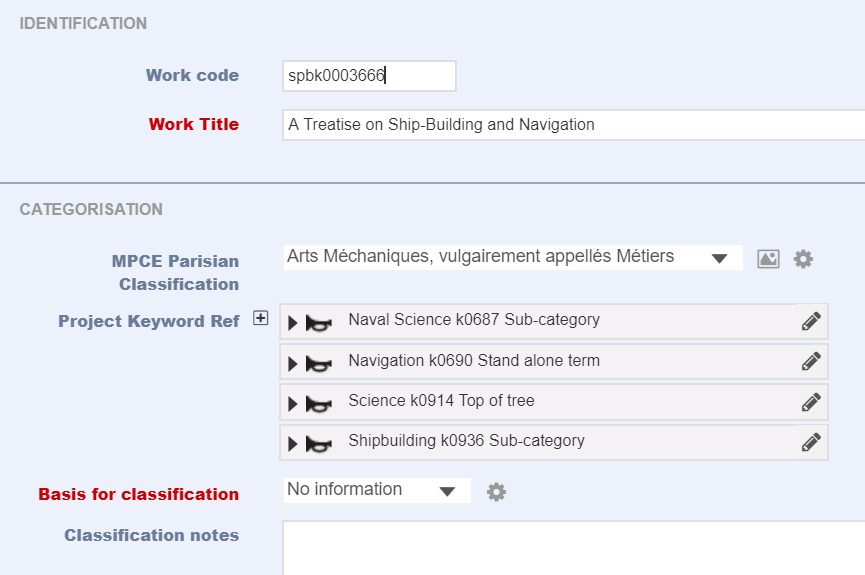
<need the MPCE popup here>
New lookup functions
Please see documentation in recordLookup.js for instructions on how to write a new lookup function.
webpage: Lookup Functions id 677
You may use the following methods to lookup (search) in different database.
window.hWin.HAPI4.RecordMgr.search(request, callback)
request is object with keys:
db: database name
q: query string
detail: ids|header|details| array of field ids
limit
offset
This returns a response object as argument in the callback function
Status of request is in response.status
response.status == window.hWin.ResponseStatus.OK
Data is in response.data. To facilitate access you may concert it to recordset
hRecordSet(response.data)
file and image management
import images koma import images from urls
Move images to repository, move images from a repository, look up and link to images in a repository
index images and create multimedia records from images and other files
To do: need to be able to index images without creating multimedia records
Export CSV of images for external manipulation in a spreadsheet and re import, as well as assigning images two records IE linking images with records
Access to remote images including triple IF I IF
Use of tiled maps images within mapping capability
webpage: Media Files id 647
Heurist offers three different ways to upload media files (sound, image, video) into your database. All files are held in a private filestore directory on the server unique to your database. The files are hidden from the public by an obfuscated URL, allowing you to control precisely who can see which files when.
When to upload files, and when not to
How to upload files
Your options for uploading files are:
You can upload files one at a time into database records. If you are performing manual data entry in the datbase, this is usually the best option. For instance, as you add Persons to your database, you can add photos of those people to the 'Representative Image or Thumbnail Field' as you go. This is the simplest way to upload or link files to your database.
You can upload files in bulk from your computer: . If you have a folder of media files on your computer, you can upload the entire folder (or selections thereof) into your database's filestore.
You can import files in bulk from other websites if you have URLs for the files: . This is especially useful if you are migrating a database from a different system into Heurist. If you can download a list of all the images in your Wordpress, Drupal or Omeka database, then you will be able to import them all at once into your Heurist database.
How to use uploaded files
If you use method 2 or 3 to upload your files, there are three different ways you can link uploaded files to records in your database.
Index media files. This tool will automatically create a record corresponding to each uploaded file in your database. These records will be of the 'Digital Media Item' type. This is a good solution when you are building a database of media files. For example, if you a building a database of electronic music, then you might use the 'Digital Media Item' type to store recordings of electronic songs. In this case, you might like to rename 'Digital Media Item' to 'Digital Music Recording' or similar.
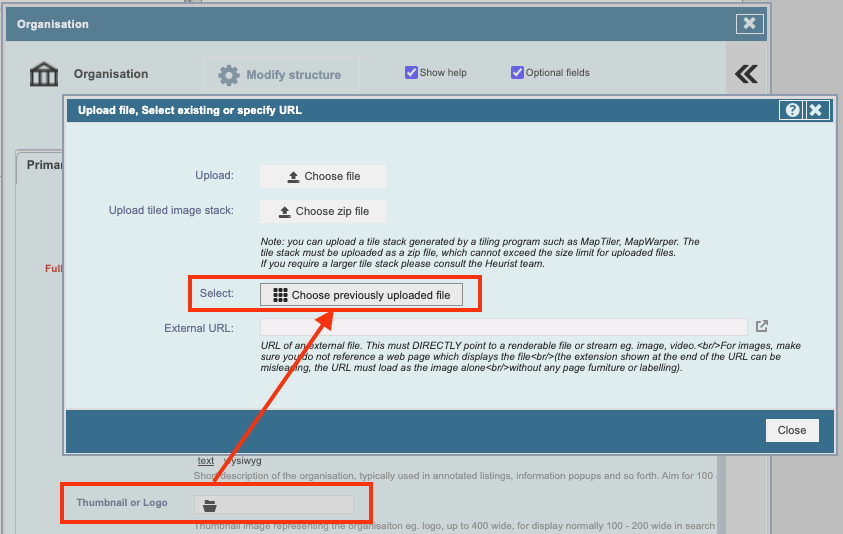
Link the files to individual records. If you want to insert the uploaded files into individual records, you can choose the 'Choose previously uploaded file' option in the file field dialog. In the below example, we can choose a previously uploaded file to serve as the logo for an 'Organisation' record in the database:
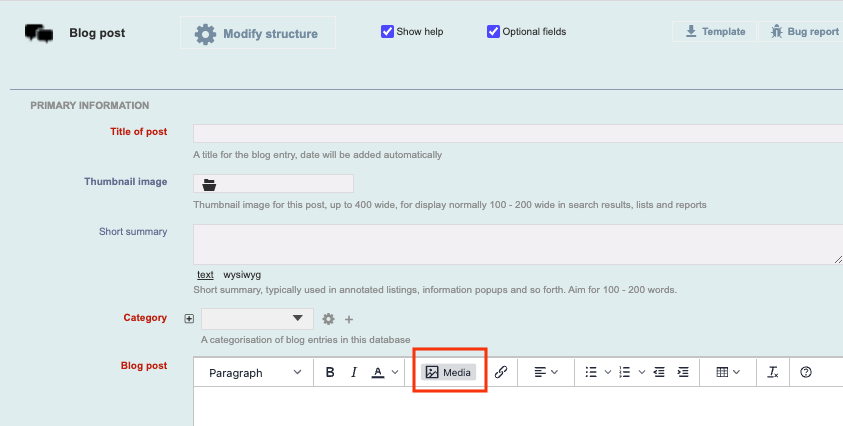
Insert the media files as content on the project website or within records. This option is useful when you are writing blog posts or content that will appear on a public website. If a record has a field of the 'Memo text' type, e.g. the content field for a 'Blog Post' record, then you can click the 'Media' button to add a previously uploaded image into the text:
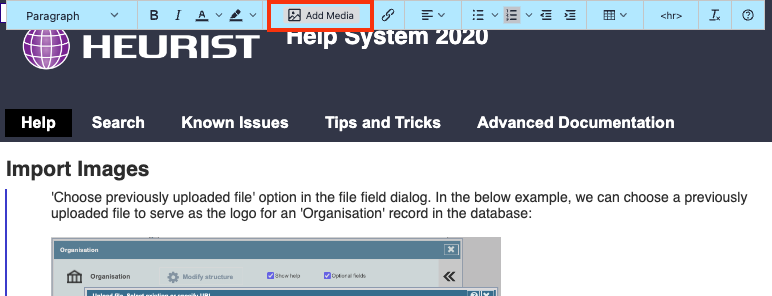
The same tool appears in the website editor:
When to upload files, and when not to
Heurist can handle most common file types: images (png, jpeg etc.), music (mp3, aac etc.) and video (mp4). If necessary it can also handle more exotic filetypes, such as css stylesheets (.css) or web fonts (.wof).
However, just because Heurist can handle all these filetypes doesn't mean it should. Heurist is always available if you have no alternative, but there are some situations where you may wish to store certain files elsehwere, and then simple store a link/URL to that file in Heurist. Some common situations include:
Video or audio files: Although Heurist can serve video and audio files, there are dedicated website such as YouTube and SoundCloud which are specifically optimised to do this. You may find that your database and project website perform much better if you rely on YouTube or SoundCloud's superior streaming services, and utilise Heurist for its superior data management and organisation capabilities.
Files in public archives/repositories: If your project relies on manuscripts, images or similar data from a public repository such as Gallica, you may prefer to link to the public version of the file, rather than copying the file into your own database. This can maintain the integrity of your data, by clearing showing where the media file comes from.
Research data that should be archived and provided with a doi: Your funding body or research council may require you to publish your research data in a certain format or in a certain repository. Heurist provides a tool for archiving your entire database for deposit in a research repository, but this would provide a URL and DOI only for the entire database. If you wish to ensure that each file in your database is also properly stored and publicly available, then you may wish to place all your media files in a public repository such as Nakala or your institutional repository, and then put links to those files into Heurist.
webpage: Harvest Emails id 555
This feature allows you to set up an email account to which users of the database can forward emails they receive or copy emails that they send, in order to have them archived in the Heurist database. It imports emails received from specific email addresses (set in each user's profile) via a specified email server supporting IMAP.
Heurist will connect to an email server using the login details stored in the database properties (sysIdentification table) and retrieve emails received from specific email addresses (set in each user's profile). The emails are dissected and used to create Heurist records owned by that user. The email server must support IMAP.
Note. You must be a member the Database Owners group for this database.
Set up the following configurations:
Configure connection to IMAP mail server (per-database). Enter details for an email account to which users of the database can forward emails they receive or copy emails that they send, in order to have them archived in the Heurist database. Click Save then Back to Import. See also Database | Properties | Locations.
Configure email addresses to be harvested. In the Optional information | Incoming email addresses section, enter one or more address (separated by commas). When ready, click Harvest Email from IMAP Server. See also Profile | My User Info.
webpage: IIIF images id 781
IIIF images
IIF (International Image Interoperability Format) provides a standard for image interchange widely used by museums, art galleries and others in the GLAM sector.
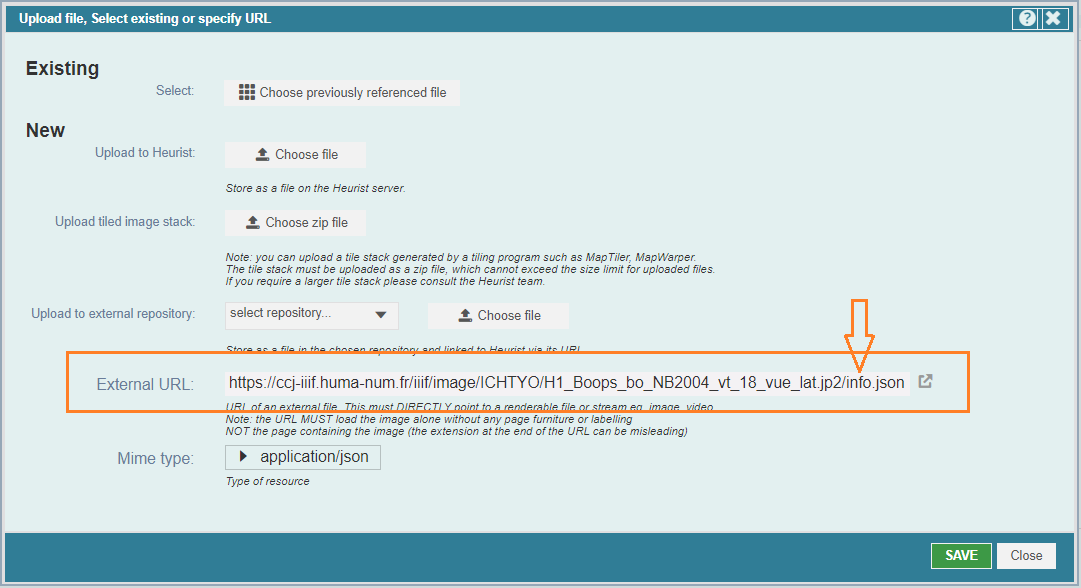
To enter an IIIF image in a File field, enter the path to the image with /info.json at the end (see arrow below).
This loads the manifest (stored or generated as a json file).
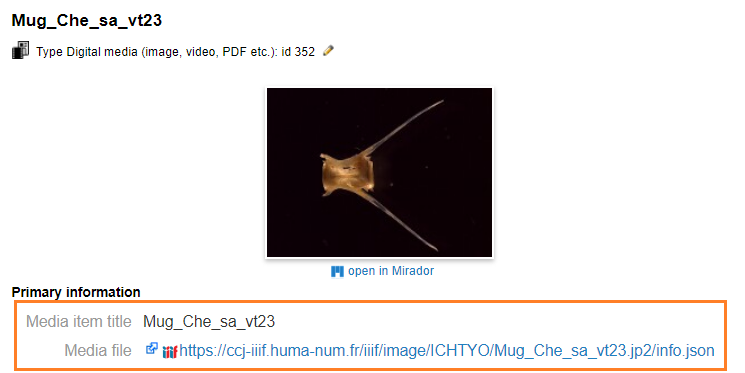
The manifest is then used to display the file (or files), which can be opened in the Mirador IIIF viewer:
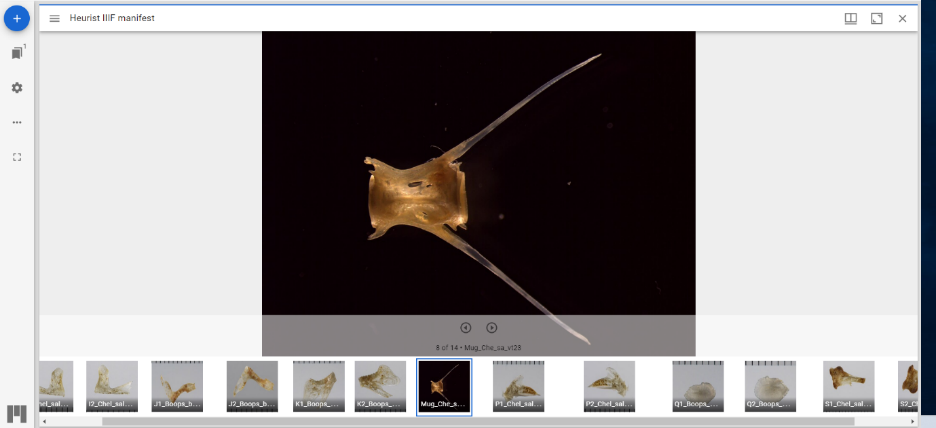
The useful thing about manifests is that they can define multiple imges, such as the pages of a manuscript,
which can all be viewed together in the Mirador viewer
Server functions
webpage: Interaction Log id 767
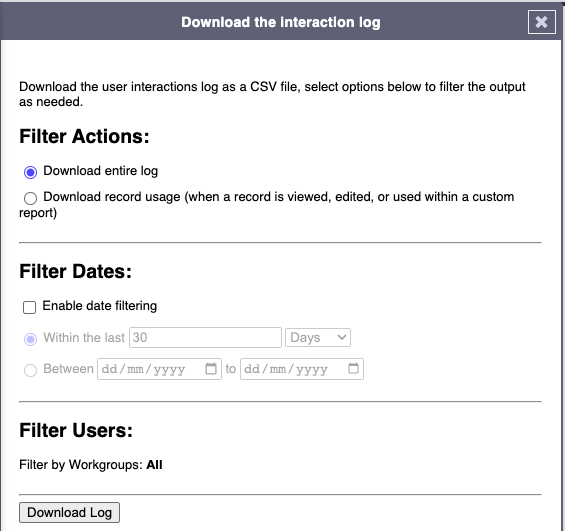
The Interaction Log is an advanced feature aimed at project managers and server administrators. It allows you to download a spreadsheet of interactions with the database, with time and user information. There are two main logs you can download:
Entire log – all interactions with the database, including adminstrative actions such as password resets
Record usage – only interactions involving records in the database, such as adding, modifying or viewing records
Currently, you can filter interactions by date and workgroup.
One major use case for the tool is to view interactions with the project website and blog. You can use the 'record usage' blog to see which blog post records have been accessed when, for example.
webpage: Database Usage Statistics id 527
webpage: Fast text searching id 690
In order to support word searches on constructed record titles and in text/memo fields in large text databases, you can enable full text indexing as follows:
CREATE FULLTEXT INDEX rec_Title_FullText ON Records(rec_Title);
CREATE FULLTEXT INDEX dtl_Value_FullText ON recDetail(dtl_Value);
For a database approaching 1M records this can cut search times down from tens of seconds to a couple of seconds,
Heurist also has a Lucene index (based on ElasticSearch) which at time of writing - end 2020 - is not used for filters.
webpage: Installation on Windows id 707
Although Heurist is primarily intended for Linux servers, a number of people have installed it under Windows. However the installation scripts are configured for bash under Linux, althoguh the actions are so simple that they are easily replicated manually in Windows.
Systemik Solutions in Sydney have installed a Windows server for an archaeological consulting company. Their chief programmer, Yang Li, has kindly provided the following notes.
I referred to the install_heurist.sh and manually ran the steps which are relevant. Some commands like chown, chmod, and ln from the install script can be just ignored as they don't apply to Windows. Once the heurist code was in place I ran the following manual steps:
wget ./DISTRIBUTION/HEURIST_SUPPORT/external_h5.tar.bz2 Download this file and put it in the code root and rename it to external.
wget ./DISTRIBUTION/HEURIST_SUPPORT/vendor.tar.bz2 Download this file and put it in the code root. I omitted this as I just ran the composer install command.
wget ./DISTRIBUTION/HEURIST_SUPPORT/help.tar.bz2 Download this file and put it in the code root.
$2 mkdir /var/www/html/HEURIST/HEURIST_FILESTORE$2 cp /var/www/html/HEURIST/$1/admin/setup/.htaccess_for_filestore /var/www/html/HEURIST/HEURIST_FILESTORE/.htaccess
Create the file store directory and move the .htaccess file
$2 mv /var/www/html/HEURIST/$1/move_to_parent_as_heuristConfigIni.php /var/www/html/HEURIST/heuristConfigIni.php$2 mv /var/www/html/HEURIST/$1/move_to_parent_as_index.html /var/www/html/HEURIST/index.html
Move the config and index file.
You may find that vendor packages are missing. You could either download the vendor package or run the composer install yourself. Then probably edit php.ini to hide "Deprecated" warnings.
Slightly older notes, these issues may have been fixed by the time you use this:
1 The file store path is not quite friendly with the Windows style path. I've tried a number of styles and finally found one working. One suggestion is to use realpath() to normalise the path rather than do the manual modifications on the leading or trailing slashes. Because in Windows there's no leading slash at all.

2 The following code in file "heurist/external/jquery-file-upload/server/php/UploadHandler.php", as in my case the path is neither of them. I'm commenting out these lines on the server for the moment, as it's popping errors when uploading files.

webpage: Migrating between servers id 688
It is quite straighforward to migrate a database from one server to another via the XML file export/import
(this also transfers images and other files which it obtains from the source database through obfuscated URLs).
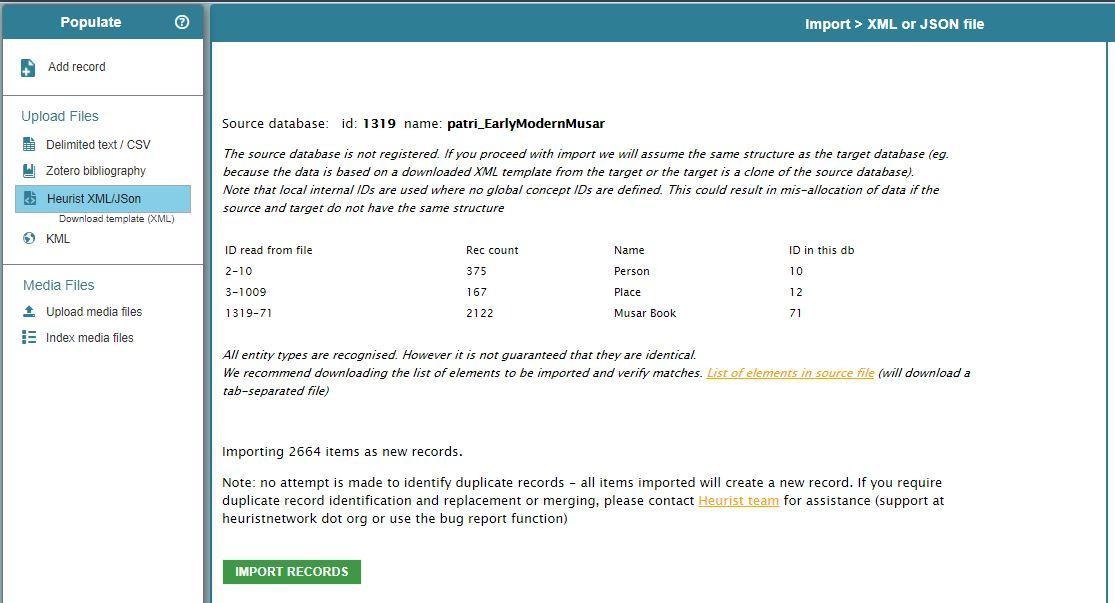
Notes:
This method can also be used to migrate subsets of records to any other database or to combine databases.
This method requires version 6.0.4 or later - install current version using the update script.
You can continue to run the old version in parallel, it will not be affected in any way by the update script.
Databases upgraded to version 6 will still work perfectly fine in version 5.
Procedure:
Register your database if not already registered ( Design > Register)
Select all records (Saved filters > All date order)
Export as XML (Publish > Export | XML). Default choice for pointer-following.
Right click and Save-as once the XML file finishes loading in the browser.
Create a new database (Admin > Database | New) or use any existing database as the target
Import the XML file (Populate > Upload files | XML). Select synch structure first, if this button shows, then import.
If you wish to check the results:
Check that a sample of images are rendering. The XML import depends on access to the images (and other files) in the original database via an obfuscated URL, so things can go wrong if there are problems of file ownership. As far as we know this isn't a problem on servers maintained by the Heurist project.
Check a small random sample of records of each type to see that they are rendering exactly the same information between the source and the target databases. It is best to do this by opening the records in edit view as it is slightly more sensitive to errors in term definitions than Record view. If the data is correct in Record view but does not show in the editor, edit the field definition.
Export each entity type in turn from the old and the new databases as CSV files selecting all fields including pointer fields, arrange the output side by side, sort as required, and check for differences in the data (pointer fields will have different values as the ID is local to each database, but if the pointers are there and a couple of records check out as having the right pointer targets, you can assume all is well).
What this workflow does not do is:
Transfer images which have been uploaded and used in wysiwyg text eg. as part of the CMS website, as the XML only transfers data records and these images are not directly associated with a record. If the images have first been imported as multimedia records and indexed, or were uploaded while editing a record, then they will be transferred.
Transfer saved filters. These will need to be re-created manually in the new database.
Transfer custom report formats. These can be exported from the Custom Reports tab and reimported in the same tab in the target database. Some editing of the imported report may be required.
Maintain the ownership, addition and modification dates of the records - they will all be set to the user who imports them and the date of the import. There is currently no way of maintaining ownership and modification dates except by using Publish > Archive package and loading the SQL dump and file structures in the backend. In a later version we plan to include the owner and update dates in the XML
No comments to display
No comments to display